
Good Sunday Morning Everyone! This is the day the Lord has made. Let us rejoice and be glad in it. Psalm 118: 24
Rejoice even if it is cold! Or hot! Or raining! Whatever. It is a good thing WE don’t control the weather or things would be in a real mess.
For some reason there are a lot of anniversaries in my family in the autumn of the year. One of my nieces is celebrating theirs soon so I made this card for them using the Festive Farmhouse Designer Series Paper as my inspiration.
If I recall, her bridesmaids wore plaid silk skirts and burgundy silk jackets. The plaid was similar to the Festive Farmhouse plaid. I think. Now, I could be WAY wrong on what I remember, but whatever. That is why I chose this paper and colors today.

My card base is Very Vanilla and the mat on the front is Merry Merlot. A strip of the Festive Farmhouse DSP is cut with my Triple Banner Punch. It has a strip of the new Merry Merlot and Copper 5/8″ reversible ribbon with the Merry Merlot side up on top. I wrapped one end over the DSP and taped it to the back, then cut the other end with my fabric scissors. It was a clean cut, but this ribbon does fray. Badly. The less handling of it the better. To get it to lie flat I used some Tear and Tape to secure it to the DSP. The DSP was Liquid Glued to the mat.

A piece of Mossy Meadow run through the Big Shot with the Subtle Dynamic Embossing Folder was then cut with the second largest Layering Ovals scalloped oval. The sentiment from Beautiful Bouquet was stamped in Merry Merlot on Very Vanilla. This was cut with the second largest Stitched Shapes oval. I stamped a bow from Beautiful Bouquet also, but didn’t really like it, so I made a bow from the Merry Merlot/Copper ribbon. It is tough to make a nice bow from 5/8″ ribbon, but it turned out fairly well. A Glue Dot adhered it to the sentiment oval and Liquid Glue adhered that oval to the scalloped oval. This was then adhered to the card front with Stampin’ Dimensionals.

The inside Merry Merlot mat was also dry embossed in the Subtle TIEF before adhering it into the card base with Liquid Glue. The sentiment (Better Together) is stamped in Mossy Meadow on Very Vanilla card stock and cut with the same die as the front. The mat is Festive Farmhouse plaid again, cut with the largest Layering Ovals scalloped oval. All are adhered with Liquid Glue.
For the envelope, I used the bow from Beautiful Bouquet to stamp a row of Merry Merlot bows across the bottom of the envelope front. Full disclosure: I stamped the first envelope front UPSIDE DOWN, meaning I stamped them across the top. Oh, my! Wasted envelope!
 For the flap, I used the Festive Farmhouse plaid Designer Series Paper again. Gotta love the plaid!
 I think this card is pleasing and hope it brings fond memories to the recipients.
Card Cuts are below, as are the products I used for this card. Also, you can leave comments below. All of the items mentioned below, clearance rack, bonus coupons and Dashing Along end today!
Host Code: RKS93T47 (Good today) Use this code when ordering from my online store to get a free gift from me. There are also other goodies you can earn. Check it out here.
Don’t forget to check the Clearance Rack when you order. There are always great deals there. Click on the image below to see what is available.

Host a party with total sales (before taxes and shipping) of $250 and earn free Designer Series Paper in addition to the usual Stampin’ Up Rewards. This offer is only good through the end of today!
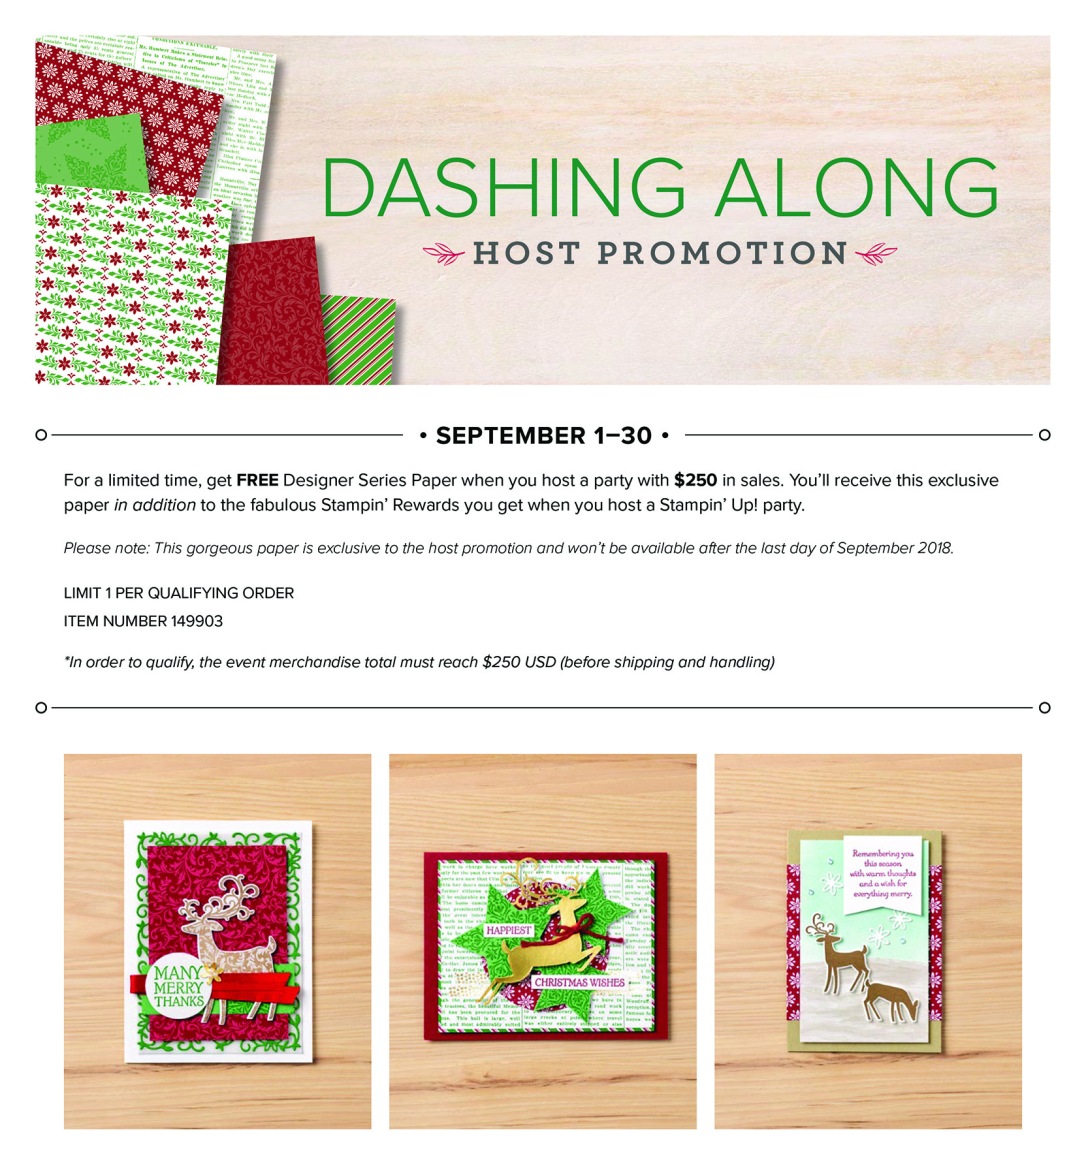

AND DON’T FORGET TO REDEEM YOUR BONUS DAYS COUPONS. STAMPIN’ UP SENT THESE TO YOU VIA EMAIL AFTER YOUR AUGUST ORDERS OF $50 OR MORE. Today is the last day to be able to redeem them.
CARD CUTS: Very Vanilla: card base 5-1/2″ x 8-1/2″ scored at 4-1/4″, front sentiment and inside sentiment (cut 2) 3-1/2″ x 5″; Mossy Meadow: scalloped oval 3″ x 4″; Festive Farmhouse Designer Series Paper: front banner 1-7/8″ x 5″, inside oval 3″ x 4″
Product List


 Designer Series Paper")


 Reversible Ribbon")


 Specialty Designer Series Paper")


 Good Thursday Everyone! Last Thursday I left home for our Inkin’ Krew Retreat, and today I am back home with plenty to do. So, let’s get on with the hop. Our Inkin’ Krew is very talented as I discovered (as if I didn’t already know it) at our Retreat. More on the Retreat later.


 Braided Linen Trim")
 Happy Thursday Everyone! Summer just won’t let go, but the weather folks are saying tomorrow it will feel more like fall. I hope everyone in the path of Florence is safe and recovering from the devastation she wrought. Here in the midwest it has been hot and humid for the past week. I don’t know if the rains we had the 10 days previous to the heat were a drought breaker, but certainly hope so. It was a long, hot, dry summer for us here. I welcome autumn! I especially like to make cards with an autumn theme.


 Designer Series Paper")


 Circle Punch")


 Polka Dot Tulle Ribbon")


