Uncategorized

Stampin’ Up! Softly Falling

frontGood Thursday morning to you all! Here it is almost the end of another week, and the end of Hurricane Harvey in Texas. However, the work of recovering from the devastation wrought by Harvey will just be beginning.

My nephew and family finally had to evacuate yesterday..two boat rides, a truck ride and a walk through flood waters later, they are safe with a family friend. When he tried to return to their home today to see the situation, he was turned back by law enforcement. They are trying to prevent looting and other crimes against persons. Prayers continue for the situation down there. Makes me want to get in my car and go do something to help, but I would probably be more hindrance than help. Donations to churches in the area would probably be the best way to help at this point in time.

OK. On with today’s card, a pretty simple one, but one that also uses a new-to-me technique.

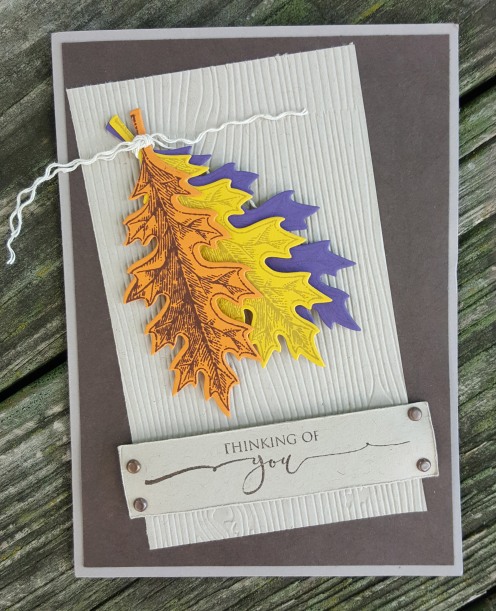
Did you know that you can use your dies to stamp and/or emboss a design? You can! The front of my card is embossed with the Softly Falling TIEF AND the little snowflake dies in the Seasonal Layers Thinlits set.

snowflake detail

To emboss with dies and your Big Shot, you will need the Sizzix Emboss and Transfer set accessory which includes a Silicone Rubber Mat (squishy) and a hard Impressions Pad. You will actually only use the squishy mat for this process.

Using your multipurpose platform on Tab 1 (the one you use when using an embossing folder) layer as follows: cut plate, die, cutting side up, paper, squishy, cut plate. Run this through your Big Shot. It will go very smoothly and you might think nothing is happening. However, your dies will emboss your paper. Cool! I would suggest doing a test run to make sure the embossing is embossing the correct side of your paper instead of debossing it.

I see all kinds of possibilities for the dies that I already have. It is more effective with detailed dies.

After embossing, I rounded the corners of the embossed panel and the corners of the card base, using the 3/16″corner punch. This is a good time to also round the corners of the inside sentiment panel.

Using a length of ribbon from my ribbon stash, I wrapped it around the embossed panel, taping it on the back, and liquid glued the panel to the Garden Green card base.

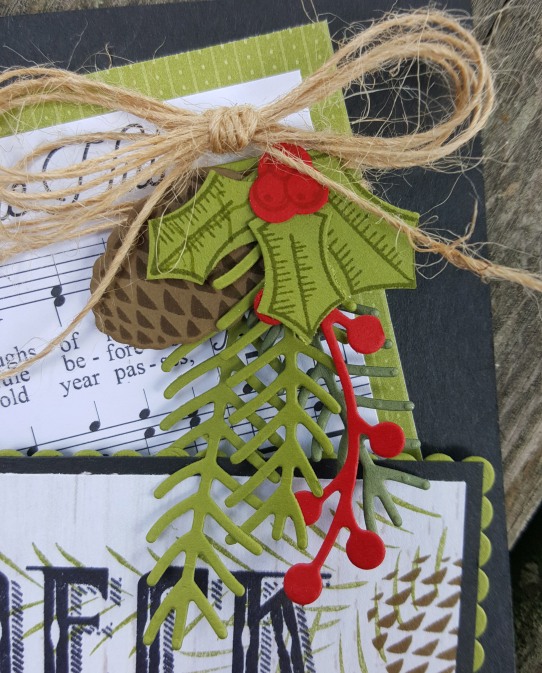
Using the tree dies from Card Front Builder die set, available tomorrow from the Holiday catalog, I cut one of the double tree and one of the single tree in Always Artichoke card stock. These were liquid glued to the embossed panel as background trees. Next, I cut two of the double tree and one of the single tree in Garden Green card stock. The double tree on the right hand side was liquid glued to the panel and the others were adhered using Mini-Stampin’ Dimensionals and Stampin’ Dimensionals.

front closeup

The sentiment is from the old Wonderland stamp set. I stamped it in Garden Green on Whisper White card stock and die cut it with the number 2 (numbered from smallest to largest) die in the Lots of Labels Framelits. I also cut one in Garden Green using the Number 3 size to use as a mat and adhered it with Stampin’ Dimensionals. The scene, to me, is reminiscent of a still, silent, nighttime snowfall and I wanted the Silent Night sentiment.

It looked a little bare, so I die cut two small deer from Early Espresso card stock using the die from the Card Front Builder Thinlits, tucking one back into the trees and adhering both with Glue Dots.

To finish the card front, a white gel pen made some snowflakes on the trees and piled up snow on the tops of the letters of the sentiment. A few tiny pearls from the Pearl Basic Jewels complete the front.

Inside, I used the dies that cut the trees for the front, only I used them to emboss the trees on the inside. Then, using my Garden Green Stampin’ Write marker, I colored them in. The photo does not show the embossing, but it is there. There was no tree stamp to coordinate with this die set, so the embossing technique allowed me to use the trees on the inside without the bulk of die cuts.

inside

The sentiment at the bottom is also from the Wonderland set, while the main sentiment is from the Holly Berry Happiness stamp set.

The envelope front received a pine bough and pine cone in Garden Green and Early Espresso using the marker to stamp method of inking. The flap is embossed with the Softly Falling TIEF.

I encourage you to try using your dies to emboss and/or stamp. To use them to stamp, just tap, tap, tap your ink pad over the cutting side of the die and run it through your Big Shot as detailed above. I love to be able to use products I have in unexpected ways.

Thought for Today: If you truly love nature, you will find beauty everywhere. Vincent Van Gogh

Card Cuts: Garden Green: card base 7″ x 10″ scored at 5″, trees 2-1/2″ x 7″, sentiment label mat 1-3/4″ x 3″; Always Artichoke: trees 2-1/2″ x 5″; Whisper White: (2) 4-3//4″ x 6-3/4″ inside sentiment panel and front panel, sentiment label 1-3/4″ x 2″; Early Espresso:  deer 1″ x 2″.

Products used not listed below: Retired Wonderland Stamp set, Sizzix Big Shot Accessory Emboss and Transfer set.

Product List

Uncategorized

Stampin’ Up! Deck the Halls

I hope you all are having a Wonderful Wednesday, unless of course you are in Texas or Louisiana and dealing with Hurricane/tropical storm Harvey. If that is the case, I am sure you have had better days! I cannot imagine what you are going through down there, but many of us are praying for your safety and the strength to deal with everything.

My card for today looks ahead to brighter days, happier days, days where we can sing again. Fa-la-la-la-la-la-la-la-la. Yes, this is my Deck the Halls card, using elements from the Carols of Christmas stamp set as well as some others. Front

The mat for the music is from the Petal Garden Designer Series Paper stack. The music is from the Merry Music Specialty DSP.  I love this paper! These were liquid glued together, and Linen Thread wrapped around three times and taped on the back. This was then glued to the Basic Black card base on an angle.

For the sentiment, the Deck the Halls, from Carols of Christmas, is stamped in Basic Black with a stamped-off-once Old Olive pine branch and Soft Suede pine cone from Christmas Pines. All this is on a panel of the white Wood Textures DSP. This was liquid glued to a Basic Black mat, then glued to a scalloped Old Olive mat cut from the Layering Squares framelits.

“But it isn’t a square”, you say. You are correct. I only ran the square about halfway through the Big Shot, then turned the paper and moved the die to the opposite end of the needed rectangle and finished cutting it. If you carefully place the cutting ridge in some of the previously cut scallops, it will hold the die in place to finish the cutting. A magnetic plate helps also.

detail

Next it is time to do a dry assembly with the sentiment mat and all the pieces of the pine and holly. Two of the pine boughs and the holly leaves are cut from Old Olive. One pine branch is cut from Always Artichoke. The pine cone, stamped in Soft Suede on Soft Suede card stock is from the Pretty Pines thinlits, as are all the pine boughs.

The holly leaves and berries are from the Holly Berry Happiness stamp set and cut with the Holly Berry Builder punch. The berries are in Real Red ink on Real Red card stock. After all, the halls were decked ‘with boughs of holly’, so I thought the card should reflect the song. I just added the pine because I like it.

After dry assembly, I used glue dots to hold the pieces in place and adhered them to the music with Stampin’ Dimensionals. The sentiment panel is also adhered with Stampin’ Dimensionals.

I made a bow from the Linen Thread and added it to the front with a Stampin’ Dimensionals. This completes the front of the card.

On the inside another panel of the Wood Textures DSP was stamped with a Soft Suede pinecone. Using a mask of the pinecone I had cut previously, I laid it over the stamped pinecone and stamped the Old Olive Pine branch, all from Christmas Pines. A bow, stamped in Real Red on Real Red card stock was punched using the Holly Berry Builder punch.

inside

The sentiments, also from Christmas Pines, were stamped in Basic Black. This panel was liquid glued to an Old Olive mat and into the Basic Black card base.

The envelope front also was stamped as the inside with an Old Olive pine branch and Soft Suede pinecone. A leftover piece of the Wood Textures DSP was glued to the envelope flap. No naked envelopes here, no siree!

I hope you like this card.

Thought for today: Today will never come again. Be a blessing. Be a friend. Encourage someone. Take time to care. Let your words heal and not wound.

Card Cuts: Basic Black: card base 5-1/2″ x 8-1/2″ scored at 4-1/4″, sentiment mat 2-7/8″ x 3-11/16″; Old Olive: scalloped rectangle 3″ x 3-13/16″, inside mat 4″ x 5-1/4″; pine branches, holly leaves 2″ x 3″; Wood Textures DSP: front sentiment 2-3/4″ x 3-1/2″, inside sentiment 3-3/4″ x 5″; Petal Garden DSP: mat for music paper 3-1/2″ x 4-3/4″ ; Merry Music DSP: 3-1/8″ x 4-3/8″; Soft Suede: pine cone 1-1/2″ x 2″; Real Red: holly branch and berries 1″ x 2″, bow 1″ x 1-1/2″; Always Artichoke: pine branch 1″ x 2″

Product List

Uncategorized

Finally, the Paisley card!

I hope you all are having a good Tuesday. Please, remember those suffering under the devastation wrought by Hurricane Harvey in Texas. I cannot imagine the mess that will be left behind when this is over, which will probably be later this week. Certainly it is an event we hope will not be repeated.

My much delayed posting of this card may finally happen today.

I began the card by Random stamping in Versamark ink some of the images from the Paisleys and Posies stamp set. Copper Emboss Powder and heat setting completed the basic design. The embossing acts as a resist for the ink, so you can just go right over your embossed designs and they will not accept the ink.

The next step involved sponging So Saffron, Calypso Coral, Old Olive and Marina Mist in a sort of rainbow style, completely covering the panel.front

From the Thoughts and Prayers stamp set, I stamped the sentiment in Marina Mist on a scrap of Very Vanilla. Using the So Saffron sponge from the previous sponging, I did not re-ink it, but rubbed it lightly over the sentiment to reduce the ‘clean’ look of the Very Vanilla. It just looked too stark against the multi-hued background before I sponged it.

Using the Pretty Label punch I punched out the sentiment as well as an identical punch from the Copper Foil Sheets. The copper one I cut in half vertically, then taped it to a small piece of the Copper Foil Sheets to add some length. I wanted a foil background for my sentiment and this seemed the best way to achieve that. The top and bottom of the foil mat are cut nearly even with the sentiment.

Also from the Copper Foil Sheets I die cut one paisley piece using the Paisley Framelits. This was liquid glued directly to the card front. The Sentiment label was then adhered over it with Stampin’ Dimensionals.

front detail

On the inside, to carry the rainbow hues on through, I used three of the Paisleys and Posies stamps and just used two colors for each of the stamps. I think that is an acceptable look without being very time consuming. I simply inked part of the stamp on the stamp pad, then inked the rest on a different stamp pad, using the same colors as on the front.

The sentiment is from the Rose Wonder stamp set. This card is for someone undergoing chemotherapy and I thought this scripture to be appropriate. I stamped it in Marina Mist, then liquid glued the panel into the Marina Mist card base. That finished the inside.

inside

As of this moment there isn’t an envelope for this card. I plan to use a couple of the Paisley stamps on the front and do some rainbow sponging on the flap. Perhaps, if time allows, I will also heat emboss some paisleys on the flap in copper

Thought for today:

Beginning today, treat everyone you meet as if they were going to be dead by midnight. Extend to them all the care, kindness and understanding you can muster, and do it with no thought of any reward. Your life will never be the same again.
Card Cuts: Marina Mist: card base 4-1/4″ x 11″, scored at 5-1/2″; Very Vanilla: front panel 4-1/4″ x 5-1/2″, inside panel 4″ x 5-1/4″, sentiment label 1-1/4″ x 2-1/2″; Copper Foil Sheets: 1-1/4″ x 5″

Product List

Uncategorized

Stampin’ Up! Paisley Thinking of You

Sunday morning.

Hey Everyone! Sorry I missed you yesterday.  Busy day here in Iowa and at the end of it I was too tired to pop, or post, or whatever. Fell asleep with the tv on, watching the devastation in Texas. So, if you are there, you are most likely not reading this. Just know that I care, and am praying for safety for all.

My card today is a rainbow hued background with heat embossed copper paisley print.


Well! Here it is Monday morning and this post did NOT happen yesterday. In fact, this may be the way the whole week will go.

A bit of explanation may be in order. I am a member of our local Kiwanis chapter. In case you never heard of Kiwanis, which would probably mean you have been living under a rock, we are an international service club with chapters all over the world. Our mission is to help children, one child, one community at a time. Our international focus the past 2 years has been to raise 115 million dollars to eradicate neo-natal tetanus world wide. Just this past month we had word that Haiti was added to the list of 38 countries where it has been eradicated! Three vaccinations costing about $1.80 each are given to the mother, which protects her and her unborn children, preventing the children from dying  a terrible death. On the local level, we sponsor ball teams, help Girl and Boy Scouts, offer scholarhips, etc. This all takes money.

One of the things our chapter does to raise funds is to ‘hire’ ourselves out to an event held annually in the next county. I think this is the 90th year for this event and we have been helping out for 40 of them.  Our club puts in about 1,000 man hours over a three week period to earn what amounts to a huge chunk of our annual fundraising.

How does this relate to this blog you might justifiably ask? As a member, I put in my share of hours. Last night was my first of 6-eight hour shifts I will do by Labor Day. Add this to other commitments and the daily grind of whatever I have to do to keep things in some semblance of order around here, that doesn’t leave much time for blogging. Or even card-making for that matter.

I took my laptop last night thinking I could do my post there. HA!

We were too busy for me to be able to do more than a sentence at a time for starters. Also, the internet connection wasn’t very good and I lost contact a couple of times. At one point I lost half of what I had already written. I began to think this post was never going to happen. It was VERY foggy driving home the 40 miles and I was done in by this point, and it was already today anyway. So, I didn’t finish it.

Which brings us to here…..I will try to make cards and get them posted every day, but if it just doesn’t happen, well, you have my apologies. Just remember, the Stampin’ Up Holiday catalog goes live on September 1. If you don’t have a catalog and would like one, just say so in the comment section and I will see that you get one. If you would like to order products and do not have a demonstrator, just click on the online order button at right.

Meanwhile, I will try to get the yard mowed, the dusting done, cook for myself enough that I won’t starve :-), and still make some lovely cards to share with you. Oh, yes, and put in my shifts to help our chapter in its fundraising. If I don’t perish from overwork, I will try to post every day for your enjoyment, or whatever.

God Bless each of you, and please, be kind.

Below is an image of a Black Tern, just so there is something of interest here!


Save

Uncategorized

Stampin’ Up! Camo

Morning everyone! This week at Splitcoaststampers, Stampin’ Up demonstrator Kelly Acheson did a tutorial on making a card for men using camouflage on the card. I thought it was pretty cool, so I have CASed her card, well sort of. It is pretty much like the one she did, with a couple of minor changes.detail

She began, as did I, by taking her Crumb Cake Classic Stampin’ Pad and drawing it across a piece of Very Vanilla card stock. Here is the trick, folks. She then wadded it up! Yep. Crumpled it really good! Then, she, and I, smoothed it out the best you can and dabbed Old Olive over it, using the stamp pad. This only hits the high spots. Let it dry a bit, then crumple it some more. Really wad it up! Smooth it out again and dab some Early Espresso over it with the stamp pad. Crumple again and smooth, then use some dabs of Always Artichoke, again using the stamp pad directly to the paper. Here is where you might want to dab at some spots that are too light. I did add just a touch of Wild Wasabi also. When dry, smooth with your hands, then use your bone folder to smooth even more. Adhere to an Early Espresso mat with liquid glue. Set aside. This looks pretty darn good!

I used the retired Lucky Stars TIEF on a piece of Crumb Cake for my mat, which is adhered to the card base with Tear & Tape.

The sentiment, from Big on Birthdays, is stamped in Early Espresso on Crumb Cake and matted on Early Espresso. Starting in the center, I stamped the stars, also from Big on Birthdays, across the bottom in Early Espresso.front

Layer the camo piece and the sentiment piece on the Starry mat and adhere. Since the sentiment is over the camo layer, I used liquid glue on that end and Stampin’ Dimensionals on the outer end. Wind a piece of Linen Thread around three fingers 3 times and tie off, leaving a loop. Use a Glue Dot to adhere this to the camo piece above the sentiment.

The inside is one piece of Crumb Cake, stamped with the boots from Country Livin’ in Early Espresso and colored in with my Stampin’ Write Crumb Cake Marker. I added a few shadows with my Early Espresso marker, stamped the sentiment, also from Big on Birthdays and this card is finished.inside

The envelope got a pair of boots on the front and debossed stars on the flap.

This would be a great card for anyone in the military or with a military background, or, for any man, especially maybe one who likes to hunt.

I enjoyed this technique, thanks to Kelly Acheson and her Splitcoaststampers camouflage background tutorial

Thanks for stopping by. Please leave comments below.

Card Cuts: Early Espresso: card base 4-1/4″ x 11″  scored at 5-1/2″,  camo mat 2″ x 4″, sentiment mat 2-1/4″ x 4-3/8″; Crumb Cake: Lucky Stars mat 4″ x 5-1/4″, front sentiment 2″ x 4-1/8″, inside sentiment 3-5/8″ x 4-1/4″; Very Vanilla: I did a piece about 4″ x 5″ so I could make 2 cards. The actual measurement for this piece is 1-3/4″ x 3-3/4″

Product List

Uncategorized

Stampin’ Up! Anniversary

Today is not going as planned. I need to mow my lawn, first time in about a month, but the weeds are looking pretty shaggy. However, it is cloudy and there was a heavy dew last night. The grass is still wet and my afternoon will be short as I am having dinner with a friend and have a meeting this evening. Tomorrow we will be canning my specialty, End-of-the-Garden Soup. I started doing this when my kids were small and I had a HUGE garden. About this time of year we dug potatoes, tomatoes were ripe, green beans had given me a second crop, onions were pulled, cabbage was ready and too plentiful to eat all of it fresh. So, I just put whatever I had in a jar and canned it. Really tasty when the snow flies and you can just have vegetable soup or add whatever meat you like. ON WITH THE CARD!

Long-time friends are celebrating their 50th anniversary, so today’s card is for them.

I began with a gold and Very Vanilla plan. Period. My next thought was not very creative or original. How about using the Large Numbers dies to cut 50 out of a Gold Foil Sheet? OK. Then what? I really wanted something fancy, but not too fancy. What follows is what resulted from my playing with paper, scissors and the BIG SHOT.

front

To conserve my precious Gold Foil Sheets, I cut the center out of both the outside and inside mats, leaving a 3/4″ frame on which I glued the fancy front panel and the inside sentiment panel.

This is another 5″ x 7″ card, just because I like them. I had a pretty, lacy oval die from Spellbinders that I used for the front, layering it on gold foil and fussy cutting around the edge. I cut a set of numbers in Very Vanilla, and layered them to the Gold Foil, Softly Falling TIEF embossed numbers with Liquid Glue. The numbers were adhered over the center of the oval with Mini Stampin’ Dimensionals,

front detail and used regular dimensionals to adhere the whole to a Very Vanilla mat and onto the Gold Foil mat with the hole in the middle. For just a little more pizazz, I cut two flourishes from the Flourish thinlits, then cut them apart, using the lower half on the front and the upper part on the inside of the card. These were attached with liquid glue. The completed front panel was Tear & Taped to the Very Vanilla card base.

flourish detail

On the inside I repeated the Gold Foil Very Vanilla mats. Over this I used the Layering Ovals framelits to cut one plain oval in Very Vanilla and one Gold Foil scalloped oval. My sentiment is from Falling For You, and stamped in Soft Suede on the plain oval. Using liquid glue I adhered the ovals together and onto the Very Vanilla mat.The upper part of the Flourishes was glued to the to the mat, overlapping the ovals just a bit. The completed sentiment panel was then Tear & Taped to the card base.inside

The envelope got a stamped Flourish in stamped off twice Soft Suede on the front. I die cut and dry embossed another 50 in the Gold Foil. This was adhered to the flap with liquid glue on the upper portion. The lower portion has Tear & Tape that will be stuck to the envelope after the card is inserted. I will be going to their open house and hand delivering the card, so the glued-on numbers won’t be a problem.

I hope you like this card for a special occasion.

Card Cuts: Very Vanilla: card base 7″ x 10″ scored at 5″, front mat 6-1/4″ x 4-1/4″, fancy oval 4-1/2″ x 5-1/4″, inside mat 4″ x 6″, sentiment oval 2-1/2″ x 3-1/2″, numbers and flourishes, scraps or 4″ x 6″; Gold Foil Sheets: (2) mats 4-3/4″ x 6-3/4″ (from these I cut out the centers leaving a 3/4″ frame), numbers-scrap from center of mat, oval mat 4-3/4″ x 5-1/2″ inside scalloped oval 2-3/4″ x 3-3/4″

Product List

Uncategorized

Stampin’ Up! Blessings and Sunflowers

New offerings in the Holiday catalog, from which you can order on September 1, a week from Friday, include the Count My Blessings and Painted Harvest stamp sets. Both are lovely and both are used for today’s card.

front

I don’t know if oak leaves and acorns go with sunflowers, but they do on this card. I wanted  a watermarked sort of background and didn’t want the sunflower to take over the whole card front, so I made this one a 5″ x 7″ card instead of the typical 4-1/4″ x 5-1/2″.

I began with a panel of Wild Wasabi card stock and stamped the acorns from the Count My Blessings set in Wild Wasabi for a subtle patterned background for my sunflower. Next came an oak leaf from Vintage Leaves. All stamping at this point is stamped off once before stamping on my panel.

In order for it to be dry when I would be ready for it, I next spritzed a panel of Crumb Cake and ran it through the Big Shot with the Pinewood Plank 3D Dynamic TIEF. Spritzing softens the paper fibers and gives a really great texture to your panel. While it dried, I proceeded with the flower.

I really wanted only one flower, and I wanted it to really stand out. This set comes with no coordinating dies, but with a leaf punch, used here. Consequently, I had to fussy cut the flower if I wanted dimension. Cutting one wasn’t enough…no, I had to cut 2.

Since this was the first time I had had an opportunity to play with this set, I did several trials in different colors on different paper colors. This is a two-step stamp. The color combination I used for this card was Crushed Curry for the background and Peekaboo Peach for the second step on Very Vanilla card stock. After fussy cutting them I stamped the center with Crumb Cake, then with some little dots in the center in Early Espresso. I didn’t like this very much, but who wants to cut those petals out again? Not Me!

To fix the center, I stamped it in Early Espresso on a piece of Vellum, fussy cut it and used glue dots under the darker portion to adhere it to the flower enter. It still wasn’t the look I wanted, so I used gold Wink of Stella to add a bit of bling. I liked this much better so quit right there.

The stems are from the Bunch of Blossoms stamp set because I wanted a thicker, more substantial looking stem for that big sunflower. It, and the leaves from the Painted Harvest set, are stamped in Wild Wasabi. Next, to add more texture to the card, I stamped the leaves second step, the details, in Always Artichoke on a scrap of Always Artichoke and punched them out. I did three of these. One is glued directly over the leaf on the right, and  slightly offset. Before adhering it I used my bone folder and drew it along the center vein of the leaves to give them just a little dimension.

flower detail

I intentionally stamped the background then offset the attached leaves, but it sort of looks like I made a mistake, so I think next time I will forego the background stamp. Or, perhaps stamp it in the Always Artichoke I used for the attached leaves. Live and learn. It is ok, but I think could be better.

The leaves on the left are also offset with the first one being glued directly onto the panel. The second leaf received the same bone folder treatment to allow the leaves to bend up at the main vein. With a folded Glue dot on the back of each leaf and a dab of liquid glue on the stem, this was also attached over the other leaves. A little pinching gave them more dimension.

The sunflower with the completed center was adhered to the second sunflower with Stampin’ Dimensionals. The whole was liquid glued to the panel. A strip of Burlap Ribbon attached along the side with Tear & Tape added more interest and texture. I liquid glued the stamped panel to the Pinewood Plank embossed panel and wrapped the ribbon around both, taping it on the back.

The sentiment, from Painted Harvest, was stamped in Early Espresso on Crumb Cake and die cut using the Lots of Labels framelits. I cut a second one from Always Artichoke, cut it in half vertically and glued the pieces to the back of the sentiment giving it the look of a mat. I wanted to carry a bit of yellow up to the top of the card. How to do this? Hmmm. Those lovely little Touches of Nature Elements, made of wood just might work if I could paint one in Crushed Curry. Well, what do you know! That worked. I added a little Peekaboo Peach as well, and found an orange brad to attach it to the sentiment panel. This was attached with Stampin’ Dimensionals to the stamped panel.

sentiment detail

A bow made from two strands pulled from the burlap ribbon finishes the front and is attached with a Glue dot.

For the inside, I again stamped the acorns, this time in Crumb Cake on Crumb Cake card stock. I think this stamp would be pretty colored in. Maybe on the next card……

The sentiment is from the Count My Blessings set also and is stamped in Early Espresso.

inside

This panel was liquid glued to a Wild Wasabi mat and into the Always Artichoke card base. This card is finished except for the envelope. As this is a 5″ x 7″ card, I didn’t have any Crumb Cake envelopes this size, so used a Kraft envelope instead. The front was embellished with a Crushed Curry Sunflower and Wild Wasabi Leaves. The flap received more of the acorns in Wild Wasabi.

I really like using these two stamp sets and most certainly will be making many more cards with them. If you do not have a demonstrator and would like to order these stamp sets when they become available on September 1, you may shop in my store. Just click on the shop online button at right.

Please leave comments below the Products list. Thanks for stopping by.

Just a reminder. If you have bonus coupons from an order in July, you only have 8 days left to redeem them.

  • Card Cuts: Always Artichoke: card base 7″ x 10″ scored at 5″, sentiment label mat 2″ x 3″, leaves 2″ x 5″; Crumb Cake: embossed panel 4-3/4″ x 6-3/4″, inside sentiment 4-1/4″ x 6-1/4″, front sentiment label 2″ x 3″; Wild Wasabi: front 4-1/4″ x 6-1/4″, inside mat 4-3/4″ x 6-3/4″; Very Vanilla: sunflowers 2 scraps about 3″ x 3″ or equivalent. Vellum: scrap for flower center

Product List

Uncategorized

Terrific Tuesday and a couple of cards

Morning Everyone! It is a terrific Tuesday, but then, every day can be terrific if we only allow ourselves to have terrific days. Some days you wake up and just want to go back to sleep. Others, you awake just rarin’ to get going on the day. Several things can account for this, but much of it hinges on ATTITUDE.

We can decide what kind of day we will have-terriffic, or terrible, or somewhere in between.

Yesterday I was going to have a terrific day seeing, and perhaps photographing, the Once-In-A-Lifetime TOTAL solar eclipse. I watched 3 weather reports on 3 different channels covering both home and the area about 3 hours away where I planned to go for the event. All said the same thing…possible showers, both places, possible clouds, both places. However, the reports for home seemed like my chance of viewing wouldn’t be as good as going south. In addition to the storms probably (key word, probably) moving east of the area where I would be by viewing time, I would be in the area of 100% totality, not 98% totality. You could say I got a little greedy here. Sometimes the old adage of a bird in hand being worth two in a bush is so very true. I think I would have gotten a glimpse, maybe, perhaps, if I had stayed home. But then……

So, off I went, cameras, solar viewing glasses and binoculars, the whole bit. It was sprinkling when I left home, so the thinking was, “I made the right choice.”

However, the closer I got to where I was going, the darker and darker it got. No problem, it was still 3 hours from eclipse time. Major lightning strikes, and then the traffic! No problem, I was going to go west, and I knew most of them were going on further south. Perhaps I should have followed them.

Long story short, it rained the whole time I was there and I got a couple of not-so-good shots of the sun peeking out of the clouds with about 1/4 of it in shadow. So much for a terrific day.

However badly I felt about missing out on the event, it was still a terrific day. I found roads in Missouri I didn’t know existed, and probably shouldn’t exist! I am known for taking side roads, back roads and other kinds of possibly dangerous roads, but yesterday’s adventure took the cake in possibly dangerous.

I wound up taking a right turn, just because I could, and because I was headed north and east and this road went north. Fine. For awhile. Then it became a very rough, twisted, hilly (I am talking mountainous hilly here folks. You didn’t know there are mountains in northern Missouri???) and uninhabited road to seemingly nowhere. No place to turn around either. Oh, and did I mention NARROW? At the bottom of some of those HILLS the road sign said unsafe during high water. About this time my phone alarm said, “Flash Flood warning for your area!” Great! I am about to drown, because I can’t turn around so I won’t drown. Oh, there isn’t water over the road, here at least. Later???

All is well though, because that road came to an abrupt end at a T-intersection….with a muddy looking gravel road going either right or left. Now what? Well, I, being me, thought I might as well continue north and east, so I took a right turn. I won’t go so far as to say it was a mistake, but I probably should have, in good sense, turned around. No cell service, no inhabitants, rough, narrow, not-very-well-graveled or maintained road. Woman alone. Bear in mind, I was not lost. I knew approximately where I was and where I was headed. It was just an unfamiliar road. And the low spots had water standing. Not rushing over, just standing. Puddles. Not deep puddles. Well, not very deep. My Explorer handled them just fine.

That adventure took me 40 minutes and 20 miles in some very scenic, forested areas I did not know existed so close to home. But I could have made my destination in 20 minutes and 15 miles had I taken a left instead of a right back at the first intersection. Chalk it up to adventure. Or curiosity, or stupidity. Whatever. I do not regret one moment of the day. I saw 23 Great and Snowy Egrets, 17 Great Blue Herons, and about 500 white pelicans that are so beautiful in flight against a blue-gray sky. There were numerous other birds I could not identifiy in the rain and darkness. Oh, and some Blue-winged Teal, Goldfinches and Eastern Kingbirds. I also met some people from Wisconsin who drove down for the Great Eclipse (which I did not see, but they didn’t either and they drove further than I did).

That’s my story and I’m sticking to it. And, I am planning now to go to Illinois in 2024 for the next TOTAL SOLAR ECLIPSE and get that darned image of the thing!

I do have two card fronts to share today, if you have read this far. The inside isn’t finished as both are ‘thinking of you’ cards, which could be for sympathy, recovery from surgery or accident, or just simply thinking of someone you haven’t seen in awhile.

Both use my all-time favorite Stampin’ Up! set Vintage Leaves, and the coordinating dies from Leaflets framelits.

The first one uses a crumb cake base, plain Early Espresso mat and an angled wood plank embossed crumb cake mat. The Oak leaves are stamped in Early Espresso on Pumpkin Pie, Crushed Curry and Elegant Eggplant cardstock, die cut and tied with a strand pulled from the burlap ribbon and knotted around the stems. The sentiment, stamped in Early Espresso on Crumb Cake is attached with Stampin’ Dimensionals and brads to the Early Espresso mat, then the whole adhered to the card base.

3 leaves

The other card deviates from anything I have ever done using only Whisper White and Crumb Cake card stock and Early Espresso ink. I again used the Vintage Leaves set, pulling out the maple leaf this time. One is stamped with the maple stamp and the other is stamped with the tree from Lovely As A Tree. They are die cut, sponged with Crumb Cake, tied with a piece of Linen Thread and glued to a Whisper White mat that had been dry embossed with the now retired Seaside TIEF.

A piece of stitched brown ribbon across the bottom and taped on the back of the white mat, grounds the sentiment banner, also in Whisper White. It is stamped in Early Espresso and sponged with crumb cake to relieve the stark whiteness. I then used brads to fasten it to the mat and adhered the whole to the card base with Tear & Tape.

maple

I hope you enjoyed my day and these cards.

No card cuts or product listings today. If you want more information, please leave a comment. Please leave a comment if you don’t want more information! I would like to know your thoughts on my blogging.

And, by the way, shhhh! Don’t tell my kids what I did. They may take away my drivers’ license.

Uncategorized

Stampin’ Up! Nature Sings Retirement

front

My card for today’s post uses the Nature sings stamp set in the 2017-18 annual catalog. This set makes a great masculine card for any occasion.

I first stamped the bull in Soft Suede and very lightly used the blender pen to sort of fill out the color. I then stamped the smaller elk also in soft suede. While I had the stamps handy I stamped them on plain paper to make a mask and fussy cut them.

After placing the mask over the elk, I VERY LIGHTLY sponged the background in Soft Sky and Soft Suede. I stamped the trees, also in the set, in Always Artichoke. Asecond set of trees slightly lower and off the edge of the panel came next. After removing the mask, this panel was liquid glued to a mat of Early Espresso.

I proceeded on to the sentiment, which is from the Teeny Tiny Wishes set. I use this set a lot because they fit in small spaces and also because there are a great variety of occasions. Using Early Espresso ink and my Stamp-A-Ma-Jig, I stamped the sentiment on a scrap of very Vanilla card stock, snipped the ends for the flag and glued it to a mat of Early Espresso. Using a tiny hole paper punch I punched the holes for the brads, attached them and used Stampin’ Dimensionals to adhere the sentiment to the front.

Using some very fine jute twine I wrapped it three times around this panel, taping it on the back. I then tied a bow near the left side and the front is finished.

Inside I stamped the smaller elk, also in Soft Suede on a Very Vanilla panel and sponged Soft Suede around the edges.

inside

The sentiment is from the Sorry for Everything stamp set, stamped in Early Espresso, again using the Stamp-A-Ma-Jig. This panel was liquid glued to an Early Espresso mat and into the Always Artichoke card base. Done!

The envelope received the same Soft Suede elk on the front and some Always Artichoke pine boughs, again, from the Nature Sings stamp set, went on the flap.

I hope you like this card. After a couple of false starts on the background, I am please with the way this turned out.

If you don’t have a demonstrator, I would be happy to help you. Please leave comments below the list of card cuts and products used for this card.

Card Cuts: Always Artichoke: card base 5-1/2″ x 8-1/2″ scored at 4-1/4″; Early Espresso:  inside and front mats 4″ x5-1/4″, sentiment flag mat 7/8″ x 2-1/4″; Very Vanilla: sentiment panels inside and front 3-3/4″ x 5″, sentiment flag 5/8″ x 2″

Product List

Uncategorized

It is still Friday!

But if I don’t hurry a bit, it will soon be Saturday.

Busy day today and a long one away from home.Today’s card follows the Freshly Made Sketches #301 Challenge

FMS Final 301-001

I chose to keep it pretty simple, but I really wanted a nautical theme. The stamp set I used is an older, long retired Stampin’ Up! set called The Open Sea. I really like it and used all of the stamps for this card.

front

First I stamped the ship in Tranquil Tide on Very Vanilla and fussy cut it. The world map is stamped in Soft Suede and cut with the Stitched Shapes circle framelit. It is adhered to the next largest circle cut from Tranquil Tide using the Layering Circles Framelits. The ship is adhered with Stampin’ Dimensionals.

My card base is Tranquil Tide and I used the Seaside Textured Impressions Embossing folder on the front, then adhered the Very Vanilla angled piece with Liquid Glue.

The sentiment is stamped in Soft Suede using just the word Greetings from the new Seasonal Lantern stamp set which will be available on September 1 in the new Holiday Catalog. I then made a Granny knot in some brown hemp cord and taped it to the angled piece. I thought it looked a little TOO clean, so I stamped the anchor in Tranquil Tide on Very vanilla and fussy cut it. It is glued and Mini-Stampin’ Dimensionaled (is that a word?) to the front of the card.

detail

The inside received a compass and an anchor from the Open Sea set in Tranquil Tide on a Very Vanilla panel. The sentiment is from Birthday Blast and stamped in Tranquil Tide and Soft Suede. This was liquid glued to a Soft Suede mat and into the card base.

The envelope got some seaweed from the Seaside Shore set in Tranquil Tide and a Soft Suede Anchor on the front and a Soft Suede rope from the Seaside Shore stamp set on the flap.

I enjoyed making this masculine card. Card cuts and products used are below.

Card Cuts: Tranquil Tide: card base 5-1/2″ x 8-1/2″, circle 3″ scrap; Very Vanilla: 5-1/4″ x 3-1/2″, then angle cut, circle 2-1/2″ scrap, scrap for stamping ship and anchor, inside sentiment panel 3-3/4″ x 5″; Soft Suede: 4″ x 5-1/4″

Product List