Uncategorized

Something Different

Well, at least it is different for me. I don’t use black very often on a card, but I love the Whole Lot of Lovely Designer Series Paper and don’t often use it. So, today is the day for a black and blue card.

card front

I began with a card base in Soft Sky. I wrapped a piece of sheer black ribbon around the DSP, taping it on the back, and adhered the DSP to my card base with Liquid Glue. Using the Flirty Flowers stamp set, I stamped one of the sillhouette images in Basic Black on Soft Sky, then cut it with the Layering Ovals Framelits. I cut another, larger oval with the next size scalloped oval and liquid glued them together. It didn’t show very well on the DSP, so I cut a rectangle in Soft Sky as a base for the oval and liquid glued it to the DSP.

The sentiment is stamped in Basic Black using a sentiment from Flirty Flowers. The ovals are attached with Stampin’ Dimensionals. A bow in the sheer black ribbon, attached with a Glue Dot, and a Black Rhinestone Jewels finishes the front.

I have not yet decided if this will be a congratulatory card or perhaps for a birthday, so I did not finish the inside. However, it will have a black mat, some DSP and a liner of Soft sky for the sentiment. I think it looks pretty feminine, so one of my girls or girlfriends will be the recipient.

The envelope has more of the Whole Lot of Lovely DSP on the flap.

flap

And a row of flowers from Flirty Flowers across the bottom of the front in Basic Black.

envelope front

I hope you like this quick and easy card. I always appreciate your comments, so please leave one.

Today is the last day for the Buy 3, Get One Free Designer Paper sale.To shop for this and other products click here

b3g1dsp_current_promo_banner_na

It is also the last day for the Merry Patterns deal, where you get a free stamp set if you have an order of $300 or more. This can be your own order or a workshop order, or combined with friends’ orders. Just click on the order online button at right and when you check out it will tell you that you qualify for the Host promotion Merry Patterns. It is a lovely set and after today it will be no more! Don’t delay!

shareable_merrypat_090117_na.jpg

While some things end today, other goodies will be available tomorrow. I am thinking specifically of the new Stampin’ Blends alcohol markers. They are fantastic. I have played with them a bit (we demonstrators get to order early so we can try them) and they really do blend well. The cap is designed so they won’t dry out and each color comes in a light and a dark version. There are 12 colors. I think you will want to try these at some point in your crafting. There is also a 16 card project kit called Color Me Happy that you might enjoy. Remember……Tomorrow is the first day to order these.

10-17-17_stampinblends_header_demo_najp

Card Cuts: Soft Sky: 5-1/2″ x 8-1/2″ scored at 4-1/4″, front rectangle 2-34″ x 3-3/4″, oval 2-1/2″ x 3-1/2″; Basic Black: oval 2-3/4″ x 3-3/4″; Whole Lot of Lovely Designer Series Paper: front mat 4′ x 5-1/4″.

Non Stampin’ Up products used: Sheer black ribbon

Product List

Uncategorized

Stampin’ Up! Musical Season

Good Monday morning Everyone! Wow! Where does the time go? I am already frantic and it is still 8 weeks until Christmas. I will NEVER be ready! Perhaps someone is trying to tell me something? Like, I need to get out of some of my (self-imposed) responsibilities?

I have not blogged for almost two weeks. Between a couple of special events in which I was VERY involved that took 6 days out of my life, altering two bridesmaids dresses and making great-granddaughter’s mermaid costume for Halloween, I only made it to my craft room yesterday for the first time in 8 days. This is ridiculous! However, yesterday I resumed, not cardmaking, but reorganizing the area. I am not finished, but am making headway. The card for today was done in about 3 short sessions of stolen moments over a period of days.

That said, I am SO glad to be back to making cards. I decided that I would limit myself to one stamp bundle and chose the Musical Season set and the coordinating Musical Instruments dies. I also wanted to try the Eclipse method, of which I have seen a lot lately. Usually, if everyone else is doing it, I shy away from whatever it is. Call me a rebel! The eclipse method is intriguing, so try it I did. Here is my card for today.

front

After choosing to use Night of Navy for my card base, I picked one of the sheets of Merry Music Designer Series Paper for the background of my card. First, I used the Softly Falling Textured Impressions Embossing Folder to emboss it.

Next up I used the little drummer boy die from Musical Instruments to cut him out of the music. Then, I adhered the music to a sheet of the Champagne Foil Sheets (with the middle cut out, of course. For those of you new to following me, I normally cut the center out of a foil mat to conserve this more expensive paper. It is from this that I then cut smaller pieces and you would never know that there is not a whole sheet behind the art piece) with Snail. This was adhered to the card base with liquid glue.

I also used the drummer boy die to cut three in Night of Navy. Liquid glue adhered all four pieces together, then back into the background. My eclipse part of this card is finished. Perhaps I will try it again using the Large Letters sometime, but this will do for now.

drummer detail

I really wanted to use the lyre in the set, but just couldn’t make it come out right, so those pieces are waiting to be used on another card sometime. The sentiment banner is cut from Night of Navy and heat embossed with white. I rubbed my Embossing Buddy over the card stock to eliminate static, then used the sentiment stamp from Musical Season, stamped it in Versamark and heat embossed. I cut the ends with the Triple Banner Punch. On the back I added Stampin’ Dimensionals, then whacked off a length of Silver Metallic Thread and wound it around, sticking it to the Dimensionals. This was then adhered to the front of the card.

The dies in the Musical Instruments set are really nice and I would love to use all of them. However, I limited myself to the spray of leaves and berries and the treble clef for this card.

The leaf design was stamped in Old Olive, four times, on Whisper White. Using my Stampin’ Blends, (which you will be able to order tomorrow…..just click on the Order Online button at right) I added color to the leaves and berries. I used the lighter of both Old Olive and Night of Navy to fill in the design, then die cut them. These were arranged rather like a wreath around the sentiment and liquid glued in place.

The clef is cut from the Champagne Foil Sheets as well as Night of Navy, and glued together with liquid glue. I offset these a bit to make a shadow, added some Mini Stampin’ Dimensionals and added it to the front of the card. A bit of liquid glue adhered it to the sentiment label. The front is finished!

detail

On to the inside. I repeated the Champagne Foil mat and Merry Music DSP, then cut two labels from Lots of Labels framelits for my sentiment. The larger one is in Night of Navy and the sentiment one is Whisper White, stamped with Night of Navy. The sentiment is also from the Musical Season set.

inside

Just so we don’t have a naked envelope, I added some of the DSP to the flap and

flap

stamped the drummer boy in Night of Navy on the front.

envelope front

I hope you like this card. If you haven’t tried the eclipse technique, try it. It is fun to do. However, my friend Mary did it using the Happy Birthday thinlits die, which has a gazillion pieces. I am not ready for that. She did a live video which you can see here.

There was a problem with the live feed, but the part with the eclipse technique is there.

Card Cuts: Night of Navy: card base 7″ x10″ scored at 5″, sentiment banner 3/4″ x 5″, drummer boy and clef 3″ x 5″, large label 3″ x 4-1/2″; Champagne Foil Sheets: front mat and inside mat (2) 4-3/4″ x 6-3/4″, clef 1-1/2″ x 2-1/2″; Whisper White: leaves 4″ x 6″; Merry Music DSP: front art and inside liner (2) 4-1/2″ x 6-1/2″.

Product List

Uncategorized

Snowy Christmas Card

Well, like it or not, ready or not, in about 9-1/2 weeks, Christmas will arrive. Yikes! You would think that one didn’t know it was coming with all the last minute activity going on. I have nearly stopped sending cards, but now that I am making them, I want to send LOTS! That means I have to MAKE LOTS! Today was a beginning. I may not get as many done as I would like, but there will be a fair number sent.

I was really just playing around with stamps and dies and a variety of paper today. I like rustic and have this old paper that I should clear out of my stash. It is sort of wood grained blue, sort of scruffy (like peeling paint scruffy) with snowflakes on it. That was my inspiration for this card. Well, really, two card fronts.

As I said, I was playing around and what I did on the inside I didn’t like for a card inside, so it became a card front for a second card. I am showing the fronts today, and at a future, yet-to-be-determined date, I will show you how I decided to finish them.

On the original front, I used a card base of Night of navy. The printed paper already has a wood grain look, but I ran it through the Big Shot with my Stampin’ Up! Pinewood Planks 3D Dynamic Textured Impressions Embossing folder.

card front

Using a die from Tonic Studios I cut a large snowflake in Very Vanilla and another in Sahara Sand. I thought the Very Vanilla was TOO bright and fresh for the aged looking paper. The Sahara Sand did a nice job of toning down the brightness. These were adhered together, offset a bit, with liquid glue.

From the Seasonal Layers dies I chose the two small snowflakes and cut them in Very Vanilla. I proceeded to lose one of them, and decided the card didn’t need it anyway, so didn’t cut another. This was liquid glued to the printed panel.

The 1″ strip cut off a full sheet of card stock when making a 5″ x 7″ card became my sentiment strip. The sentiment is from Merry Patterns. I love this font and it is the perfect size for this card. Using my Paper Snips, I cut a flag at one end and liquid glued it to the printed panel.

detail

A length of Linen Thread was wrapped around 3 times and taped to the back. Over this, I used Stampin’ Dimensionals to adhere the layered snowflake. The final touch was a Linen Thread bow made by wrapping it around 3 fingers 4 times and tying it with another length of thread that I wrapped around the bow 3 times. A Glue Dot holds it in place above the sentiment. Nice.

ON to the inside, er, uh, the second card front. When I decided I didn’t like this for an inside, I simply used my Stampin’ Trimmer and cut the card into two pieces. Easy Peasy!

Another piece of the snowflake, worn looking paper is the mat for the Very Vanilla die cut piece. I used the Swirly Snowflakes dies to cut the bottom half of the panel and liquid glued it to the printed mat. The sentiment from Snowflake Sentiments was stamped in Night of Navy off to the right, leaving room for a couple of Seasonal Layers snowflakes, also in Night of Navy.

inside or second front

I did not dry emboss this printed paper, but I think any future cards using this will be embossed. I think it gives a richer look to the finished piece.

This is a very nice front of the card, but not for the inside. I just think the whole look says, “I am the front of the card.”

The medium Very Vanilla Envelope was stamped on the front with the three small snowflakes stamp from Snowflake Sentiments in Night of Navy across the bottom of the front. This is a lovely little stamp with a lot of potential. The flap is dry embossed with a Darice embossing folder of swirling snowflakes. When I finish the two cards I will need to make a second envelope, but for now this is all there is.

envelope front

flap

While this is not the type of card I will send at Christmas, it could be part of a set of cards as a gift for someone. And with a different sentiment, perhaps “Thank You?” it could be an any occasion type of card.

I hope you enjoyed my experimenting. What fun is it to have all these things to play with and not try anything new? Be brave, and do some experimenting on your own. It is only paper and ink!

I am willing to be your demonstrator if you do not have one. Just click on the Shop Online button at right to shop with me. There are goodies for you if you do.

HOST CODE OCTOBER 16-31: 3HM7FW4Q

If you apply that Host Code to your online orders under $150, you’ll get a free gift from me. If your order is over $150, please don’t apply the hostess code (you’ll miss out on your own Stampin’ Rewards/Host $$ if you use it), but you’ll still get the free gift, too!

Wild Wing Creations Bird Egg Rewards:

Bird Egg Rewards

Qualify to earn FREE Stampin’ Up! product from ANY current Stampin’ Up! catalog or promotion!  The Wild Wing Creations Bird Eggs Rewards Program is my way of personally saying “thank you” to my returning customers.

For all the details on the customer rewards, click here.

The Designer Paper Series ‘Buy Three, Get One Free’ promotion is good until October 31. All purchases for this deal must be from the list below. You can order as many as you like. You get to choose which ones from the list that you want, so if you want 3 at the $10 price and the free one is $13, you can do that!The T

Untitled-1

The Merry Patterns Host promotion also ends October 31. To get this lovely stamp set FREE, just have sales of $300. You can order this yourself, or get some friends together and place your order. This is a great set, very versatile.

Shareable_MerryPat_090117_NA

Card Cuts: Night of Navy: card base 4-1/4″ x 11″ scored at 5-1/2″, 2 small snowflakes 2″ x 3″; Very Vanilla: large snowflake 4-1/4″ x 4-1/4″, sentiment panel 1″ x 5-1/4″, small snowflake 2″ x 2″, inside (or second card front) 3-7/8″ x 5-1/8″; Printed paper: front mat 4″ z 5-1/4″, inside mat (or second card front) 4″ x 5-1/4″; Sahara Sand: snowflake 4-1/4″ x 4-1/4″

NON Stampin’ Up! products used: Tonic large snowflake die, printed paper, Darice swirling snowflakes embossing folder (envelope)


Product List

Uncategorized

Stampin’ Up! birthday

Good Tuesday morning everyone! We had a nice rain over the weekend, a beautiful Sunday and Monday. I think Sunday night was our coldest so far this fall, but no frost, at least where I live.

I have several birthdays coming up so this is for one of them.

front

I began with a Crumb Cake card base . This is a 5″ square card, different than what I usually do.

The mat is Early Espresso with 3 equal size pieces of map paper adhered with liquid glue. I then took 4 pieces of jute twine and tied the knot. Some call it a granny knot, some a nautical knot, but whatever it is, I like it on masculine cards. This was wrapped to the back of the mat and taped SECURELY.

The anchor is from the Seaside Shore stamp set, stamped in Early Espresso and fussy cut. I used Glue Dots to adhere it to the ‘rope’.

detail

The ship, from The Open Sea (retired) was stamped in Basic Gray on Smokey Slate card stock and colored in with Smokey Slate and Island Indigo Stampin’ Write markers. I used the White Chalk marker to color the clouds and Real Red for the flags, then fussy cut a general shape and adhered it with Stampin’ Dimensionals. The Early Espresso mat is Fast Fused to the card base.

On the inside, I adhered an Early Espresso mat to my card base, then die cut the Happy Birthday sentiment from another panel of the map paper. This die is from Simply Defined and gives a totally different look to the card. Liquid glue adhered it to the mat.

inside

This was pretty fast and simple to do,yet the effect is nice. Since it is a square card, I had to make an envelope, using the envelope punch board, as I have no square envelopes. Another piece of the map paper made a very nice one, needing no further embellishment.

envelope

If you do not have a demonstrator, I would be happy to have you order from me. Just click on the Shop Online button at right.

October 16-31 HOST CODE: 3HM7FW4Q

If you apply that Host Code to your online orders under $150, you’ll get a free gift from me. If your order is over $150, please don’t apply the hostess code (you’ll miss out on your own Stampin’ Rewards/Host $$ if you use it), but you’ll still get the free gift, too!

Wild Wing Creations Bird Egg Rewards:

Bird Egg Rewards

Qualify to earn FREE Stampin’ Up! product from ANY current Stampin’ Up! catalog or promotion!  The Wild Wing Creations Bird Eggs Rewards Program is my way of personally saying “thank you” to my returning customers. For details on the rewards, click here.

The Designer Paper Series ‘Buy Three, Get One Free’ promotion is good until October 31. All purchases for this deal must be from the list below. You can order as many as you like. You get to choose which ones from the list that you want, so if you want 3 at the $10 price and the free one is $13, you can do that!The T

Untitled-1

The Merry Patterns Host promotion also ends October 31. To get this lovely stamp set FREE, just have sales of $300. You can order this yourself, or get some friends together and place your order. This is a great set, very versatile.

Shareable_MerryPat_090117_NA

Card Cuts: Crumb Cake: card base 5″ x 10″ scored at 5″, anchor 2″ x 3″‘; Smokey slate: ship 3″ x 3″; Early Espresso: cut 2 for inside mat and outside mat 4-3/4″ x 4-3/4″; DSP: inside sentiment 4-1/2″ x 4-1/2″, for front cut 3  at 1-1/2″ x 4-1/2″.

NON STAMPIN’ UP! PRODUCTS USED: Happy birthday die from Simply Defined, map paper.

Product List

Uncategorized

Stampin’ Up! Magical Mermaid

Hey everyone! I have been very busy trying to get my craft space re-organized so it is easier to work. It seems to take forever, but I am making headway. At least on Sunday afternoon I got all the scrap card stock and DSP sorted and put in the proper file. Whew! I didn’t know I had so many scraps.  Some might say I am a pack rat. That isn’t true, but I do try to save where I can and believe in using odd bits when possible.

Today’s card is for my Great Granddaughter who will turn 4 on Friday. She told me recently that she wants to be a mermaid for Halloween. I managed to find an idea to make her a costume, so that will be her birthday present. I made this card to go with it.

card front

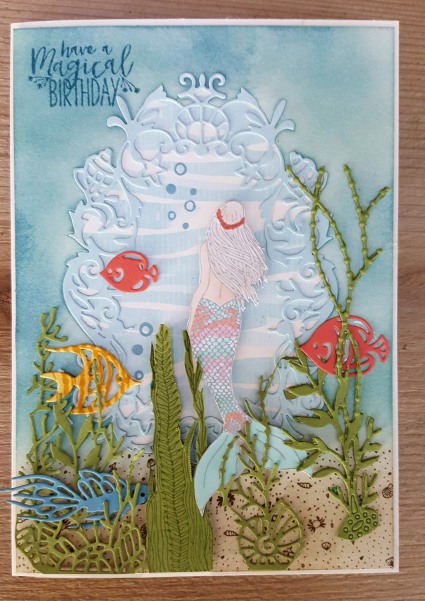
The card base is Very Vanilla. I began by taking another panel of Very Vanilla and die cutting the fancy oval from it. My intent was to adhere the DSP on the back and put the die cut back in the space, leaving the center open. But first, I wanted the mermaid to be IN the water, so I sponged the upper portion in Soft Sky, which, on Very Vanilla, turned sort of green. Not good.

I decided the sand should be done next, so I inked up the sand stamp from Magical Mermaid in soft Suede and stamped until the lower area was covered. Who ever heard of vanilla sand? I sponged over the stamping with Sahara Sand until I thought it looked more like real sand at the bottom of the ocean, blending it into the ‘water’ above.

To correct the greenish tint I sponged over the Soft Sky with Marina Mist, rendering a bluer water with some green undertones. Using Liquid Glue I adhered a piece of the wavy water from the retired By the Shore DSP to the back of my panel. So far, so good.

Then, when I re-inserted the die cut into the oval, it was all wrong. I didn’t want to sponge it, so I cut another oval from Soft Sky and used that die cut to put back into my panel. Oohh! I like this. That die, as well as the fish dies and the mermaid on the inside are from a stamp/die set from Simply Defined and is called Time and Tides. The die cut seaweeds are also from that bundle.

detail

I spent the next hour or so die cutting, all the pieces I would need for my vision, which included ruining a couple of pieces and having to cut them again. The gluing was a bit tedious, but not too much of a chore.

The seaweed is cut all in one piece as the die is really a frame, then I simply cut it apart to make more of an ocean bottom look. All the seaweed, inside and out, is from Old Olive. I dry arranged everything before starting to adhere elements in place.

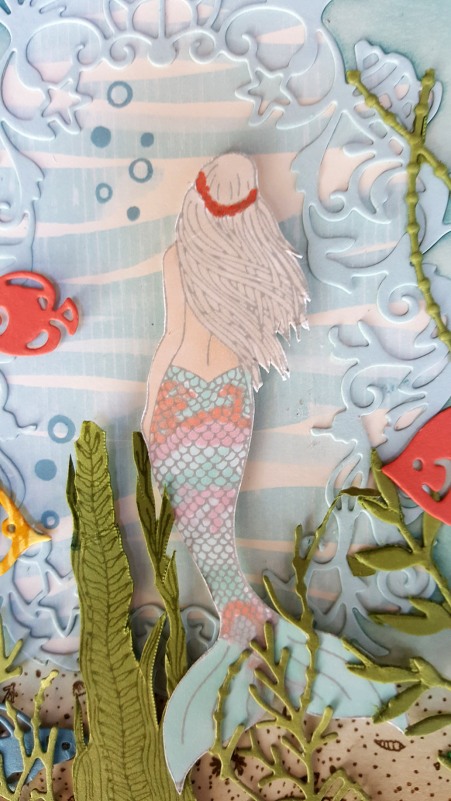
I stamped the mermaid from Magical Mermaid in Smokey Slate ink onto Whisper White card stock, made sure it was dry, then proceeded to color her with my new Stampin’ Blends. These are Stampin’ Up!s new alcohol markers and they really blend well. They were available to demonstrators on October 1, but I do not know when they will be available for customers. As soon as I get the word I will let you know.

I used Calypso Coral, Pink Pirouette, Pool Party, Ivory and Crumb Cake to color the mermaid. Each color comes in a dark and a light, which makes blending very easy. There is also a color lifter which can be used to take away any color where you get too much. The mermaid costume has pink, coral, cream and about 3 shades of blue, so I tried to replicate that look on this card. I will say here that I thought about adding some pearls or enamel dots, but she has a 1 year old brother and I figured if they came off it might be a choking hazard, so I left them off.

Her hair is Crumb Cake, body is Ivory, and the other colors are in the tail. Her hair band is Calypso Coral, the dark one. Since there is no die for her, I fussy cut the pretty girl fish, or is it fish girl?

seaweed detail

I die cut 2 fish in Calypso Coral, one in Marina Mist and one from a previously stamped scrap of Daffodil Delight. I thought it made a nice tiger fish. (See, all those scraps come in handy sometimes!)

The seaweed at left is adhered with Stampin’ Dimensionals cut to fit the small spaces. Mini Stampin’ Dimensionals were too big and more difficult to cut smaller. The piece at right is two pieces cut and layered, gluing them together, which was almost as much of a chore as cutting bitty pieces of Dimensionals. Both the one at right and the one next to it were liquid glued to the card front. I left a gap about halfway up that was not glued down so I could have a fish swimming through the seaweed.

Before adhering the next pieces I attached the Mermaid with Stampin’ Dimensionals so she could appear to be rising from the seaweeds. There was a blank space and I was DONE with the bitty, fragile pieces of seaweed, so I stamped the weeds from Magical Mermaid onto Old Olive with Old Olive ink and fussy cut it. This was adhered with Stampin’ Dimensionals also, with the edge tucked behind the Mermaid’s tail.

The blue fish and striped fish were also attached with Dimensionals in the seaweed at left. The smaller coral fish was also adhered with Dimensionals.

To finish the card front, I stamped some air bubbles from the Seaside Shore stamp set, and the sentiment from Magical Mermaid in Marina Mist.

I LOVE the dimension and textures of this card. I am equally certain the little girl in question will love it too.

On the inside, I cut the By the Shore wavy paper one inch too short, intentionally, and liquid glued it to a Soft Sky mat, keeping it at the top. At the bottom I added a one inch strip of Very Vanilla that I had stamped with the sand image in Soft Suede and sponged over it with Sahara Sand.

Over this I stamped a couple of seaweed images from the Magical Mermaid set in Old Olive and the sentiment from the same stamp set in Marina Mist.

inside

Using the Mermaid from the Time and Tides collection from Simply Defined, I stamped her in Smokey slate and used my new Stampin’ Blends to color her the same as the one on the front. I don’t mind that the waves show through, as I think it lends a more ethereal look to the Mermaid. To complete the inside of the card, I die cut 3 small seaweeds and a Conch shell (stamped with Calypso Coral on Very Vanilla first) from the Time and Tides collection. The weed at left is adhered with Stampin’ Dimensional bits and the rest with liquid glue.

The envelope flap got more of the By the Shore DSP while the front was stamped with Old Olive seaweed and a Soft Sky mermaid, all from the Magical Mermaid set.

envelope front

flap

I hope you like this card as much as I do! Card cuts and products used are below.

If you do not have a demonstrator and would like to order from me, please click on the Shop Online button at right.

October 16-31 HOST CODE: 3HM7FW4Q

If you apply that Host Code to your online orders under $150, you’ll get a free gift from me. If your order is over $150, please don’t apply the hostess code (you’ll miss out on your own Stampin’ Rewards/Host $$ if you use it), but you’ll still get the free gift, too!

Wild Wing Creations Bird Egg Rewards:

Bird Egg Rewards

Qualify to earn FREE Stampin’ Up! product from ANY current Stampin’ Up! catalog or promotion!  The Wild Wing Creations Bird Eggs Rewards Program is my way of personally saying “thank you” to my returning customers. For details on the rewards, click here.

The Designer Paper Series ‘Buy Three, Get One Free’ promotion is good until October 31. All purchases for this deal must be from the list below. You can order as many as you like. You get to choose which ones from the list that you want, so if you want 3 at the $10 price and the free one is $13, you can do that!The T

Untitled-1

The Merry Patterns Host promotion also ends October 31. To get this lovely stamp set FREE, just have sales of $300. You can order this yourself, or get some friends together and place your order. This is a great set, very versatile.

Shareable_MerryPat_090117_NA

CARD CUTS: Very Vanilla: card base 7″ x 10″ scored at 5″; card front 4-7/8″ x 6-7/8″, sand strip on inside 1″ x 4-1/2″, conch shell 2″ x 2″; Soft Sky: fancy oval die cut 4-1/2″ x 6″, inside mat 4-7/8″ x 6-7/8″; Whisper White: mermaid 2-1/2″ x 6″; Old Olive: seaweed 5″ x 6″; By the Shore DSP: front 4-1/2″ x 6-1/2″, inside liner 4-1/2″ x 5-1/2″; Calypso Coral, Marina Mist, Daffodil Delight: fish 1-1/2″ x 2″

NON STAMPIN’ UP! products used: Simply Defined Time and tides stamp and die collection

Product List

Uncategorized

Stampin’ Up! Sheltering Tree Leaf

Good Friday the 13th Everyone! I am not superstitious. Are you? It is just another day.

I do have another sympathy card to show today. There has been WAY too much need for these this year. And, they are not all old people either.

I kept it very simple this time. Starting with a Pear Pzazz card base, I die cut a maple leaf with the leaflets framelits from scrap paper and used the negative as a stencil. Using some Post-it tape, I taped it to the card base and sponged the leaf with Always Artichoke, Crushed Curry, Pumpkin Pie and Soft Suede. Then I inked up the bare tree from Sheltering Tree stamp set in Soft Suede and stamped over the leaf, lining up the trunk with the leaf stem. As the stamp set is photopolymer, it is easy to line it up with another image.

front

Next was the hard part…die cutting the same leaf out of my card front so that it was in the same position as the leaf. I did some measuring, re-measuring and marked lightly on a used piece of card stock the same size as my card front. It was off to the left a bit, so I measured again, and took my chances with the Very Vanilla panel for my card front. It is off just slightly to the lower end, but not enough to concern me. It would have been easier to cut the card front first, mark the opening, then sponge the card base. However, what I ended up doing was not what I started to do, so I did it backwards.

Using a sponge dauber I inked around the edge of the leaf and the edges of the panel in Pear Pzazz, then liquid glued it over the card front.

detail

Using a scrap from cutting the card base, I stamped my sentiment in Pear Pzazz, then liquid glued it to the panel. The sentiment is one I have had a long time, and don’t remember where I got it, nor the company. To finish it, I used a metal leaf brad on the sentiment strip.

On the inside liner I again used the sponge dauber and Pear Pzazz ink to soften the edges, then stamped the tree in the corner, again with Pear Pzazz. The sentiment is from Thoughts and Prayers stamp set and is stamped in Soft Suede.

inside

The front of the envelope is done with a soft suede tree, while the flap was finished with 3 of the sponged  and stamped leaves, done the same way as the front of the card.

envelope front

flap

I do like this technique of sponging, then stamping over the sponging for a different look.

If you do not have a demonstrator, I would be happy to fill that role for you. To order from me, just click on the Order Online button at the right side of this page.

HOST CODE OCTOBER 1-15…2HRMVCPM

If you apply that Hostess Code to your online orders under $150, you’ll get a free gift from me. If your order is over $150, please don’t apply the hostess code (you’ll miss out on your own Stampin’ Rewards/Hostess $$ if you use it), but you’ll still get the free gift, too!

Wild Wing Creations Bird Egg Rewards:

Bird Egg Rewards

Qualify to earn FREE Stampin’ Up! product from ANY current Stampin’ Up! catalog or promotion!  The Wild Wing Creations Bird Eggs Rewards Program is my way of personally saying “thank you” to my returning customers.

Card Cuts: Pear Pzazz: card base 7″ x 10″ scored at 5″, sentiment strip 1″ x 4-3/4″; Very Vanilla: front panel 4-7/8″ x 6-7/8″, inside liner 4-3/4″ x 6-3/4″

Product List

Uncategorized

Stampin’ Up Count My Blessings

Hey Everyone! We have had a couple of days of rainy, cloudy, misty weather. I LOVE it! We have been so dry, and the hope was for moisture in the ground before it freezes. Yesterday my gauge had 1-3/4″ on top of the 1-1/4″ last Friday. Much of the harvesting has been done, though there is still plenty left to do. It will take more than what we have had to stop them for very long once the sun shines again.

My card today is a birthday card, disguised as an autumn card. There are several birthdays coming up and this is what I created for one of them.

front

The card base is Cajun Craze, the mat, Pear Pzazz and the art panel is Pumpkin Pie. I stamped over it randomly with Pumpkin Pie ink using the acorn and leaves from Count My Blessings. This is a wonderfully versatile set. Love it! I adhered this panel to the Pear Pzazz mat with liquid glue and wrapped a 1-3/4″ piece of burlap around it, taping on the back.

There is quite a lot of die cutting here using the Swirly Scribbles Thinlits (Pear Pzazz round shape), Leaflets (oak leaves) Framelits,  Bouquet Bunch Framelits (Pear Pzaz and Painted leaves), and Patterned Pumpkin Thinlits (rounded berry leaf in Pear Pzazz, paint and Cajun Craze). The painted pieces are from the WHOLE SHEET of Very Vanilla that I painted with Distress Oxide inks a couple of days ago.

detail

I also stamped acorns from Acorny Thank You stamp set and punched them with the Acorn Builder punch. The cap was stamped in Soft Suede on Crumb Cake and the body in Soft Suede ink on Soft Suede card stock. They were adhered with liquid glue.

After dry arranging all the bits, I used liquid glue, mini Stampin’ Dimensionals and Stampin’ Dimensionals to adhere everything to the card base and burlap.

The sentiment is from an old stamp I have had for a long time, and is stamped directly onto the stamped panel in Soft Suede ink.This completed card front was attached to the card base with Stampin’ Dimensionals.

card front

On the inside I reversed the mat and liner colors, again stamping the acorn/leaf randomly on the Pumpkin Pie mat with Pumpkin Pie ink. The liner is stamped in Soft Suede for both the sentiment and acorns. The sentiment is also from an old stamp set. I don’t know the company nor the name of the set.

inside

The envelope is adorned very simply with the acorn/leaf stamp in Soft Suede ink, both on the flap and on the front.

envelope frontflap

This was a relatively quick card to make in spite of the many die cuts in the collage. I hope you like.

OCTOBER 1-15 HOST CODE 2HRMVCPM

 If you apply that Host Code to your online orders under $150, you’ll get a free gift from me. If your order is over $150, please don’t apply the hostess code (you’ll miss out on your own Stampin’ Rewards/Host $$ if you use it), but you’ll still get the free gift, too!

Wild Wing Creations Bird Egg Rewards:

Bird Egg Rewards

Qualify to earn FREE Stampin’ Up! product from ANY current Stampin’ Up! catalog or promotion!  The Wild Wing Creations Bird Eggs Rewards Program is my way of personally saying “thank you” to my returning customers.

For details on the rewards, click here.

To order from me, if you don’t have a demonstrator, just click on the Shop Online button at right.

Card Cuts: Cajun Craze: card base 7″ x 10″ scored at 5″, oak leaf and leaf 2″ x 4-1/2″; Pear Pzazz: mat 4-3/4″ x 6-3/4″, inside liner 3-3/4″ x 5-3/4″, swirl and leaves 4″ x 4″; Soft Suede: acorns 1-1/2″ x 6″; Crumb Cake: acorn caps 1-1/2″ x 3″; Painted Very Vanilla: leaves 2-1/2″ x 4-1/2″.

NON Stampin’ Up Products used: burlap, sentiment stamps

Product List

Uncategorized

Amy’s Inkin’ Krew Giving Thanks Blog Hop

inkin-krew-blog-hop-banner2Good Tuesday morning to Everyone. I have been absent from the Blogging scene for a few days and it feels good to be back.

Today our creative Inkin’ Krew has some lovely projects to share with you, so, lets Hop!

My card uses my favorites: Leaflets framelits, Copper and Vintage Leaves stamps. I also chose to use my new Ranger Distress Oxide inks.

Using about six of the Distress Oxide inks, I just smeared them around on my craft mat, spritzed a LITTLE water and dragged my 8-1/2″ x 11″ sheet of Very Vanilla through it. I heat dried it, and repeated the process twice more, then touched up some bare spots with my Stampin’ Sponge and Pumpkin Pie ink.

From this sheet I cut my front panel and dry embossed it with the Layered Leaves 3D Dynamic Textured Impressions Embossing Folder, making sure my painted side was the DE-bossed side. The debossing does show up in the photo. I just love this embossing folder, but then if it has leaves or trees, I like it! I also really like these fall colors.

card front

This whole card was an experiment. The oak leaves were die cut using the Leaflets framelits after I stamped them using the Vintage Leaves stamps. Each one is different. Two of the leaves are cut from Wood Textures DSP, two different woods. One is stamped with Versamark and heat embossed using Copper Embossing Powder. The other one is stamped with Fossilized Amber Distress Oxide ink. One of the things I like about the oxide inks is that you can use a light color on dark paper and it shows. This is the leaf at the right side of the bunch.

The third leaf is stamped with Fired Brick Distress Oxide Ink on the previously inked Very Vanilla card stock. Remember, I did the WHOLE sheet? This allowed me to choose where to cut the leaf. I dry arranged these 3 leaves then liquid glued them to one another.

Next, using the acorn and leaf stamp from Count My Blessings stamp set, I stamped them in Versamark ink on a third piece of Wood Textures DSP and heat embossed them, also in Copper. There is no die for these, so I fussy cut them.

leaf detail

I tied them together by the stems using a length of Copper Trim and tied it in a bow. I took another length of the Copper Trim and spread it out to make a mesh, which I Tear & Taped to the painted, dry embossed panel, wrapping it around to the back and taping it securely.

This panel was adhered to an Always Artichoke mat with Stampin’ Dimensionals. This was then liquid glued to the Crushed Curry card base. tent

For the sentiment, I chose the one from Paisleys and Posies stamp set, inked it in Versamark on a Wood Textures DSP and heat embossed it in Copper. Using my Paper Snips Scissors, I cut a flag end at the end of the sentiment, liquid glued it to a Crushed Curry mat and trimmed it, also with the Paper Snips. Stampin’ Dimensionals adhered it to the painted panel, over the Copper mesh.

sentiment

To the left of the sentiment, I used more Stampin’ Dimensionals to adhere my grouping of oak leaves and acorns to the card front. There is an Amish general store not far from me, where I frequently shop. They have everything from books and boots to fabric and zippers, as well as bulk groceries. It was here that I found the little metallic leaf brads that I used, both on the front sentiment and on the inside.

On the inside, I used my Always Artichoke Stampin’ Write marker to draw a border on my Very Vanilla insert, criss-crossing it at the corners. Then, I cut another leaf from the previously painted sheet of Very Vanilla and liquid glued it to the liner.

inside

Again, with Versamark ink and Copper Embossing powder, I added the sentiment. This one is from an autumn themed Gina K stamp set. Another copper metallic brad finishes the inside, which is liquid glued to an Always Artichoke mat and into the Crushed Curry card base.

I have not done an envelope  for this card as I am undecided as to how I want it to look.

Card Cuts: Crushed Curry: 7″ x 10″ scored at 5″, front sentiment mat 1-1/2″ x 3-1/2″; Always Artichoke: (cut 2) inside mat and outside mat 4-3/4″ x 6-3/4″, Wood Textures DSP: use 2 different 6″ x 6″ sheets for leaves, acorns and sentiment label; Very Vanilla: One 8-1/2″ x 11″ sheet for painting, inside sentiment liner 4-1/4″ x 6-1/4″

If you care to shop with me, just click on the Shop Online button at right.  Otherwise, go on with the hop and visit Mary, or go back to Jaimie’s page. If you get lost, the list is below.inkin-krew-blog-hop-previous2

inkin-krew-blog-hop-next2


Karen Finkle

Linda Richenberg

Jaimie Babarczy

Julie Johnston You are Here

Mary Deatherage

Sue Prather

Jari Francis

Barbara Staradumsky

Amy Koenders

Save

Save

Save

Uncategorized

Christmas is Coming!

I know. That is no secret. It also amazes me that every year about this time I start to panic that I won’t get everything done that I WANT to do before then. I times past, either I was better organized, did less, or did fewer things that were time intensive. By Halloween I ALWAYS had my shopping done, cards were mailed by December 1 and by Thanksgiving most of the wrapping was done as well. That left December free for getting together with relatives to bake and decorate dozens of cookies, to make candy, attend events, practice for the church Christmas program and such things. Now……well.

Today’s card is a Christmas card, though I typically don’t send this kind of card. I honestly think that since Jesus is the reason for the season, my cards should reflect that belief. I do like the red and green traditional colors, the Santa Claus figure, deer, Christmas trees, etc. I just don’t usually send those kinds of cards. However, others do, and our Women’s Club has a bake sale and bazaar the first Saturday of December, so I may sell these for their fundraiser. At any rate, I like this card, and I hope you do too.

card and envelope


I began by using the lantern die from the Seasonal Lantern bundle to cut the lantern from Gold Foil Sheets. Using the same die, I cut another out of Very Vanilla card stock so I would have the middle of the lantern to stamp my candle, saving the rest of the lantern for another project. I then used the larger lantern, solid die, to cut one from Real Red Card Stock. I adhered the Gold one to the red lantern with Liquid Glue.

From Old Olive and Garden Green I die cut pine boughs using the Pretty Pines thinlits. Using the Holly Berry Happiness stamp set, I stamped several of the smaller leaves in Garden Green on Garden Green Card stock and the three berries in Real Red on Real Red card stock. These were punched out using the Holly  Berry Builder Punch.card-front.jpg

On the center panel of the lantern, I stamped the Seasonal Lantern candle in Real red and the flame and ‘glow’ in Crushed Curry. I outlined the flame in Real Red with my Stampin’ Write Marker. Using a white gel pen, I added a little highlight on the side of the candle. This piece was then liquid glued into the lantern.

I dry embossed a panel of Real Red using the Holly Textured Impressions Embossing Folder. Using Real Red as my card base, I liquid glued a panel of plaid paper to a panel of Garden Green and onto the card base. On the embossed red panel, I wrapped a piece of gold and white ribbon around, taping it to the back.

I assembled all the pieces of the lantern using liquid glue and Stampin’ Dimensionals and Mini-Stampin’ Dimensionals, then used Stampin’ Dimensionals to adhere the finished lantern to the embossed panel.

Taking my sentiment from the Wonder of Christmas stamp set (retired) I stamped it in Versamark on a panel of Very Vanilla and heat embossed it with Gold Emboss Powder. This was punched out using the Everyday Label Punch. I punched out another in Garden Green to use as a mat for the sentiment label. This one was cut in half vertically and liquid glued to the back of the sentiment. Stampin’ Dimensionals adhered it over the ribbon.front

This finished panel was put on the card front using Stampin’ Dimensionals also.

The inside of the card was made with a plaid panel on a Garden Green mat and adhered to the card base. This sentiment, also from Wonder of Christmas, was heat embossed in gold on a panel of Very Vanilla and adhered to a Real Red mat using Liquid Glue. I lightly drew three holly leaves and filled them in with my Garden Green Stampin’ Write marker. Ditto the red berries, using a Real Red Stampin’ Write marker. I deliberately placed the sentiment toward the left side of the panel to leave room to hand write a message. If I am going to the trouble to make a card for someone, I am going to write a few words of personal greeting as well.

inside

The envelope received a plaid flap and a Garden Green lantern, embossed with Gold on the front.flap

envelope front

I am having a little difficulty in wrapping my mind around the fact that October is nearly 1/3 gone already. YIKES! There are only 24 hours in a day, and I think I need at least 30! Either that, or I don’t need to sleep.

Please use the host code for October 1-15 if you decide to order from me. Also, now is a good time to become a demonstrator if you have any thoughts of doing so.

HOST CODE THROUGH OCTOBER 15: 2HRMVCPM

If you apply that Host Code to your online orders under $150, you’ll get a free gift from me. If your order is over $150, please don’t apply the hostess code (you’ll miss out on your own Stampin’ Rewards/Host $$ if you use it), but you’ll still get the free gift, too!

For details on my rewards program just click here

Wild Wing Creations Bird Egg Rewards:

Bird Egg Rewards

Qualify to earn FREE Stampin’ Up! product from ANY current Stampin’ Up! catalog or promotion!  The Wild Wing Creations Bird Eggs Rewards Program is my way of personally saying “thank you” to my returning customers.

Card Cuts: Real Red: card base 7″ x 10″ scored at 5″, embossed panel 4″ x 5″, inside mat 3-3/4″ x 5-3/4″, solid lantern 3″ x 4″; Garden Green: front mat and inside mat 4-3/4″ x 6-3/4″, mat for sentiment 2″ x 3″, scraps for holly leaves and pine boughs; Very Vanilla: sentiment 2″ x 3″, lantern 3″ x 4″, inside sentiment panel 3-1/2″ x 5-1/2″; Gold Foil sheets: lantern 3″ x 4″; Plaid Designer Paper: front and inside 4-1/2″ x 6-1/2″

NON Stampin’ Up! products used: ribbon, plaid paper. I wanted to use up some older stock, so used these from my stash. You could use instead the DSP Around the world and the gold stripe ribbon, which I will put in my product list.

Product List