sympathy

Stampin’ Up! Peaceful Boughs Sympathy for Happy Inkin’ Thursday Blog Hop

Good Morning Everyone! I hope your week is going well, and that you have all your Christmas cards mailed out already. Sorry to say, I still have a few to send. Gosh, where did this year go? In some ways it went on far too long, thanks to Covid19, and in other ways it flew by.
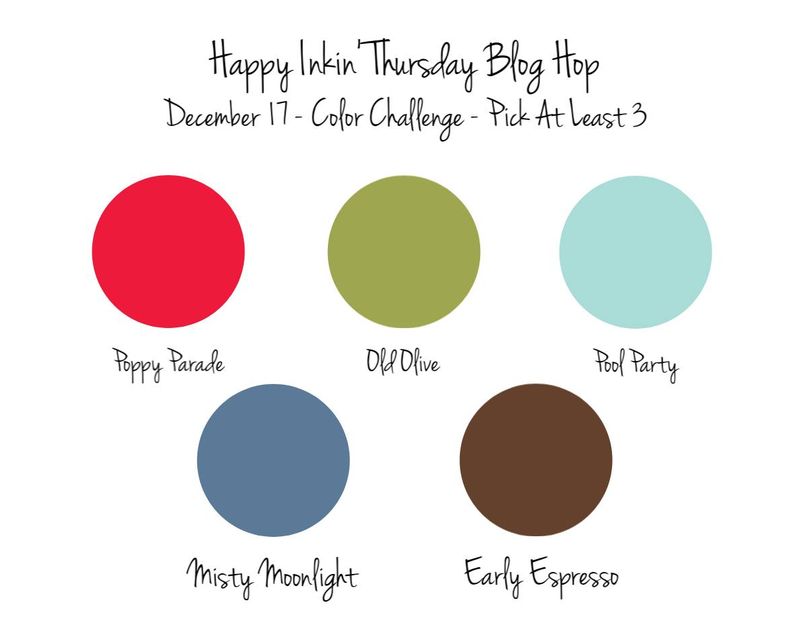
At any rate it is Thursday and my creative, talented team mates have some lovely things to show. Our inspiration this week is color. We can use all of them, but must use at least 3. Here is our inspiration:

I chose to use Pool Party, Early Espresso and Old Olive for my sympathy card today. Here it is:

The card base is Pool Party (5 1/2″ x 8 1/2″) as is the front of the card. I cut a separate panel of Pool Party (4 1/4″ x 5 1/2″) to emboss with the Evergreen Forest Embossing Folder, then used Liquid Glue to adhere it to the card front.

Using the Beautiful Boughs dies, I cut one large and one small bough from Old Olive. For these you will need a piece of card stock about 3″ x 5″. I then cut 2 large and 2 small pine cones and 2 large and 2 small pine cone details from Early Espresso ( 2 1/2″ x 5 1/2″). In hind sight, I think I should have used a sponge and some ink to highlight them, but, I didn’t. Just an idea you might want to try.

The smaller label die in that die set was used to cut the Pool Party sentiment panel (1 1/2″ x 3″) AFTER I stamped it in Early Espresso. The sentiment is from the Well Said stamp set. Using my Early Espresso Stampin’ Write Marker, I penned some stitches around the edge.

The elements were dry fit, that is, laid out without any adhesion. When I was satisfied, I took a photo with my phone to ensure that I could repeat the layout. The larger bough was Liquid Glued to the card front. Over this I glued a small pine cone, then used Stampin’ Dimensionals to adhere the larger one over the small one.

The smaller pine branch was partially adhered with Liquid Glue to leave some of the needles loose. The other small pine cone was adhered with Liquid Glue. Over this, Liquid Glue was used on the sentiment corner that overlaps the 2 pine cones, and Stampin’ Dimensionals adhere the other corners. Liquid glue was used to stick down the last pine cone under the sentiment.

The finishing touch is a Linen Thread, loopy, casual bow, which is attached with a couple of Glue Dots.

For the inside I cut a panel of Early Espresso (4″ x 5 1/4″) as a mat for the sentiment liner. ThisĀ  liner was cut from a 3 1/2″ x 5″ piece of Pool Party with the third largest Stitched Rectangles die.

I laid this on a piece of scrap paper so I could stamp off the edge without getting my mat all inky. The Peaceful Boughs stamp set coordinates with the Beautiful Boughs dies and is just simply beautiful. Using Old Olive ink, I stamped off the larger bough once, then stamped it in the upper left corner. The middle sized bough was used twice in the lower right, and was also stamped off once each time. The pine cones are the smaller ones and stamped full strength in Early espresso. Lastly, with the sentiment from Woven Heirlooms and Early Espresso Ink, I stamped the sentiment.

This liner was glued to the Early Espresso mat and into the card base. This finishes the card, but we can’t have naked envelopes, now, can we?

I put the flap in the Evergreen Forest Embossing Folder and embossed it. Then, with Old Olive Ink I stamped a couple of pine boughs, full strength, from Peaceful Boughs, on the front.

I hope you enjoyed this card, and will want to make one yourself. Now, on with the hop. Just click the button below to go to the Amy’s blog, or any individual’s name to go directly there.

Amy Koenders

Mary Deatherage

Kristi Gray

Jaimie Babarczy

Sue Prather

Karen Finkle

Akiko Sudano

Karen Ksenzakovic

Julie Johnston – You are Here

Product List

Uncategorized

Stampin’ Up! Wonderful Romance for Amy’s Inkin’ Krew Team Blog Hop

inkin-krew-blog-hop-banner2

Good Morning All!

We have had a couple of very spring like days, with high temperatures around 70 degrees and a GEN-U-WINE summer thunderstorm. Wow! I had forgotten just how powerful they are. The best thing was on Sunday. I saw a rainbow in the WEST going to church, and then in the evening we had a thunderstorm followed by a gorgeous, brilliant rainbow in the east. I don’t believe I have ever seen two rainbows on the same day, and in opposite directions! Spectacular. Thank you, Lord, for such beauty and hope.

Now, on with the hop. Our theme for today’s hop is ‘feminine’, which we are free to interpret any way we choose. I chose to use the Wonderful Romance Bundle and Wonderful Romance Designer Series Paper, as well as Petal Pink. All together, those say ‘feminine’ to me.

Here is my card.

4

I began by using Petal Pink for my card base, and used the border leaf design on an angle to cut the front of the card.

On the inside, I used Liquid Glue to attach the lacy vellum paper from Floral Romance Designer Series Paper so it would show under the die cut front.

5

For the inside sentiment, I marked the angle on Whisper White card stock with a light pencil mark, then cut from mark to mark. I then cut it to 5-3/8″ and used Liquid Glue again to adhere it to the inside of the card. The sentiments are stamped in Fresh Fig using sentiments from Dear Doily.

Now, back to the front of the card. I stamped the large floral image from Wonderful Romance in Smoky Slate on Whisper White card stock, then colored it with Old Olive, Pear Pzazz, Petal Pink and Fresh Fig Stampin’ Write Markers. I was going to use Stampin’ Blends, but didn’t have the correct colors.

1

This image was then die cut with the coordinating die that is part of the bundle. The Wonderful Romance sentiment was stamped in Fresh Fig on Whisper White card stock and cut with the Wonderful Floral die, also part of the bundle.

There is a tiny flower in that stamp set, so I inked it up with Petal Pink and stamped it next to the sentiment. This sentiment panel was attached with Stampin’ Dimensionals, as was the floral piece. A few Pearl Basic Jewels complete the front.

The envelope front was stamped with the large floral image in Smoky slate and colored the same as for the front of the card. I deliberately stamped some of the image off the edge.

2

The flap has more of the lacy vellum Floral Romance Designer Series Paper. It does look different on Whisper White than on Petal Pink.

3

I think this card fulfills the parameters of the challenge theme and I hope you like my card. Please leave comments below.

Now, to see what Shirley Gentry has for you, click the ‘previous’ button, or to move forward and see Terry Lynn Bright’s creation, click the ‘next’ button. Of course, you all know you can click on any name to just go to her blog. Enjoy!

inkin-krew-blog-hop-previous2inkin-krew-blog-hop-next2

  1. Mary Deatherage
  2. Julie Johnston:Ā You Are Here

CARD CUTS: Petal Pink: card base 5-1/2″ x 4-1/4″; Whisper White: inside sentiment panel 3-1/2″ x 5-3/8″, front sentiment 2-1/2″ x 3″, large floral piece 4″ x 4″; Floral Romance Designer Series Paper vellum lace: inside liner 4-1/4″ x 5-1/2″, envelope flap 2-1/2″ x 6″

Product List

Uncategorized

Stampin’ Up! First Frost Sympathy

Good Wednesday morning All! It is otherwise known as Hump Day, or, to me, a meeting day, which seems to happen almost every Wednesday. Some of these meetings are in the morning, some in the afternoon and Kiwanis is always on Wednesday evening. Most churches around here have church meetings and Bible Studies on Wednesday as well as youth group meetings. I guess Wednesday could also be called Popular!

Anyway, my card for today is another sympathy card using the First Frost Bundle and Frosted Floral Designer Series Paper. This paper is too lovely for words. It has a soft sheen to it which I love. I am not much for BLING, and this is just elegant, not blingy. (Is that a word?)

4

My card base is Smoky Slate. Over that is a mat of the Glossy White card stock. This serves well to showcase the Frosted Floral DSP paper.The DSP has a bit of texture as well, which, if you look closely at the photo, you can see it. Using the branch, or berries, or, how about berry branch? framelit from the First Frost Bundle, I cut 3 from the center of the Glossy White card stock before adhering it to the card base. I don’t like to waste good paper hiding most of it, so, I cut pieces from it whenever possible.

The sentiment is from Better Together. It is stamped in Mossy Meadow on Whisper White card stock and die cut with a Floral Frames framelit. I chose the Mossy Meadow to add a bit of color without it being TOO bright and colorful.

Behind this sentiment piece is a second one cut from Smoky Slate and cut in half lengthwise. This is adhered with Liquid Glue to the back of the sentiment making a nice mat. A Frosted Epoxy droplet is added just above the sentiment.

1

I also cut oneĀ  of the branches from some Mossy Meadow card stock. This and the Glossy White ones are arranged behind the sentiment piece and Liquid Glued to the card front. Liquid Glue adheres the sentiment over them.

Card front – done.

Inside, after stamping off once, I stamped the berry branch in Mossy Meadow on Whisper White card stock.Ā  The sentiment is stamped full strength over it. The sentiment is from Better Together. This panel is backed with a mat of the Frosted Floral DSP that is also used on the front.

5

The envelope is one from the Silver Foil-edged Cards and Envelopes pack. I could have used the card as well, but had already started my card when I remembered I had those cards. I cut a piece of the same Frosted Floral DSP as on the card for the flap. Looks Great! It is very elegant and dressy. These will be nice for Christmas cards also.

3

The front has a lone Mossy Meadow stamped-off-once berry branch from the First Frost Bundle. Stampin’ Up! has made it easy to coordinate a theme or style for your cards and scrapbook pages. And, several of their stamp and die sets are interchangeable with others, giving you nearly limitless design possibilities.2

This card and envelope are now ready for the post. I hope you like.

The host code for October is EV7ETS99. When placing an order of $50-$149.99 from my online store, use this code to earn a free gift from me. For orders over $150, DO NOT USE THE HOST CODE, as this will nullify any rewards you earn from Stampinā€™ Up! You will still get your free gift from me. And, you will earn bird eggs. For complete details on customer rewards, go here.

You also are eligible for my online class tutorials if you place a (pre-tax and shipping) $50 order through my online store.

October-Online-Class-Collage

Card Cuts: Smoky Slate: card base 4-1/4″ x 11″ scored at 5-1/2″, sentiment mat 2-1/2″ x 3-1/2″; Glossy White: front mat and berry branches 4″ x 5-1/4″; Whisper White: sentiment piece 2-1/2″ x 3-1/2″, inside liner 3-1/2″ x 4-3/4″; Mossy Meadow: berry branch 2″ x 3″; Frosted Floral Designer Series Paper: front 3-3/4″ x 5″, inside mat 4″ x 5-1/4″, envelope flap 3-1/2″ x 5-3/4″

Product List

Uncategorized

Stampin’ Up Hold on to Hope Happy Inkin’ Thursday Blog Hop

Good Thursday morning Everyone! I am trying something new today. I have joined some of my team members for the Happy Inkin’ Thursday Blog Hop. This is a whole new adventure for me, so I hope I do the team justice.

Blog hop header

We are working with a sketch this week:

Thursday blog hop sketch mar 1

and as I have need of sympathy cards, this is what I did with the sketch.

wild wing creations-4

My card base is Smoky slate and the first mat is Silver Foil. The second mat is Soft Sky. I took a panel of the new, Springtime Foils Specialty Designer Series Paper, which is in the Sale-A-Bration 2nd release, and free with a $50 qualifying order. I love, love, love this paper and hope it stays around beyond the Sale-A-Bration.

I used my Light Pool Party Stampin’ Blends Marker to color in the leaves. It seemed a shame to cover it up! I then cut the end with the Banner Triple Punch and Liquid Glued it to the Soft Sky mat. This was adhered, also with liquid glue, to the Silver Foil and onto the card base.

I was going to use my Stitched Shapes Framelits for the Very Vanilla square, but the largest one wasn’t big enough for the cross. I used instead a die from Scrapbooking Made Simple. This was the perfect size. I could have used a plain square, which was my original intent, but it was too plain looking. If one thing doesn’t work, try something else!

Taking the swirly design from the Beautiful Peacock stamp set (another Sale-A-Bration free product), I stamped it in Versamark and heat embossed it with Silver Stampin’ Emboss Powder in the lower right corner of the square.

The sentiment, from Teen Tiny Wishes, was also stamped in Versamark and heat embossed in silver.

wild wing creations-1

Using the dies from the Hold on to Hope Bundle, I cut the solid cross in Soft Sky and the more intricate one in Very Vanilla. These were Liquid Glued together then popped onto the square with Stampin’ Dimensionals. The square was then adhered over the foiled banner with Stampin’ Dimensionals.

For the inside I inked the swirly design from Beautiful Peacock in Soft Sky, stamped it off once on scrap paper, then onto the center of my panel. Over this I stamped the sentiment from Thoughts and Prayers in Smoky Slate full strength. To finish this panel, I inked the little corner piece from Hold on to Hope, and stamped each one off once before stamping my panel. Done.

wild wing creations-5

The envelope got another Silver heat embossed swirly design on the front and a piece of the colored Springtime foils on the flap.

I think this turned out quite well. Please leave your comments below.

If you need products to do this card and do not have a demonstrator, I would be happy to help you. Just click on the Shop Online button at right to shop from my store, or contact me. Card cuts and products for this projects are listed below.

All right! On with the hop. By clicking the ‘Next’ button you will go to Amy’s blog. If you get lost, here are the links to the rest of the team hopping with us today.

Blog hop next button


Amy Koenders

Shelagh Freemantle

Mary Deatherage

Kristi Gray

Jaimie Babarczy

Sue Prather

Karen Finkle

Julie Johnston (you are here)

HOST CODE:Ā  UJWYGVQJ Good through March 15

When you place an order of at least $50, before taxes and shipping, through me, You earn Bird Egg Points, and a free gift. For more details on the customer rewards program, please click here. Also, with a $50 order you get tutorials for at least 5 different projects using the Petal Palette Bundle. What a deal!

Petal Palette Online Class

Card Cuts: Smoky slate: card base 5-1/2″ x 8-1/2″ scored at 4-1/4″; Silver Foil Sheets: cut 2 mats 4″ x 5-1/4″; Soft Sky: front mat 3-7/8″ x 5-1/8″, inside mat 3-3/4″ x 5″, cross 2-1/2″ x 3″; Springtime Foil Sheets: front banner to color 2″ x 4-1/2″; Very Vanilla: Front square 3-1/2″ x 3-1/2″, inside panel 3-1/4″ x 4-1/2″, fancy cross 2-1/2″ x 3″

Product List

Uncategorized

Stampin’ Up! Heartfelt Blooms Sympathy

Today is Thursday, the 4th day of 2018. How did it get to be the 4th? Before we know it, it will be summer and this winter season of frigid record-setting temperatures will be one for the history books. Life is passing quickly, so make the most of every day!

Today’s card is another sympathy, which is why I guess I am brought to the realization once again of how brief (in the big picture) is our time here on earth.

The Sale-A-Bration catalog has some wonderful items you can choose, for FREE, with a purchase of $50. One of those is the stamp set I chose to use today, Heartfelt Blooms.

This stamp is one of Stampin’ Up!s new Distinctive stamps, that is to say, photorealistic. I love this one.

I began by stamping the image in Smoky Slate on Smoky Slate card stock. This panel was mounted on a mat of Berry Burst. A piece of Berry Burst Crinkled Seam Binding Ribbon was wrapped around and taped on the back. This panel was then adhered to the card base with Liquid Glue.

wild wing creations-3

For the sentiment, I again stamped the design in Smoky Slate, this time on Whisper White card stock, and cut it with a Layering Ovals Framelits die. Using Berry Burst and the sentiment from Heartfelt blooms, I stamped the sentiment over the flower image. To give the oval more definition, I simply rubbed the Smoky Slate Classic Stampin’ Pad around the edge, making a nice, even, narrow band of gray. This was adhered to a Berry Burst scalloped Layering Ovals die-cut. Using Stampin’ Dimensionals I adhered this layered oval to the card front.

For the inside, I again stamped the floral image in Smoky Slate on Smoky Slate card stock, this time placing it more in the corner. Then, leaving room for my sentiment, I stamped the corners of my panel with the floral image.

wild wing creations-4

The sentiment is from Heartfelt Sympathy and is stamped in Berry Burst. This panel was adhered to a Berry Burst mat and into the card base.

For the Whisper White Medium Envelope, I stamped the floral image in Smoky Slate twice on the flap and just in the corner on the front.

I need to state here that, while it is not so obvious on the gray, the imperfections of this stamp took on Huge Proportions when it was stamped on white. I kept trying to get a good image, and finally realized that the stamp had holes in it. This prevented a clear image no matter what I did. The more I stamped, the worse it got!

Stampin’ Up! stands behind their products, and, while it doesn’t often happen (this is the first problem I have had), there are times when an imperfect product is shipped. Before I got off the phone with their support team, a new stamp was on its way to replace the faulty one.

I debated about showing the envelope on this blog, but I think you all need to know that this company does indeed stand behind their products and will replace a bad one. I think this is the third envelope I did, and I am not proud of it. The recipient of this card may get a naked envelope!

wild wing creations-2

wild wing creations-1

HOST CODE: 4USUHDHC

If you apply that Host Code to your online orders under $150, youā€™ll get a free gift from me. If your order is over $150, please donā€™t apply the hostess code (youā€™ll miss out on your own Stampinā€™ Rewards/Host $$ if you use it), but youā€™ll still get the free gift, too!

In addition, you can earn Wild Wing Creations Bird Egg Rewards! The Wild Birds Club is a way to earn free stamps and merchandise when you order Stampinā€™ Up products with me. Placing qualified orders or referring friends who place a qualifying order will earn you Bird Egg Points.

For more details on the my customer rewards, click here.

Also, with a $50 order placed through my online store in January, you get my Sure Do Love You Class Tutorials. This is in addition to the other goodies you can earn.

January Card Class Tutorials

Sure-Do-Love-You-Collage tutorial image

Card Cuts: Smoky Slate: card base 5-1/2″ x 8-1/2″, floral panels front and inside 3-7/8″ x 5-1/8″; Berry Burst: mats 4″ x 5-1/4″, scalloped oval 3″ x 3-3/4″; Whisper White: sentiment oval 2-1/2″ x 3-1/2″

Product List

sympathy, Uncategorized

Stampin’ Up! Hold on to Hope Sympathy

The new Hold on to Hope Bundle (Occasions Catalog page 27, available tomorrow) was the basis for this card inspired by Mary over at Stamps ‘n’ Lingers. You can see her card here.

This is a beautiful stamp set and has excellent dies as well. It will become a staple for me. And, it is very versatile, could be used for Baptisms, confirmations, encouragement, Easter….the list goes on.

wild wing creations-4

I began with a panel of Whisper White card stock and So Saffron, Melon Mambo, Pool Party, and Night of Navy inks, sponging the colors randomly for my background.

The card base is Pool Party and the mat is Night of Navy.

Using the dies from the Hold on to Hope Bundle I die cut a Night of Navy cross and an openwork cross in Whisper White, adhering them together with Liquid Glue. Behind the cross is a die cut from Flourish Thinlits, also in Whisper White, and adhered to the sponged panel with Liquid Glue. The layered cross is adhered with Stampin’ Dimensionals.

The sentiment is from Thoughts and Prayers stamp set, stamped in Night of Navy on Whisper White. It is punched with the Everyday Label Punch, with the outer long edges trimmed off with my Paper Snips Scissors. It was just too wide for this card. Using the Melon Mambo and Night of Navy sponges, I sponged the edges of the sentiment label. I used whatever ink remained in the sponge and did not re-ink.

wild wing creations-1

This, too, was attached with Stampin’ Dimensionals. The Hold on to Hope butterfly is stamped in Pacific Point (I thought the Pool Party would be too pale) and cut with the die from the bundle. Liquid Glue adheres the art panel to the mat and into the card base.

On the inside, a stamped-off-once flower spray, also from Hold on to Hope, in Pacific Point serves as a backdrop for the Heartfelt Sympathy sentiment in Night of Navy. I inked the flower spray, stamped it off, then wiped off the three flowers and inked them with my light Rich Razzleberry Blends, then stamped my Whisper White panel.

wild wing creations-5

I like this little added touch of color. You could use a Melon Mambo Stampin’ Write Marker, and I probably would have, if I had had my markers available at the time.

Using the little corner stamp in Hold on to Hope, I stamped the corners of the inside of the card base in Night of Navy, wishing I had the Stamp-A-Ratus to get the placement perfect. But, I don’t, so they are not exactly where I wanted them.

For the Whisper White Medium Envelope, I stamped the little butterfly several times in Night of Navy on the front

wild wing creations-2

and a pair of the same flower spray as on the inside, only in Night of Navy, on the flap.

wild wing creations-3

I know you will get a lot of good from this Bundle, a must have, in my opinion.

Card Cuts below

HOST CODE: 4USUHDHC

If you apply that Host Code to your online orders under $150, youā€™ll get a free gift from me. If your order is over $150, please donā€™t apply the host code (youā€™ll miss out on your own Stampinā€™ Rewards/Host $$ if you use it), but youā€™ll still get the free gift, too!

Wild Wing Creations Bird Egg Rewards:

Bird Egg Rewards

Qualify to earn FREE Stampinā€™ Up! product from ANY current Stampinā€™ Up! catalog or promotion! Ā The Wild Wing Creations Bird Eggs Rewards Program is my way of personally saying ā€œthank youā€ to my returning customers.

With a $50 order placed through my online store in January, you get my Sure Do Love You Class Tutorials. You also earn Bird Egg Reward Points (see the information below) and if you apply the Host Code or have an order of over $150, you get the free thank you gift too!!

Sure-Do-Love-You-Collage tutorial image

For more information on rewards, click here.

Card Cuts: Pool Party: card base 5-1/2″ x 8-1/2″ scored at 4-1/4″; Night of Navy: front mat 4-1/8″ x 5-3/8″, inside 3-5/8″ x 4-7/8″, cross 2″ x 3″; Whisper White: panel to sponge 4″ x 5-1/4″, inside panel 3-1/4″ x 5-1/2″, cross, sentiment, flourish, butterfly 3-1/2″ x 8-1/2″

Product List

Uncategorized

Stampin’ Up! Sheltering Tree Leaf

Good Friday the 13th Everyone! I am not superstitious. Are you? It is just another day.

I do have another sympathy card to show today. There has been WAY too much need for these this year. And, they are not all old people either.

I kept it very simple this time. Starting with a Pear Pzazz card base, I die cut a maple leaf with the leaflets framelits from scrap paper and used the negative as a stencil. Using some Post-it tape, I taped it to the card base and sponged the leaf with Always Artichoke, Crushed Curry, Pumpkin Pie and Soft Suede. Then I inked up the bare tree from Sheltering Tree stamp set in Soft Suede and stamped over the leaf, lining up the trunk with the leaf stem. As the stamp set is photopolymer, it is easy to line it up with another image.

front

Next was the hard part…die cutting the same leaf out of my card front so that it was in the same position as the leaf. I did some measuring, re-measuring and marked lightly on a used piece of card stock the same size as my card front. It was off to the left a bit, so I measured again, and took my chances with the Very Vanilla panel for my card front. It is off just slightly to the lower end, but not enough to concern me. It would have been easier to cut the card front first, mark the opening, then sponge the card base. However, what I ended up doing was not what I started to do, so I did it backwards.

Using a sponge dauber I inked around the edge of the leaf and the edges of the panel in Pear Pzazz, then liquid glued it over the card front.

detail

Using a scrap from cutting the card base, I stamped my sentiment in Pear Pzazz, then liquid glued it to the panel. The sentiment is one I have had a long time, and don’t remember where I got it, nor the company. To finish it, I used a metal leaf brad on the sentiment strip.

On the inside liner I again used the sponge dauber and Pear Pzazz ink to soften the edges, then stamped the tree in the corner, again with Pear Pzazz. The sentiment is from Thoughts and Prayers stamp set and is stamped in Soft Suede.

inside

The front of the envelope is done with a soft suede tree, while the flap was finished with 3 of the spongedĀ  and stamped leaves, done the same way as the front of the card.

envelope front

flap

I do like this technique of sponging, then stamping over the sponging for a different look.

If you do not have a demonstrator, I would be happy to fill that role for you. To order from me, just click on the Order Online button at the right side of this page.

HOST CODE OCTOBER 1-15…2HRMVCPM

If you apply that Hostess Code to your online orders under $150, youā€™ll get a free gift from me. If your order is over $150, please donā€™t apply the hostess code (youā€™ll miss out on your own Stampinā€™ Rewards/Hostess $$ if you use it), but youā€™ll still get the free gift, too!

Wild Wing Creations Bird Egg Rewards:

Bird Egg Rewards

Qualify to earn FREE Stampinā€™ Up! product from ANY current Stampinā€™ Up! catalog or promotion! Ā The Wild Wing Creations Bird Eggs Rewards Program is my way of personally saying ā€œthank youā€ to my returning customers.

Card Cuts: Pear Pzazz: card base 7″ x 10″ scored at 5″, sentiment strip 1″ x 4-3/4″; Very Vanilla: front panel 4-7/8″ x 6-7/8″, inside liner 4-3/4″ x 6-3/4″

Product List

Uncategorized

Inked Inlay

I hope you all are having a tremendous Thursday. I am not complaining today…about anything.

At the moment the sun is shining. It is pretty breezy and a little on the warm side for September and (almost) the first day of fall. Most yearsĀ  the autumn equinox falls on September 21, but this year it is September 22, which is tomorrow. Good Grief! Where has this month gone? Wasn’t it just a couple of days ago we had Labor Day?

The best part of today is that a little line of storms went through yesterday evening and missed us altogether. That was followed by another thin line that dropped a couple of sprinkles. After that, another one formed then sort of fell apart, re-formed and we actually got a nice shower out of it. If you keep up with the weather aside from where you are, you know we are desperate for moisture. Well! That little shower re-developed and just hung over us all night, including lightning and thunder. I so enjoyed it!

This morning I dodged raindrops to see how much actually made it into my rain gauge. Holy Smokes! 4.4″! That surpassed what we had received all summer! Does this have anything to do with cards? Nope! I am just so happy that we got some rain that I had to share.

Now, on with the card.

wild wing creations5

Today is Technique Thursday. I saw this technique some time ago on a You Tube video, and recently ran across it again. This one was done by Jennifer McGuire and you can see it here. I was fascinated by the process and loved the finished card. Today I needed to make a sympathy card, so follow along to see how I did it.

I first cut two pieces of Whisper White card stock the size I would need knowing I would mat it before attaching to the card base. There are two ways of inking one of these, leaving one of them white. First, you can sponge, spray, dab, or whatever method you use to ink a background onto the whole piece. The second way is to die cut, then ink your paper.

I chose to die cut first then ink. Here is what I did:

I arranged my Flourish Thinlits die on the Whisper White card stock. I used both the large and small flourishes, cutting them at the same time using the Big Shot and the Precision Base Plate. This is an optional accessory to your Big Shot, and well worth it for detailed die cutting. I repeated the process with the second piece of card stock. To hold the small pieces in place, still in the background piece, while I inked it, I taped some Post-it Note tape over the back. This held everything in its original place. Just do this on one of your die cut pieces.

Since I wanted a soft look to the inlay, I chose to use the Distress Oxide inks again, randomly sponging over the die cut designs. I spritzed it with water, used the heat tool to dry it, then added more color and wet it again. After two or three layers I thought that was enough color and proceeded with the inlay.wild wing creations2

After removing the die cut design from the second piece, (remember, this is still white) I placed a piece of Multi-purpose Adhesive Sheets on the back of the Whisper White negative space, using the release sheet under my card stockĀ  to prevent the adhesive sticking to the grid paper underneath my card stock. I flipped it over and, using the inked die cut design, placed it in the white negative space like I was putting together a puzzle.

My white die cut design still had all the little pieces in the leaves and flowers, so I simply laid it over the inked piece, and using my piercing tool, pushed them down into the corresponding holes below.wild wing creations1

This is SO easy to do and results in a very nice finished product. If you use a design with a lot of little pieces, it can be tedious, but not difficult. Instead of inking, you could glue some DSP to card stock, and cut the design from that. All kinds of possibilities open up with this technique. You could use words, glitter paper, the sky is probably the limit, or at least, whatever you can imagine.

I stamped the sentiment, from Flourishing Phrases in Faded Jeans Distress OxideĀ  and immediately slipped it into my Clear Emboss powder, then used the heat tool to emboss.

This finished panel was liquid glued to a mat of Pool Party and the front is finished. No frills, no glitz. Liquid Glue adhered it to the Dapper Denim card base.

For the inside sentiment panel, I stamped another sentiment from Flourishing Phrases in Faded Jeans in the lower right corner, and heat embossed the same as the front. I wanted to leave room for the white left-over flourish design, which I adhered to the piece of Pool Party, stamped with my sentiment, with liquid glue. This was then liquid glued this to a mat of Whisper White and into my Dapper Denim card base.

wild wing creations6

I hope you like this card enough to try this technique. It is fun and yields a different look than just gluing everything on top of card stock.

The envelope is stamped on the front with the same flourish design, using the stamp from Flourishing Phrases. I inked it with my Stampin’ Write markers in Dapper Denim, Pool Party, Blushing Bride, Perfect Plum and Mint Macaron.

wild wing creations4

Using those same markers, I did a striped effect on a piece of Whisper White card stock, then used my Aqua-painter to blend the colors a bit. When it was dry, I randomly stamped some leaves in Dapper Denim using the leaf stamp in the Flourishing Phrases set. This was liquid glued to the flap and trimmed.

wild wing creations3

Thank you for stopping by. I would like to see your comments on this technique. Just scroll down to where it says comment.

Card Cuts: Dapper Denim: card base 4-1/4″ x 5-1/2″; Whisper White: Inlay panels (2) 4″ x 5-1/4″, inside mat 4-1/8″ x 5-3/8″; Pool Party:Ā front mat 4-1/8″ x 5-3/8″, inside sentiment panel 3-7/8″ x 5-1/8″

Non Stampin’ Up! products used Ranger Distress Oxide Inks

HOST CODE good through September 30 NB7HX2ST

If you apply that Host Code to your online orders under $150, youā€™ll get a free gift from me. If your order is over $150, please donā€™t apply the hostess code (youā€™ll miss out on your own Stampinā€™ Rewards/Hostess $$ if you use it), but youā€™ll still get the free gift, too!

Wild Wing Creations Bird Egg Rewards:

Bird Egg Rewards

Qualify to earn FREE Stampinā€™ Up! product from ANY current Stampinā€™ Up! catalog or promotion! Ā The Wild Wing Creations Bird Eggs Rewards Program is my way of personally saying ā€œthank youā€ to my returning customers.

For details on the rewards programs click here

September Card Class Tutorials

septembercollage

With a $50 order placed through my online store in September, you get my Painted Harvest Class Tutorials. You also earn Bird Egg Reward Points (see the information below) and if you apply the Host Code or have an order of over $150, you get the free thank you gift too!!

Product List

Uncategorized

Fall Sympathy card

Well, folks, here it is Sunday and I actually had time to finish helping yesterday with the pancake feed and get home to work on this post. We served over 1,800 pancake and sausageĀ  breakfasts. Though the tent was still up, things were pretty much torn down when I left. With what remained to be done, I figured I would be more in the way than I would be help. I think all us Kiwanians were tired to the bone, but the day was a success.

This is the second iteration of this card. The first one had REAL twigs framing the oak tree. I really liked it and thought I was being pretty smart in thinking of that. Then, I thought, “that isn’t so smart. How will that fit in an envelope, never mind get through the mail without being ruined. ” So, I opted for the twigs from the Seasonal Layers thinlits, cut from Early Espresso card stock. However, the first one will be saved to use on a gift package for someone, or whatever use I can find for it.

wild wing creations4

I started with a piece of Sahara Sand and ran it through the Big Shot with the Pinewood Planks dynamic embossing folder. From this I cut a rectangle, using the Layering Squares framelits. To cut a rectangle with a square die, all you need to do is cut one square at one end of your panel, slide it toward the other end, keeping the die lined up, and cut the other end of your rectangle.

Then, cutting a piece of Sahara Sand slightly smaller than the embossed piece, I stamped this with the oak tree from Lovely As A Tree in Early Espresso. These two panels were liquid glued together.

The card base is Early Espresso, and the next two layers are Sahara Sand and a panel from the Painted Autumn Designer Paper Series. The mat and DSP panel are liquid glued together.

Four branches from the Seasonal Layers thinlits in Early Espresso form the frame around the rectangle. Seasonal Layers and Colorful Seasons form a bundle that saves you 10% over purchasing them separately.

Since I was not using real twigs, I decided to cut four more out of fun foam to lift them off the page and give some dimension. After gluing them together with their card stock counterpart, I dry arranged them on the card front. I didn’t want four look-alike branches, so each was trimmed in a different way and liquid glued to the art panel. This, in turn, was added to the DSP panel with Stampin’ Dimensionals.

wild wing creations6

At this point in the construction, I decided a little fall color would be good, so I stamped the oak leaf cluster from Lovely As A Tree, and the one with the acorns from Count My Blessings, both in Early Espresso. I already had my heat gun and tub of Clear Emboss Powder ready. As soon as I stamped, I dipped it in the emboss powder, shook it off and heat embossed those leaves. I only did one cluster at a time, as the Early Espresso dries much more quickly than the Versamark.

Since the embossing acts as a resist, it was a simple matter to use a small piece of sponge and sponge the leaves with Cajun Craze, Crushed Curry and Pumpkin Pie, first masking off the acorns. I then masked off the leaves with a piece of Post-it-Note and sponged the acorns in Soft Suede.

Both leaf clusters were fussy cut, then adhered to the corners of the branch frame with Stampin’ Dimensionals. This art panel was then adhered with Stampin’ Dimensionals to the DSP panel.

wild wing creations1

Sometimes I don’t know when to quit. I wrapped a piece of fine, lightweight jute twine I had in my craft room (you could use Linen Thread) around the panel 3 times, securing it on the back with tape. Glue Dots hold the 3 strands together as though they are tied, and a bow is Glue Dotted over this. The bow is made by wrapping the twine around 3 fingers 5 times (or as many times as you want) and tied in the middle.

Now all that remains is the sentiment. I wanted it to look like an old board. The sentiment, in Early Espresso, was stamped from the Teeny Tiny Wishes stamp set on a scrap of the embossed Sahara Sand (made when I cut the rectangle). This was fussy cut to, perhaps, look like an old board. The mat for this was another scrap, this time from the Wood Textures DSP, with notches cut unevenly in both ends with my Paper Snips. Mini-Stampin’ Dimensionals attach the sign to the mat, and Stampin’ Dimensionals were used for the mat to the front panel. After it was too late to do so, I wondered if this card would have been improved had I very lightly distressed the embossed wood, perhaps by sponging some ink over it. However, I didn’t, so maybe that technique will get a chance on another card.

More Stampin’ Dimensionals (Wow! Wish I had stock in the company that makes these!) adhered the finished panel to the card base and the card front is done.

The inside boasts a mat of Sahara Sand with a panel of the same Autumn Harvest DSP liquid glued to it.

wild wing creations5

I cut a much smaller mat of Sahara Sand, and stamped the branches from Colorful Seasons around it as a frame in Early Espresso. The Oak Cluster from Count My Blessings was stamped in the corner in Soft Suede, and colored in using the stamp pad lid and Blender Pen. In the closed position, squeeze the stamp pad to get some of the ink on the lid, then use that as your palette with your Blender Pen to paint the leaves and acorns. I again used Cajun Craze, Crushed Curry and Pumpkin Pie for the leaves, and Soft Suede for the acorns.

The sentiment, in Early Espresso, is from the Thoughts and Prayers stamp set. This panel was liquid glued on the DSP and into the card base.

To coordinate the envelope with the card, I stamped several of the oak/acorn cluster along the bottom of the front, and adhered a final piece of the DSP to the flap.

I hope you enjoy this card. I think it is lovely and sure to lift anyone’s spirits. To me, the oak is symbolic of longevity. We all know that longevity on this earth is not forever, but the spirit lives on, making the oak appropriate for a sympathy card.

HOST CODE for September 16-30 is NB7HX2ST

If you apply that Host Code to your online orders under $150, youā€™ll get a free gift from me. If your order is over $150, please donā€™t apply the hostess code (youā€™ll miss out on your own Stampinā€™ Rewards/Hostess $$ if you use it), but youā€™ll still get the free gift, too!

Wild Wing Creations Bird Egg Rewards:

Bird Egg Rewards

Qualify to earn FREE Stampinā€™ Up! product from ANY current Stampinā€™ Up! catalog or promotion! Ā The Wild Wing Creations Bird Eggs Rewards Program is my way of personally saying ā€œthank youā€ to my returning customers.

For details on both rewards, and the free tutorials, click here.

September Card Class Tutorials

septembercollage

With a $50 order placed through my online store in September, you get my Painted Harvest Class Tutorials. You also earn Bird Egg Reward Points (see the information below) and if you apply the Host Code or have an order of over $150, you get the free thank you gift too!!

Card Cuts: Early Espresso: card base 7″ x 10″ scored at 5″, branches 2 pieces 1-1/2″ x 8-1/2″; Sahara Sand: inside mat and outside mat (2) 4-3/4″ x 6-3/4″, embossed panel 3-3/4″ x 5-3/4″, oak tree panel 3-1/2″ c 5-1/4″, inside panel 3-1/2″ x 5″, sentiment ‘sign’ scrap from inside rectangle of embossed piece, for oak leaves 4″ x 4″; Autumn Harvest Designer Series Paper: front panel and inside mat (2) 4-1/2″ x 6-1/2″; Wood Textures Designer Series Paper: mat for sentiment 1″ x 2-1/2″

Non Stampin’ Up! products used in this project: Fun Foam, thin jute twine, Kraft 5-1/4″ x 7-1/4″ envelope

Product List


Ā 

Product List

Uncategorized

Medallions for Sympathy

Good Day Everyone! What a Fabulous Friday it is.

I began this sympathy card with absolutely no idea what to do. After looking at my paper stacks I settled on Night of Navy for the card base and the card just made itself.

I didn’t want fussy, just classy, so I paired it with Smokey Slate and Very Vanilla; no bling, no embossing, no ribbons and bows.

This is the result.

Front

Card Cuts at the end of this post.

First cut the card base from Night of Navy card stock using my Stampin’ Trimmer. The first mat is Smokey Slate card stock and the top mat is Night of Navy. The mat in between is Very Vanilla card stock stamped with an old background stamp in Night of Navy. This stamp has a sort of Eastern Medallion look to it.

The medallion is cut with the Eastern Medallions thinlits from Very Vanilla card stock, as are the two pieces with sentiments. The sympathy piece is stamped with Night of Navy Classic Stampin’ pad using a Gina K stamp. I like the font and it was the exact size needed for this project. The sending thoughts sentiment is from the Thoughts and Prayers set, again, stamped in Night of Navy. I used my Stamp-A-Ma-Jig to line up all the sentiments.

The Sympathy sentiment is glued to the medallion which is adhered to the Navy mat with mini stampin’ dimensionals. Sending thoughts is glued to the navy mat below the medallion and the finished art piece is adhered to the stamped mat. This is then glued to the Smokey Gray mat. The card front is now finished.

On the inside I again used the Smokey Gray card stock as the mat, with the sentiment piece in Very Vanilla. To dress up the sentiment piece without overdoing it, I used my Simply Scored board and the stylus to emboss a border around all 4 sides, crossing the lines at the corners. It is a little hard to see in the photo, but I think you can discern where it is. I did this from the back side as I didn’t want a debossed look. Using the sentiment from Strength and Prayers stamp set (retired), and Night of Navy ink, I completed the sentiment.inside

This was glued to the Smokey Gray mat and into the card base.

I then attached the card front and the card is complete.

On to the envelope! Using a medium Very Vanilla envelope I inked up part of the background stamp in Night of Navy and stamped the flap.

envelope flap

On the front corner I stamped the little corner design from the Make A Medallion stamp set. Then, I mirror imaged it and stamped it again. This finishes the envelope.envelope front

I think it turned out quite well, considering I had no design in mind when I started.

I hope you like it and if you need supplies, please contact your demonstrator. If you don’t have one, I would be very happy to help you. Just click on the ‘shop online with me’ button at right to go to my store. Thanks for stopping by!

Card Cuts:Ā  Night of Navy: card base 5-1/2″ x 8-1/2″, scored at 4-1/4″, 3-1/2″ x 4-3/4″; Ā Ā Ā Ā Ā Ā  Smokey Gray:Ā  (2) 4″ x 5-1/4″; Very Vanilla: (2) 3-3/4″ x 5″, medallion 3″ square, sentiment 5/8″ x 3-1/2″, sentment 1-1/4″ x 3-1/4″.

Product List

Save