Uncategorized

Stampin’ Up Beauty Abounds with Butterflies

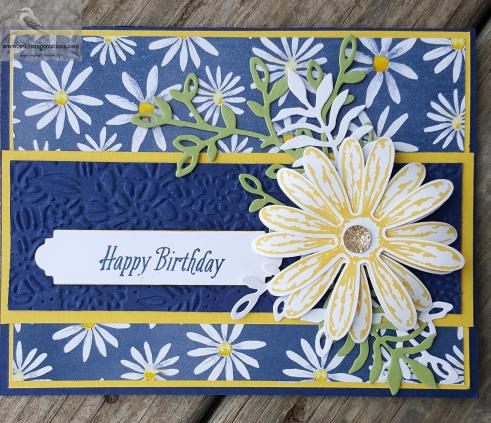
Good Wednesday, or Hump Day, if you prefer. I have need of several cards this month. A lot of birthdays and a few sympathy cards are in order. Today is another birthday for a 93 year old.

4

I think this is a lovely card, but it is not my own design. Jan Brown, Stampin’ Up! demonstrator in the UK posted this and did a video on it. I used different colors and sentiments, but the basic idea is the same. If you want to see the video, just click here.

I began with a Whisper White card base, a Night of Navy mat and Whisper White for the artwork.

I began by cutting all the panels, then stamped the floral image from Beauty Abounds in Memento Tuxedo Black. I taped of one end, inked the stamp, removed the tape and stamped  the image diagonally across the paper. Repeat this for the other end.

4

Ink the sentiment from Butterfly Gala and stamp the upper right corner. Ink the Happy Birthday sentiment from Beautiful Bouquet and stamp the lower left side. All stamping is done with Memento Tuxedo Black.

Using my Basic Black Stampin’ Write Marker, I made some little dots in the center where the stamps nearly met, so that if someone looks under the butterfly they will see little dots. While this was drying I stamped two of the double butterfly images from Butterfly Gala in Memento Tuxedo Black also.

Stampin’ Blends were great for coloring the image. I used Light Granny Apple Green for the leaves and flourishes and Dark Balmy Blue for the flowers. Since these are small images, I did not do any blending.

1

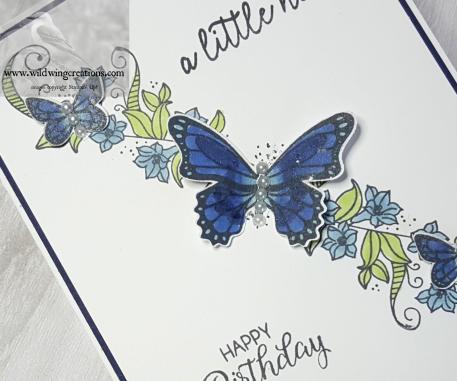
Now to color the butterflies. I first used Memento Tuxedo Black to stamp their bodies, then used Light and Dark Balmy Blue and Light and Dark Night of Navy, beginning next to the body with the lightest color and moving outward and darker, blending as you go. the last color was the Dark Balmy Blue next to the Dark Night of Navy. The little dots at the outer edge of the wings are then filled in with Light Balmy Blue. I  spritzed all the butterflies with some Imagine Crafts Sheer Shimmer Silver Spray to add a little sheen. Probably some Wink of Stella would do about the same thing.

Fold the wings next to the bodies, add some Liquid Glue and adhere to the card front. Some Pearl Basic Jewels finishes them nicely.

Inside, I stamped the sentiment in Memento Tuxedo Black from Stitched All Around.  The other large butterfly was Liquid Glued at the body. To this one I added the antennae. I didn’t think the front ones needed them as it was already pretty busy and thought the antennae might be confusing or distracting.

5

The envelope was stamped on the front with another large butterfly, taping off the smaller one before inking. It was then colored the same as the ones on the card. Be sure when using Stampin’ Blends on the envelope that you slip a scrap of card stock or something inside the envelope as the Blends do bleed through.

2

The flap was finished with a strip of the Night of Navy dots from the 6″ x 6″ Subtles Designer Series paper.

3

I hope you like this card. I think it is lovely and not difficult at all.

CARD CUTS: Whisper White: card base 5-1/2″ x 8-1/2″ scored at 4-1/4″, art panel 4″ x 5-1/4″, inside liner 4″ x 5-1/4″,  butterflies, scrap at least 3″ x 4-1/2″; Night of Navy: outside and inside mats 3-7/8″ x 5-1/8″; 6″ x 6″ Subtles Designer Series Paper in Navy: envelope flap 2-1/4″ x 5-1/2″.

Product List

sympathy

Stampin’ Up! Golden Afternoon for Happy Inkin’ Thursday Blog Hop

Good morning All! We are still in the deep freeze, though the freeze isn’t as deep as it was earlier in the week. It seems that whenever it warms up a bit we get more snow. We shall see if the predicted amount happens today. But, it IS March, which means that spring can’t be too far away. Oh, and by the way, just in case you haven’t heard, this weekend is the time to turn your clocks forward. Already???

My card for today is one of the unfortunate ones we all have to make from time to time….sympathy. Two friends  lost their fathers this past week, so I have been in the sympathetic mode. What better stamp set to use than Golden Afternoon? It has both as quiet scene and great sentiments for the purpose.

Our hop challenge today is color, also perfect for a sympathy card:

And here is the card I created

4

This is without a doubt the easiest card I have ever made. It is truly simple, and quick to make. Only one stamp set, no dies and two inks. Easy Peasy.

I began with a Night of Navy card base, a mat of Balmy Blue and an art piece in Whisper White. I stamped the large tree from Golden Afternoon in night of Navy, the birds in flight in Balmy Blue, and the sentiment also in Balmy Blue.

1

This was adhered to the Balmy Blue mat with Liquid Glue and Stampin’ Dimensionals adhered this card front to the card base.

On the inside, I used the same Balmy Blue mat, and liner in Whisper White. I wanted room to write, so I only stamped some Balmy Blue birds, or would that be Balmy Bluebirds?? Just kidding.

5

Liquid Glue was used for adhesion of both pieces.

The envelope got the small tree from the stamp set in Night of Navy ink, with more of those Balmy Blue birds on the flap.


See, I told you it was easy.  Now on with the hop. Our very creative team will no doubt have some wonderful projects for you. Clicking the ‘next’ button will take you to the uber creative Eve, but you can click on any name to just hop around.

Amy Koenders

Shelagh Freemantle

Mary Deatherage

Kristi Gray

Jaimie Babarczy

Sue Prather

Karen Finkle

Julie Johnston – You are Here

Eva Dobilas

CARD CUTS: Night of Navy: card base 5-1/2″ x 8-1/2″ scored at 4-1/4″; Balmy Blue: front mat and inside mat 4″ x 5-1/4″; Whisper White: front art piece 3-7/8″ x 5-1/8″, inside liner 3-3/4″ x 5″

Product List

Uncategorized

Stampin’ Up! Rooted in Nature Congratulations for Happy Inkin’ Thursday Blog Hop

Blog hop header

Good Thursday to you all. Time for another Happy Inkin’ Thursday Blog Hop with my friends and teammates. Start hopping to see what wonders they all have for you. Today we are working with a color challenge. color challenge

Here is the card I created using these parameters.

4

I began with a Night of Navy card base. This is a top fold card. Using the Rooted in Nature large tree and Call Me Clover Classic Stampin’ Pad, I stamped the image near the bottom of the whitewashed Wood Textures Designer Series Paper Pack.

I adhered this to a Call Me Clover mat, but instead of centering it on the mat, I placed the top edges even, just for something different. Who says everything has to be straight and centered all the time? It is straight, and it is centered side to side. I like the way this looks for a top fold card. My friend Mary likes all the border edges the same, and usually, I do also. However, on this top fold, I like the larger border at the bottom and none at the top.

With my Banners For You stamp set, I stamped the sentiment in Lovely Lipstick, and the border in Night of Navy. This was stamped on the strip I had cut off the Wood Textures Designer Series Paper. Using a scrap of Call Me Clover and two dies from the Rooted in Nature Bundle, I embossed and cut a triple leaf design, then liquid glued it under the sentiment. Stampin’ Dimensionals were used to mount this on the card front.

1

To finish, I made a loopy bow with Linen Thread and adhered it to the sentiment with a Glue Dot.

For the inside, another panel of Wood Textures DSP was stamped in the corners with the triple leaf from Rooted in Nature in Call Me Clover . The sentiment is in Lovely Lipstick with a stamp from Needle and Thread. A Call Me Clover mat is adhered with Liquid Glue and the whole thing into the card base.

5

This card is destined for a middle school aged young man who earned an outstanding student award recently. I think this sentiment sends a perfect message to a special young person.

At this point, I thought it looked a little plain, so I added some ‘stitch’ marks in Night of Navy around the edge, then added a few more to the front of the card.

The envelope has a Call Me Clover big tree on the front, and randomly stamped triple leaves on the flap. I deliberately kept the leaves inside the edges so I could add more ‘stitches’ around the edge of the flap. I did not put them on the front as I decided that would be a bit of overkill.

I hope you like this card and our colors today. Now on with the hop! Just click the ‘Next’ button to continue the hop to see what the uber creative Eva has done for you.

Blog hop next button

Amy Koenders

Shelagh Freemantle

Mary Deatherage

Kristi Gray

Jaimie Babarczy

Sue Prather

Karen Finkle

Julie Johnston – You are Here

Eva Dobilas

CARD CUTS: Night of Navy: 4-1/4″ x 11″ scored at 5-1/2″; Call Me Clover: front mat 4-1/8″ x 5-3/8″, inside mat 4″ x 5-1/4″, leaf 2″ x 2″; Wood Textures Designer Series Paper Pack: front and inside liner 3-3/4″ x 5″, banner scrap from trimming the front.

Product List

Uncategorized

Stampin’ Up Still Night for Happy Inkin’ Thursday Blog Hop

Blog hop headerI hope you have a Tremendous Thursday, Everyone! It is much cooler now, feels like it is supposed to feel near the middle of October. For me, that is tremendous! I know the farmers are getting anxious to get back to the harvest, but we have had considerable rain. It may have to freeze before they can go.

Today for our hop we have a sketch challenge. This is the sketchsketch

And this is my card.

4

I began by sponging Balmy Blue ink over the Stampin’ Up! side of the Woodland Textured Impressions Embossing Folder, intentionally making it uneven,  then inserted a panel of Whisper White and ran it through the Big Shot. With an Early Espresso Stampin’ Write Marker, I filled in all the marks on the birch trees. This panel was trimmed to fit the Balmy Blue mat . Liquid Glue adhered these together and onto the Night of Navy card base.

Before you criticize my light blue sky and a moon, remember that the moon does not always rise in the dark of night! Besides, card makers have the advantage of using fantasy to make their cards. You might call it ‘artistic license’.

A strip of the white Wood Textures Designer Series Paper Stack (representative of a birch log) backs a flag of Night of Navy.  Pieces of Foam Adhesive Strips back the Wood Textures strip to lift the art off the background1


A Mango Melody moon, cut with the number 6 die in the Layering Circles Framelits (numbered smallest to largest) was smudged with a nearly dry Stampin’ Sponges with just a touch of Smoky Slate. Who ever saw a BRIGHT, CLEAR moon? There are shadows folks.  This was adhered to the Night of Navy flag with Liquid Glue.

The branch and owl from the Still Night Bundle were cut from scraps of Wood Textures DSP, the owl in a light shade and the branch in a dark one. The left side of the branch was cut off and Liquid Glue adhered it to the lower part of the branch, dipping downward.  This branch was adhered to the moon with more Liquid Glue, leaving the ends free.

The owl was stamped in Early Espresso on the light colored wood with the grain vertical to represent feathers. I colored in the owl’s eyes with my Dark Daffodil Delight Stampin’ Blends marker. Two more owl shapes were cut from Mango Melody to layer the owl for definition. These were stuck together with Liquid Glue, and the Wood Textures owl glued to this stack, with more Liquid Glue to attach it to the moon.

This will be a birthday card for a man. The inside sentiment from Country Road was stamped in Night of Navy on the white Wood Textures DSP. The owl was stamped off twice Early Espresso before stamping the sentiment panel.

5

The envelope flap has yet another owl on a branch, while the owl is stamped again on the front of the Whisper White envelope. Both owls and branch are stamped in Soft Suede. The one on the flap was stamped on a scrap of Very Vanilla card stock, colored with Stampin’ Blends, die cut and adhered to the flap. Blends used were Light and Dark Crumb Cake, Pumpkin Pie and Dark Daffodil Delight.

3

2

Now, on with the hop. Just click the ‘next’ button to go to Amy’s blog to see what fantastic creation she has to share. Card cuts and products needed for this card are below. Please leave a comment.

Blog hop next button

Amy Koenders

Shelagh Freemantle

Mary Deatherage

Kristi Gray

Jaimie Babarczy

Sue Prather

Karen Finkle

Julie Johnston – you are here

Host Code: EV7ETS99 good through the end of October.

If you would like to order any of the products used in this card, or any other products, please click on the ‘shop online with me’ button at right. Purchases, before tax and shipping, of $50-$149.99 qualify for a free gift from me if you use the host code. For orders over $150, do NOT use the host code. You will still get the free gift, as well as any rewards available from Stampin’ Up!. Using the host code for larger orders will nullify those Stampin’ Up! rewards. Details on my customer loyalty program can be found here.

CARD CUTS: Night of Navy: card base 5-1/2″ x 8-1/2″ scored at 4-1/4″, flag 1-1-2″ x 4-1/2″;  Balmy Blue: cut 2 mats 4″ x 5-1/4″; Whisper White: 4-1/2″ x 6″ embossed and trimmed to 3-7/8″ x 5-1/8″; Wood Textures Designer Series Paper Stack: dark wood for branch 3-1/2″ x 4″, light wood for owl 1-1/2″ x 2-1/2″,  inside liner 3-3/4″ x 5″, white wood for ‘log’ strip on front 3/4″ x 4-3/4″ (this from what is left after cutting inside liner); Mango Melody: moon 3″ x 3″, owls 2-1/2′ x 3″

Product List

Uncategorized

Happy Inkin’ Thursday Blog Hop with Delightful Daisies

Blog hop headerGood morning, All! Well, I think we have finally turned a corner on the seasons. After snow on Sunday we have seen temperatures about 20 degrees below normal….until yesterday. Now, we are approaching temps where they should be for this time of year. The farmers around here are happy for that, as they are 2-3 weeks behind in their spring work.

That said, let’s get on with the hop. Today our Inkin’ Krew  has a full slate of talented hoppers, and many lovely projects for you.

Our hop this week is based on this sketch.

april 12 challenge

And this is the card I created. This is such a cheerful, happy card! it is sure to brighten someone’s day.

wild wing creations-4

I began with a Night of Navy card base and added a mat of Daffodil Delight. Over this I added a panel of Delightful Daisy Designer Series Paper. Then the fun began.

A strip of Night of Navy card stock run through the Big Shot in one of the Petal Pair embossing folders, forms the background for the focal point. This was matted to another panel of Daffodil Delight. Liquid Glue adhered them to each other and to the card base.

Using the Daffodil Delight Classic Stampin’ Pad, I stamped 4 daisies and punched them out with the coordinating punch. This punch is included in the Daisy Delight Bundle, allowing you to save 10% over the individual prices.

wild wing creations-6

With my bone folder, I curved the petals of each daisy, then Liquid Glued them together, offsetting the petals a bit with each layer. I only used 3 of the punched out daisies. I will use the other one on another project.

With the Petal Palette Bundle, you also get the Petals and More Thinlits, also at a 10% discount, and I used the leafy branch to cut a couple of branches to go behind my daisy. I cut one in Pear Pzazz and one in Whisper White. I also cut one in Vellum, but decided I wouldn’t use it on this card. But, I saved it!

Anyone who knows me well, knows that I save stuff. I might need it later. Do you do that too? Well, some demonstrators only keep current products, but I keep all the ones I like, and I use them. That said, my other leaf, also cut in Pear Pzazz and Whisper White, is from the Botanical Builders Thinlits, now retired. It was the perfect leaf for this project.

I arranged these behind where I wanted to place the daisy, then Liquid Glued the stem ends under the daisy, leaving the leafy ends free to ‘blow in the breeze’. I did cut apart the Whisper White branch so I could arrange the leaves more effectively.

Over this I attached the assembled daisy with a Stampin’ Dimensional. The daisy is finished with a Faceted Gem.

wild wing creations-1

For the sentiment, I inked the Happy Birthday portion of the sentiment in Avant Garden, (which is also now retired) in Night of Navy and stamped it on Whisper White. I used this sentiment partly for the size and partly for the font. It was perfect for what I wanted the finished project to be. This was die cut using the die from Petals and More Thinlits. After cutting it I edged the sentiment piece with my Daffodil Delight Stampin’ Write Marker, just to give it a little extra Something. This was attached with Stampin’ Dimensionals.

This completes the front of the card.

wild wing creations-5

For the inside, a Night of Navy sentiment from Southern Serenade, which is in the Occasions Catalog is centered on a panel of Whisper White. in each of the four corners, I stamped the small daisy from Daisy Delight in Daffodil Yellow. This panel was Liquid Glued to a mat of Daffodil Yellow and onto a mat of the daisies from the Delightful Daisy DSP. This piece was then liquid glued into the card base.

For the envelope, a strip of the Delightful Daisy DSP covers the flap, and a big Daisy Delight daisy is stamped on the front.

wild wing creations-3

I hope you like this card. I think it is cheerful and fun, and sure to be well received.

If you don’t have a demonstrator, I would be happy to help you with your projects and purchases. You can shop online with me by clicking on the Scissor-tailed Flycatcher button that says ‘shop online with me’. Using the Hostess code earns you a free gift from me. For rewards details, click here

HOSTESS CODE: 4UPWPWTN

There are other freebies to be had, including my April Tutorials using the Cake Soiree stamp set. Just go to the rewards page for details.

Stay tuned as we will soon have more information to share with you about the new catalog that will be available for ordering on June 1. Today will will have information on the retiring list, so be aware and get yours ordered before it is gone. Retiring items are on a ‘while supplies last’ basis.

ON WITH THE HOP! Just click the next button to go to the next hopper, or any individual name to go directly to their blog.

Blog hop next button

Amy Koenders

Shelagh Freemantle

Mary Deatherage

Kristi Gray

Jaimie Babarczy

Sue Prather

Karen Finkle

Julie Johnston-you are here

Card Cuts: Night of Navy: card base 5-1/2″ x 8-1/2″ scored at 4-1/4″, front embossed strip 1-3/4″ x 5-1/4″; Daffodil Delight: front mat 4-1/8″ x 5-3/8″, mat for embossed strip 2″ x 5-1/2″, inside mat 3-3/4″ x 5″; Whisper White: daisies 2-1/2″ x 8-1/2″, sentiment strip front 1″ x 3-1/2″, inside liner 3-3/8″ x 4-1/8″, leaves 3″ x 5″; Pear Pzazz: leaves 3″ x 5″; Delightful Daisy Designer Series Paper: front mat and inside mat 4″ x 5-1/4″, envelope flap 2-1/2″ x 5-5/8″

Product List

Uncategorized

Stampin’ Up! Birthday Pocket

Good Morning All,

Yesterday was a GORGEOUS day in the heartland, or at least the part where I live. 52 degrees, light wind, sunshine and beautiful blue sky. Made a great day for birding with friends. Actually, we were scouting eagle nests, and did a little birding in between. So, no card-making yesterday, and I have a large number to get done today.

Today it is VERY windy and still way above normal temperature wise, so a good day to make cards. On with the show!

This birthday card is for a little cowboy who loves his Wrangler jeans and plaid shirts. He is sure to like this, especially with some spendable green tucked into the pocket.

wild wing creations-3

I started with a Night of Navy card base and fast fused some old plaid paper from days gone by that I found in my scrap stash.

Next, also with a scrap that vaguely resembles old jeans, I stamped the pocket from the Pocketful of Sunshine Bundle in Cajun Craze. Using the straight line piece of ‘stitching’, I stamped the W like is found on Wrangler pockets. It is by no means perfect, but I think you, and my little cowboy, will get it.

Using Cajun Craze card stock and some dies I have had for awhile (pre-Stampin’ Up! days), I cut a square large enough to fit under the pocket. This was lightly sponged around the edges with Cajun Craze ink to give it a more leathery look. The pocket was Liquid Glued to this piece, which was Liquid Glued to the plaid mat.

For the sentiment, from the FREE Sale-A-Bration exclusive Party Pandas stamp set, I stamped it in Night of Navy on another die cut piece of Cajun Craze that was Liquid Glued to a Night of Navy mat. This piece was adhered above the pocket with Liquid Glue.

For the inside, another piece of the plaid served as a mat for yet another panel of lightly sponged Cajun Craze, where I stamped the boots from the Country Livin’ stamp set in Early Espresso. The sentiments,  from Picture Perfect Birthday (Occasions catalog), were also stamped in Early Espresso. To give the boots an ‘old and worn’ look, I used my dark and light Crumb Cake Stampin’ Blends to color them.

wild wing creations-4

This panel was liquid glued to the plaid mat and into the card base and the card is finished.

The envelope, never to remain naked, got a pair of boots stamped on the front in Early Espresso and more of the plaid on the flap.

I had fun with this card, and as usual, wish I could see the face of the recipient when it is opened. This could happen if I hand delivered it, but children like to receive mail, so I always mail them. This is the 9th family birthday this month!

HOST CODE: U77FG3VD (good through January 31)

If you  have visited my blog before, you know that using the host code for any order over $50 placed through me earns rewards. To see the details, go here.

And don’t forget that you also can earn FREE stamps and other goodies for every $50 you spend during Sale-A-Bration.

01.03.17_CMAIN_SAB_US

Card Cuts: Night of Navy: card base 5-1/2″ x 8-1/2″ scored at 4-1/4″; front sentiment mat 1-5/8″ x 3-1/2″ Cajun Craze: mat for pocket 3-1/2″ x 3-1/2″, sentiment panel 1-1/2″ x 3-3/8″, inside panel 3″ x 4″; Plaid paper: front 4″ x 5-1/4″, inside 3-3/4″ x 5″; Blue paper: pocket 3″ x 4″

Non Stampin’ Up! products used: Square dies from Scrapbooking Made Simple, plaid and blue paper from my stash.

Product List

sympathy, Uncategorized

Stampin’ Up! Hold on to Hope Sympathy

The new Hold on to Hope Bundle (Occasions Catalog page 27, available tomorrow) was the basis for this card inspired by Mary over at Stamps ‘n’ Lingers. You can see her card here.

This is a beautiful stamp set and has excellent dies as well. It will become a staple for me. And, it is very versatile, could be used for Baptisms, confirmations, encouragement, Easter….the list goes on.

wild wing creations-4

I began with a panel of Whisper White card stock and So Saffron, Melon Mambo, Pool Party, and Night of Navy inks, sponging the colors randomly for my background.

The card base is Pool Party and the mat is Night of Navy.

Using the dies from the Hold on to Hope Bundle I die cut a Night of Navy cross and an openwork cross in Whisper White, adhering them together with Liquid Glue. Behind the cross is a die cut from Flourish Thinlits, also in Whisper White, and adhered to the sponged panel with Liquid Glue. The layered cross is adhered with Stampin’ Dimensionals.

The sentiment is from Thoughts and Prayers stamp set, stamped in Night of Navy on Whisper White. It is punched with the Everyday Label Punch, with the outer long edges trimmed off with my Paper Snips Scissors. It was just too wide for this card. Using the Melon Mambo and Night of Navy sponges, I sponged the edges of the sentiment label. I used whatever ink remained in the sponge and did not re-ink.

wild wing creations-1

This, too, was attached with Stampin’ Dimensionals. The Hold on to Hope butterfly is stamped in Pacific Point (I thought the Pool Party would be too pale) and cut with the die from the bundle. Liquid Glue adheres the art panel to the mat and into the card base.

On the inside, a stamped-off-once flower spray, also from Hold on to Hope, in Pacific Point serves as a backdrop for the Heartfelt Sympathy sentiment in Night of Navy. I inked the flower spray, stamped it off, then wiped off the three flowers and inked them with my light Rich Razzleberry Blends, then stamped my Whisper White panel.

wild wing creations-5

I like this little added touch of color. You could use a Melon Mambo Stampin’ Write Marker, and I probably would have, if I had had my markers available at the time.

Using the little corner stamp in Hold on to Hope, I stamped the corners of the inside of the card base in Night of Navy, wishing I had the Stamp-A-Ratus to get the placement perfect. But, I don’t, so they are not exactly where I wanted them.

For the Whisper White Medium Envelope, I stamped the little butterfly several times in Night of Navy on the front

wild wing creations-2

and a pair of the same flower spray as on the inside, only in Night of Navy, on the flap.

wild wing creations-3

I know you will get a lot of good from this Bundle, a must have, in my opinion.

Card Cuts below

HOST CODE: 4USUHDHC

If you apply that Host Code to your online orders under $150, you’ll get a free gift from me. If your order is over $150, please don’t apply the host code (you’ll miss out on your own Stampin’ Rewards/Host $$ if you use it), but you’ll still get the free gift, too!

Wild Wing Creations Bird Egg Rewards:

Bird Egg Rewards

Qualify to earn FREE Stampin’ Up! product from ANY current Stampin’ Up! catalog or promotion!  The Wild Wing Creations Bird Eggs Rewards Program is my way of personally saying “thank you” to my returning customers.

With a $50 order placed through my online store in January, you get my Sure Do Love You Class Tutorials. You also earn Bird Egg Reward Points (see the information below) and if you apply the Host Code or have an order of over $150, you get the free thank you gift too!!

Sure-Do-Love-You-Collage tutorial image

For more information on rewards, click here.

Card Cuts: Pool Party: card base 5-1/2″ x 8-1/2″ scored at 4-1/4″; Night of Navy: front mat 4-1/8″ x 5-3/8″, inside 3-5/8″ x 4-7/8″, cross 2″ x 3″; Whisper White: panel to sponge 4″ x 5-1/4″, inside panel 3-1/4″ x 5-1/2″, cross, sentiment, flourish, butterfly 3-1/2″ x 8-1/2″

Product List

sympathy

Hearts Come Home Sympathy

For today’s card I chose to use the Hearts Come Home bundle, which is a Christmas bundle. However, I think it is appropriate for a sympathy card as well.

This is the third iteration of this card, as the first two had major design flaws. I wanted to use the inlay technique and it wasn’t going well. I typically design as I go, with a germ of an idea in mind when I begin. Sometimes the logistics of what I want to do simply do not work!

card front

I began by cutting two panels of Whisper White card stock, one to paint and one to leave white and cut out. Well, actually, both are cut as you will see.

Using Pacific Point, Perfect Plum, Garden Green and Berry Burst I sponged one of the panel, starting with the Pacific point at the bottom, blending as I moved up, and ending with the Berry Burst at the top.

I thought the horizon (the edge of the snow) should be slightly below the halfway mark. I die cut the Whisper White panel first, then, laying the upper portion over the sponged panel, I lined up the die so they would match perfectly. I then cut the sponged panel, carefully removing it from the Big Shot so that all the little pieces would remain in the die.

The sponged sky and the white lower portion were taped together (perfect fit!) on the back to hold them in place, then I placed a layer of Multipurpose Adhesive Sheets to the back of this inlaid panel. This adhesive sheet is necessary for all the window and door details to stick into their respective holes. This will be adhered to the card base. Now for the tricky part.

detail

I positioned the die (with the sponged cut out still in the die) over the white die cut and, using my paper piercing tool, pushed out the small bits and pieces and down into the openings.

After lifting off the die, most of the details were left on the white cut out, more or less in the place where they belonged. I simply used the paper piercing tool to finish the job. They stick nicely to the Adhesive Sheet. The ones that didn’t come out on the first try, did on the second.

The sentiment, from the now retired Strength and Prayers stamp set, was stamped in the ‘snow’ in Night of Navy. Then I peeled off the backing from the Multipurpose Adhesive Sheet and stuck the finished panel to the Night of Navy card base.

card front

For the inside, I sponged another panel of Whisper White for the mat, and stamped my sentiment on a liner of Whisper White. This sentiment is from the Thoughts and Prayers stamp set, as is the tree. Both are stamped in Night of Navy. This is my ‘go to’ stamp set for sympathy cards. The liner was adhered to the sponged mat and into the card base with Liquid Glue.

inside

In looking again at the front, I decided it needed a little something. Hmmm. Stars? Using the stamp from Night in Bethlehem, I stamped it once in Versamark and heat set the Silver Embossing Powder with my heat tool. I did not use the Embossing Buddy, so there are some little sprinkles of silver among the stars, which I rather like.

For the envelope, I used the tree stamp from the Hearts Come Home bundle to stamp a row across the bottom front in Night of Navy.

envelope front

For the flap, I used the silicone rubber mat and impressions pad (sizzix accessory) to use the die to emboss the design. It did cut a little, as the envelope is not as thick as card stock, but didn’t cut through enough to ruin the flap. I also stamped some stars in the blank upper right side to finish it.

flap.jpg

Once I worked out the bugs, this was an easy card to do. I like this technique so much, I think I will make a Christmas card with it! I hope you try it. Please leave comments or questions below.

If you wish to order from me, use the Online Order button at right and don’t forget to cash in on the Wild Bird rewards and earn Bird Eggs as well.

December Host Code: VHXAV2SZ

If you apply that Host Code to your online orders under $150, you’ll get a free gift from me. If your order is over $150, please don’t apply the host code (you’ll miss out on your own Stampin’ Rewards/Host $$ if you use it), but you’ll still get the free gift, too! For more information on my rewards program, click here.

Card Cuts: Night of Navy: card base 5-1/2″ x 8-1/2″ scored at 4-1/4″; Whisper White: cut 3 (two to sponge, one to die cut) 4″ x 5-1/4″, inside liner 3-1/2″ x 4-3/4″

Product List

Uncategorized

Stampin’ Up Night in Bethehem Diorama

Good Sunday to you all, and I hope your weekend is going well. Did you get that extra hour of sleep? I don’t think I did, though I am such a night owl it is hard to tell sometimes.

I had seen a diorama card on a You Tube video a while back and do not remember who did it. However, my first thought when I saw it was to use the Night in Bethlehem and try to make one.

You need 3 layers for this. I used Night of Navy and Shimmery White card stock. All of it is die cut. The only stamping is the sentiment.

I wanted this to be bold, so I decided to make it 5 x7. It does lay flat, so if you choose to mail it you can. I also made an envelope to fit it.

front

Here is what I did:

First off I cut the two pieces of Night of Navy and scored them. Then I cut the Shimmery White and scored it.

Across the top of one of the Night of Navy pieces, I cut the moon and stars from the Card Front Builder Thinlits. This die is sized for the narrow side of an A2 card, so I had to move it over and very carefully line it up so I wouldn’t cut another moon, and only ran it partway through the big shot.  I have a 3-1/2″ circle die that I used for the opening in the Night of Navy, centering it side to side and up slightly from center top to bottom.

Then, matching up the score lines with those on the Shimmery White, I laid the Night of Navy over the Shimmery White and had the placement for the smaller circle. For this I used the largest of the Layering Circles dies, and simply put it inside the opening . I used the Magnetic Platform to aid in lining it up, then simply ran it through the Big Shot. Perfect.

You now have a whole Night of Navy panel (background), a Night of Navy panel with a moon and stars and a big circle cut out, and a Shimmery White panel with a smaller circle cut out.

Using the leftover pieces of the Shimmery White, I cut two of each of the Bethlehem Edgelits of the city and one large star.

Laying the Shimmery White piece with the circle cutout over the whole Night of Navy panel for placement, I liquid glued one of the die cut city pieces and the star to the Night of Navy panel. This is the background.

direct

Then, again laying the Shimmery White with the hole over the background, I arranged the second (different) city die cut and glued it to the Shimmery White and partially over the hole to show different buildings in my cityscape.

The final piece is the front of the card which has the circle cutout and the moon and stars. Using the final two city die cuts, I arranged them so they were different views of the buildings and cut off the parts that I didn’t need. These were liquid glued to the Night of Navy with liquid glue, up about 1/4″ from the bottom and about the same in from the sides.

Joseph, Mary and the donkey, and the shepherd, were die cut from Night of Navy and attached with Stampin’ Dimensionals and Mini Stampin’ Dimensionals over the top of the buildings on the front of the card.

detail

Since there is no inside for a sentiment, it has to go on the front. I used a 1/2″ strip of Night of Navy for this, stamping the sentiment from Joyful Nativity (retired) in Versamark, and heat embossing with White Embossing powder. Using my Paper Snips, I cut the flag ends. Stampin’ Dimensionals adhered it to the front, just under the stars on the right side. The cityscape tells the story, but I did want a sentiment. I just didn’t want it to overwhelm the rest of the piece.

To finish, fold the ends of the background UP on the score lines. Fold the Shimmery White BACK on the score lines. (Let me say here that you can adhere your Edgelits diecut on either side of the Shimmer white. Mine is on the top, but it could just as easily go on the back. I didn’t want the circle to show, and the lower edge is hidden by the city cuts on the front.) Do what makes your heart happy. It is YOUR card. You get to decide.

top down

I used Liquid Glue to adhere these tabs together, putting the Shimmery White on the inside of the background tabs. Folding the front tabs BACK, liquid glue them to the outside of the folded up tabs of the background.

I used the Envelope Punch Board to make an envelope from a subtly striped sheet of paper from my stash.

envelope

All DONE! Please leave a comment below. Card Cuts and products used listed below.

If you do not have a demonstrator and you wish to order supplies, just click on the order online button at right. Here are two great ways to earn free stamps and merchandise when you place a Stampin’ Up! order with me:

NOVEMBER 1-15 HOST CODE: JREYRYDQ

If you apply that Host Code to your online orders under $150, you’ll get a free gift from me. If your order is over $150, please don’t apply the hostess code (you’ll miss out on your own Stampin’ Rewards/Host $$ if you use it), but you’ll still get the free gift, too!

Wild Wing Creations Bird Egg Rewards:

Bird Egg Rewards

Qualify to earn FREE Stampin’ Up! product from ANY current Stampin’ Up! catalog or promotion!  The Wild Wing Creations Bird Eggs Rewards Program is my way of personally saying “thank you” to my returning customers. For more information on the ordering benefits, click here.

THE NEW ALCOHOL BLEND MARKERS are here!! These are great and SO easy to use.

10-17-17_stampinblends_header_demo_najp

Card Cuts: Night of Navy: background and front 5″ x 11″ scored 2″ from each end, sentiment 1/2″ x 3-1/2″, figures 2″ x 3″; Shimmer White: center 5″ x 9″ scored 1″ from each end.

NON STAMPIN’ UP! PRODUCTS USED: 3-1/2″ circle die from Scrapbooking Made Simple, paper for envelope is from my stash

Product List

Uncategorized

Stampin’ Up! Musical Season

Good Monday morning Everyone! Wow! Where does the time go? I am already frantic and it is still 8 weeks until Christmas. I will NEVER be ready! Perhaps someone is trying to tell me something? Like, I need to get out of some of my (self-imposed) responsibilities?

I have not blogged for almost two weeks. Between a couple of special events in which I was VERY involved that took 6 days out of my life, altering two bridesmaids dresses and making great-granddaughter’s mermaid costume for Halloween, I only made it to my craft room yesterday for the first time in 8 days. This is ridiculous! However, yesterday I resumed, not cardmaking, but reorganizing the area. I am not finished, but am making headway. The card for today was done in about 3 short sessions of stolen moments over a period of days.

That said, I am SO glad to be back to making cards. I decided that I would limit myself to one stamp bundle and chose the Musical Season set and the coordinating Musical Instruments dies. I also wanted to try the Eclipse method, of which I have seen a lot lately. Usually, if everyone else is doing it, I shy away from whatever it is. Call me a rebel! The eclipse method is intriguing, so try it I did. Here is my card for today.

front

After choosing to use Night of Navy for my card base, I picked one of the sheets of Merry Music Designer Series Paper for the background of my card. First, I used the Softly Falling Textured Impressions Embossing Folder to emboss it.

Next up I used the little drummer boy die from Musical Instruments to cut him out of the music. Then, I adhered the music to a sheet of the Champagne Foil Sheets (with the middle cut out, of course. For those of you new to following me, I normally cut the center out of a foil mat to conserve this more expensive paper. It is from this that I then cut smaller pieces and you would never know that there is not a whole sheet behind the art piece) with Snail. This was adhered to the card base with liquid glue.

I also used the drummer boy die to cut three in Night of Navy. Liquid glue adhered all four pieces together, then back into the background. My eclipse part of this card is finished. Perhaps I will try it again using the Large Letters sometime, but this will do for now.

drummer detail

I really wanted to use the lyre in the set, but just couldn’t make it come out right, so those pieces are waiting to be used on another card sometime. The sentiment banner is cut from Night of Navy and heat embossed with white. I rubbed my Embossing Buddy over the card stock to eliminate static, then used the sentiment stamp from Musical Season, stamped it in Versamark and heat embossed. I cut the ends with the Triple Banner Punch. On the back I added Stampin’ Dimensionals, then whacked off a length of Silver Metallic Thread and wound it around, sticking it to the Dimensionals. This was then adhered to the front of the card.

The dies in the Musical Instruments set are really nice and I would love to use all of them. However, I limited myself to the spray of leaves and berries and the treble clef for this card.

The leaf design was stamped in Old Olive, four times, on Whisper White. Using my Stampin’ Blends, (which you will be able to order tomorrow…..just click on the Order Online button at right) I added color to the leaves and berries. I used the lighter of both Old Olive and Night of Navy to fill in the design, then die cut them. These were arranged rather like a wreath around the sentiment and liquid glued in place.

The clef is cut from the Champagne Foil Sheets as well as Night of Navy, and glued together with liquid glue. I offset these a bit to make a shadow, added some Mini Stampin’ Dimensionals and added it to the front of the card. A bit of liquid glue adhered it to the sentiment label. The front is finished!

detail

On to the inside. I repeated the Champagne Foil mat and Merry Music DSP, then cut two labels from Lots of Labels framelits for my sentiment. The larger one is in Night of Navy and the sentiment one is Whisper White, stamped with Night of Navy. The sentiment is also from the Musical Season set.

inside

Just so we don’t have a naked envelope, I added some of the DSP to the flap and

flap

stamped the drummer boy in Night of Navy on the front.

envelope front

I hope you like this card. If you haven’t tried the eclipse technique, try it. It is fun to do. However, my friend Mary did it using the Happy Birthday thinlits die, which has a gazillion pieces. I am not ready for that. She did a live video which you can see here.

There was a problem with the live feed, but the part with the eclipse technique is there.

Card Cuts: Night of Navy: card base 7″ x10″ scored at 5″, sentiment banner 3/4″ x 5″, drummer boy and clef 3″ x 5″, large label 3″ x 4-1/2″; Champagne Foil Sheets: front mat and inside mat (2) 4-3/4″ x 6-3/4″, clef 1-1/2″ x 2-1/2″; Whisper White: leaves 4″ x 6″; Merry Music DSP: front art and inside liner (2) 4-1/2″ x 6-1/2″.

Product List