Uncategorized

Stampin’ Up! many sets

Good Monday to you all. My day started early and included more cleaning for granddaughter. By 10 a.m. all was done, the last pickup load moved to their new house and they were on the way to their vacation.

I made myself finish mowing my lawn, fixed lunch and FINALLY got around to card making! I made two cards from the same design, and they are totally different. The original plan was to post both today, but as I used several colors and stamp/die sets, I will post one today and one tomorrow.

front

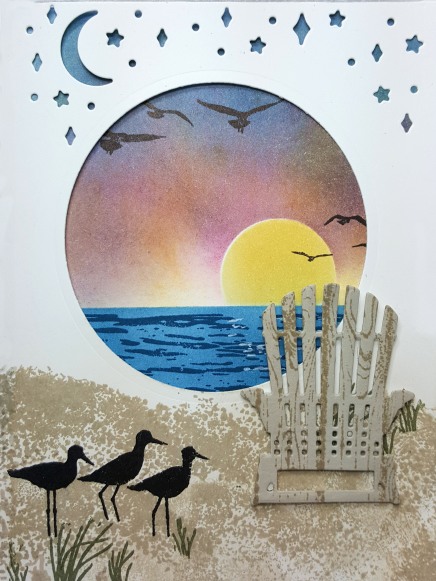
I wanted to do a window card, and the first one shows a sunset scene on the water. I began by scoring an  8-1/2″ x 11″ sheet of Whisper White at 4-1/4″ and 5-1/2″. Fold, toward the ‘mountain’, and look at it the way a normal card would open. Then fully open it out and cut off the upper left quarter, using the score lines as your guide. In the photo below you can see that the upper left is missing.

sentiment

The next step was to paint my sunset scene on the outside of the upper right piece, which folds down over the sentiment panel.

I began by masking off the horizon line with Post-it Notes, covering the ground portion of the scene. Then, using the smallest circle in the Layering Circles Framelits I cut a mask for the sun and placed it about 1/3 below the horizon. Starting with the lightest color and using Stampin’ Sponges, I sponged the sky using, in order, So Saffron, Watermelon wonder, Perfect Plum, Soft Sky, Pacific Point and Night of Navy.  I left the sky lighter toward the horizon and darker at the top.

Next, I removed the mask and placed it over the sky so I could sponge the water. Beginning with Marina Mist, then Dapper Denim and just a touch of Night of Navy, I sponged the water. Using the water stamp from High Tide, I stamped with Night of Navy all over the sponging, taking care to offset the stamp placement so there were no obvious repeats, over-stamping a couple of times, just for a more realistic look.

Then, removing the sun mask and replacing it with the negative (the Post-it with a hole in the middle), I sponged the sun lightly with So Saffron. It looked a bit pale, so I repeated the process a couple of times to give it some depth.

For the reflection on the water, I used a white gel pen below where the sun was setting. Lastly, I stamped the birds from High Tide in Basic Black and the art was done.

art panel

For the front, I used the largest circle in the Layering Circles framelits, first laying it over the art to see what would show through the window, then eyeballing approximately the same placement on the card front. Perfect!

For the foreground scene, I stamped the sand in Sahara Sand using the sand stamp from High tide, not using the portion of the stamp that allows for the lighthouse. Three shorebirds from the same set in Basic Black march along through the sand and the Old Olive grass, also from High Tide.

Remember a week or so ago I did a card and wound up with several adirondak chairs. I used the one cut from Sahara Sand with the Hardwood stamp in Soft Suede for the final piece of the front, attaching it with mini stampin’ dimensionals.

unfolded

This shows the front and the flap when it is unfolded.

Hmmm. I thought the top part of the front to be too plain. How to fix that? I considered sponging it, but wasn’t sure of my ability to duplicate the inside sky, which was the focal point, so opted to leave it white and punch out the new moon and some stars using the die from the new Card Front Builder thinlits, which will be available in the holiday catalog.

This allowed the sky to show through and did not detract from the main show.

All that remains is the sentiment from the Big on Birthdays stamp set (retired), stamped in Pacific Point on Whisper White card stock. I added more shore birds below the sentiment in Night of Navy, liquid glued this panel to a Night of Navy mat and into the card base.

sentiment alone

The card was done. A little tip: with all those layers inside, your card might not lie flat when closed. Mine didn’t, so I trimmed a scant 1/8″ off the art panel on the side next to the fold that closes the card (in other words, the long side next to the fold). This allowed the card to close nicely.

The envelope front received more shore birds in Basic Black, marching across the Sahara Sand at the bottom. The flap has flying birds, also in Basic Black.

I hope you enjoy this card. Stay tuned tomorrow for another version in this same style.

Card Cuts: Whisper White: 8-1/2″ x 11″ scored at 4-1/4″ and 5-1/2″, then the upper left quarter cut off; sentiment 4″ x 5-1/4″; Night of Navy: inside mat 4-1/8″ x 5-3/8″; Sahara Sand: chair, scrap roughly 2″ x 3″.

Product List

Uncategorized

Creative? Not today!

Unless you can count cleaning as creative. My oldest granddaughter called early this morning asking for my help. I said I would come after church.

They have been planning since the beginning of the year to go to Vermont with their 2 little ones to visit family, go to a reunion and have some quality time with his side of the family.

They had purchased a house to flip last year, and when all was said and done it didn’t sell within their time-frame. They moved into it themselves, and rented out their old house.

About a month ago she told me that one of the couples who had seriously looked at the house when it was on the market had made an offer of their full asking price. Neither she nor her husband really wanted to move, but decided to accept the offer and look for another place for themselves, living in their old house in the interim.

Late last week they heard their neighbor was moving out of the state and wanted to sell. They made a deal, so at the moment (until closing tomorrow on the one they sold) they own 3 houses! They have been moving for a week, cleaning, etc. It is enough to wear me out thinking about it!!!

I, being a good Grandma, ( :-} ) offered to help do whatever I could, pack, babysit, clean. I am no good with hefting boxes and furniture too much, but willing to help where I can.

I think she REALLY didn’t want to have to call me, but when all their friends (whom they have helped many times), the rest of the family, both his and hers, were unable or unwilling to help, she called me. (in fairness to her mom, she at least helped her yesterday.)

So, today, instead of having a free afternoon to make cards, I spent it cleaning. We got the kitchen, cabinets clean inside and out, refrigerator and stove cleaned, and downstairs bath done, windows washed and woodwork wiped down. Tomorrow at 7 a.m. I am going to help with the final vacuuming, bathroom wipe-down and mop the floors. At 9:30 they close and hope to be on the road to Vermont by 10!

WHEW! Tune in tomorrow. I will post unless I am unable to. I can’t believe how tired cleaning for 3 hours without a break has made me. I guess the cleaning muscle isn’t used enough!! My style has been to clean awhile, take a break, clean some more, take a break, etc. Usually the breaks last longer than the cleaning!

Tomorrow I will have 2 cards. At least I better as there are birthdays coming up, I need a couple of thank you cards and a couple more sympathy. So, tune in tomorrow for a blog with more creativity involved.


Uncategorized

Another sympathy……

While I am glad to be able to make cards to send for any occasion, it seems lately that I have had A LOT of sympathy cards to send. Here is the latest.

front

This week’s Fusion Card Challenge was my inspiration for this card. I immediately knew what I wanted to do with it. I chose to use most of the colors as well as the design sketch, starting with a Whisper White card base. I cut a piece of Sahara Sand card stock the width of the card and about an inch shorter, then eyeballed the angle. It wasn’t quite steep enough so I cut off a bit more, then used that as my template for cutting the Soft Sky for the top of the card. A piece of Crumb Cake covers the seam. I was going to use the Burlap Ribbon, but decided to just use card stock as it reminded me more of a branch for the leaves.

As an afterthought (hindsight is 20/20 you know), I could have used the lovely branch from the Seasonal Layers thinlits to cover the seam.

Before attaching any of these to the card base, I ran the Sahara Sand through the Big Shot in the Layered Leaves Dynamic Textured Impressions Embossing Folder. Oh, yeah! Love this folder.

The die I wound up using for the leaves is an older one from Impression Obsession. I opted for it instead of the Stampin’ Up! Leaflets simply because of the size. I wanted small, and none of the Leaflets was small enough. I cut 2 in Peekaboo Peach, one each in Powder Pink, Sahara Sand and Crumb Cake. Somehow I just couldn’t see a pink leaf, though it was one of the colors in the challenge. But, AHA! Gold was in the challenge, so I grabbed a scrap of Gold Foil Sheet and cut another leaf from it. Much better. leaves closeup

Before attaching them to the card front I used my Gold Wink of Stella to accentuate the veins, then dry arranged them. One Peekaboo Peach, the Sahara Sand and Gold Foil leaves were liquid glued to the front. The other Peekaboo Peach and the Crumb Cake leaf were attached with Mini Stampin’ Dimensionals.

For the sentiment I used the ‘Thinking of You’ from Thoughts and Prayers. This is pretty much my ‘go to’ set for sympathy cards. I stamped it on Crumb Cake with Versamark and heat embossed it in Gold Embossing Powder. I always forget to say that I used the Embossing Buddy to rub off any oils or static before embossing, which cuts down on embossing where you don’t want it.

leaf detail

The Pretty Label punch was perfect for this sentiment and I punched another from the Gold Foil with which to back my Crumb Cake sentiment. To do this, cut the backing in two equal pieces lengthwise and glue them to the back of the the sentiment, being sure not to leave points showing at the ends.

I put 4 Stampin’ Dimensionals on the back, wound some Gold Metallic Thread around and popped it on the card. The front is done.

Inside I used the oak leaf from Vintage Leaves in stamped off twice Crumb Cake on Soft Sky card stock. Then I over-stamped the sentiment, again from Thoughts and Prayers, with full strength Crumb Cake. This panel was liquid glued to a Crumb Cake mat and into the card base.inside

The envelope got the same Vintage Leaves oak leaf in Crumb Cake on the front and several of them on the flap, stamped randomly. I am sorry there is no photo as I forgot to take one.

I hope you enjoy this card, though enjoy is not usually associated with sympathy. Perhaps “like” would be a better term. I did enjoy making it as I thought about the recipients as I was working on it.

If you don’t have a demonstrator, I would be happy to answer any questions you may have.

The Holiday Catalogs will be sent out in August and ordering will go live on September 1. If you would like a catalog, please leave a comment. To order from the annual catalog, just use the shop online button at right.

Product List

Uncategorized

Stampin’ Up! Christmas and Nature

I hope you are having a Fabulous Friday wherever you are! Here it is a nearly perfect summer day, although I would trade it for a rainy one. We are very dry here, so some moisture in the ground would be appreciated.

Today my inspiration was the Global Design Project challenge, which is a color challenge that I thought would lend itself well for an antique looking card. Global Design Project 097/ Color ChallengeGDP097

These colors would translate very well to a Christmas theme, I’m-a-thinkin’, so I pulled out my Father Christmas and Nature Sings stamp sets, and the new Card Front Builder thinlits from the Holiday Catalog which goes live on September 1.

First, I cut the card base from Wild Wasabi, then a mat in Berry Burst. The art panel is from Crumb Cake and die cut with the beautiful framing die. After tearing some Post-it tape to look like a snowdrift, I masked off the frame with Post-it notes and the sky with the torn tape and sponged Stampin’ Craft White with a sponge dauber. I moved the mask to cover part of the ‘snow’ and sponged a bit heavier, although when it dried it wasn’t very obvious.To highlight the snow a little and give it some dimension, I used a white gel pen to just add a few indentations.front

I then masked off the snow and VERY lightly sponged soft sky on the upper part of the card with a sponge, just to take the edge off the crumb cake color. I stamped some little clouds in Craft White using the stamps from the retired Sky is the Limit.

Using the trees from the Nature Sings set, I stamped two sets of them on Wild Wasabi in Crumb Cake ink and fussy cut them. The small stamp of two reindeer was stamped in Crumb Cake on Crumb Cake card stock and fussy cut also. I dry arranged these before liquid gluing the back set of trees to the panel, and used stampin’ dimensionals for the other set.

I used liquid glue and mini stampin’ dimensionals to adhere the deer.

Father Christmas  was stamped twice in Crumb Cake, once on Very Vanilla and once on the panel. My reason for doing this was that it gave me the shadow under his feet, which I fussy cut off the other one. I used Berry Burst, Wild Wasabi and Crumb Cake Stampin’ Write markers to color the Santa. His face is Powder Pink applied with a blender pen. I also used the blender pen and the Craft White to color in his beard and eyebrows to give them a little whiter look than the fur on his cloak.

Having done all the coloring, I was dissatisfied with the little tree he is holding, so I stamped part of another Father Christmas in Crumb Cake on Wild Wasabi and cut out the tree. I also fussy cut the colored Father Christmas and liquid glued the Wild Wasabi tree over the top of the original. Using Stampin’ Dimensionals the Santa figure was adhered to the front panel.

The sentiment was also from Nature Sings and stamped in Crumb Cake on Crumb Cake and cut with the 7/8″ x 1-3/4″ oval punch, now retired. It looked rather plain, so I stamped the pine branch from Nature Sings in Crumb Cake on Wild Wasabi and fussy cut it, liquid gluing it to the back of the sentiment, which was adhered to the front panel with Stampin’ Dimensionals. A tiny boy in Linen Thread finished the panel.

20170728_110852

My original thought was to use dimensionals to adhere the Berry Burst mat to the card base, but decided there was already enough dimension. The art panel was liquid glued to the mat and liquid glued onto the card base. The card front is finished.

The inside sentiment panel of Crumb Cake was stamped in Crumb Cake using the sentiment and reindeer from Nature Sings. This was liquid glued to a Berry Burst mat and into the card base.

inside

The Crumb Cake envelope received some trees on the front and on the flap, stamped in Wild Wasabi. envelope flap

I hope you like my take on Christmas using these colors.

Card Cuts: Wild Wasabi: card base 5-1/2″ x 8-1/2″ scored at 4-1/4″, pine bough, trees  scrap approx. 2″ x 6″ ; Berry Burst: front mat 4-1/8″ x 5-3/8″, inside mat 4″ x 5-1/4″; Crumb Cake: front art piece 3-7/8″ x 5-1/8″, inside sentiment 3-3/4″ x 5″, deer and sentiment scrap approx 2″ x 3″; Very Vanilla Father Christmas 2″ x 4-1/2″.
Product List

Product List

Crumb Cake Stampin' Write Marker

Crumb Cake Stampin’ Write Marker
[120967]
$3.50
Wild Wasabi Stampin' Write Marker

Wild Wasabi Stampin’ Write Marker
[120975]
$3.50
White Signo Uni-Ball Gel Pen

White Signo Uni-Ball Gel Pen
[105021]
$4.00
Whisper White Craft Stampin' Pad

Whisper White Craft Stampin’ Pad
[101731]
$8.00

Uncategorized

Stampin’ Up! Butterflies

Today I am W-A-Y out of my comfort zone with a) Blues and b) Bright colors! I almost never use brights unless they are paired with more neutrals than bright colors. I just find them too harsh in general. And blue, well, blue is NOT my favorite color, but it ranks way higher than Lemon Lime Twist!

That said, this past weekend I was at a retreat and had the opportunity to play with clay..polymer clay, that is. We made and painted some butterflies. One of the gals made hers a bright blue, and I remembered seeing a bright blue one somewhere. So, I Googled (what else? because I could) blue butterflies and they are gorgeous! And very vibrant in their coloring. If they were as big as, say, a cat, they would be jarring, but if they were as big as an elephant! I can’t imagine. But in a small thing like a butterfly they are simply beautiful!

Anyway, that was the basis for my brights/blues. While I was working on this card, I had a phone call informing me that a young mother in our community suffered a farm accident while helping her husband in the hay field. A large round bale fell on her and broke several ribs, her pelvis and several vertebrate. I hate having to send sympathy and get well cards, but I hope they at least bring a smile. At least the recipient will know that I care (enough to send the very best-a handmade card).

front

Stories aside. I began by choosing the blues closest to the images I had seen of blue butterflies, which were Pacific Point and Tempting Turquoise. White was too stark a contrast so I sponged Tempting Turquoise all over, darker in places and lighter in others. Sort of sky-like, I guess.

Now for the pretty part, the butterfly. I used the large butterfly in the Watercolor Wings stamp set, which is a three part stamp. Actually, it is a five part stamp if you count the body and antennae. I did not stamp the body, nor the antennae at this point.

Using Pacific Point I stamped the first image, the outer wings. Using the all-over stamp, I stamped off once the Tempting Turquoise before over-stamping my butterfly. The third part is the detail, which is full strength Tempting Turquoise. Die cut this with the Bold Butterfly framelit.

Using a detailed die (that pretty much matches in size the stamped butterfly) from the Butterflies thinlits, I cut three from vellum paper.

Bend the wings of all four butterflies along the edge of the body area to add dimension. But before you do that to the last vellum cutout, apply a little clear Wink of Stella for just a bit of sparkle. Liquid glue these, one on top of the other, just along the body, saving the glittery one for the top. Set aside and let dry while you stamp the sentiment.

detail

The sentiment is from Thoughts and Prayers, stamped in Pacific Point on Whisper White card stock. I used the Triple Banner punch to cut the ends. I found a scrap of sheer ribbon, cut it at an angle and a bit longer than the sentiment banner and Snailed it to the back.

Somehow all that blue was getting to me, so I cut a doily exactly in half and liquid glued it to the sponged panel, lining up the cut edges with the outside edge of the panel. Much better. Now this is where the butterfly will be glued.

My original intent was to set it straight onto the card and square with the world, but, in playing around with placement, I decided it looked more natural to angle it just a little bit. This gives the appearance of flight, I think. Before adhering the butterfly and after deciding exactly where I wanted it, I stamped the antennae in Pacific Point directly onto the sponged panel. Then I glued down the butterfly.

With Stampin’ Dimensionals I attached the sentiment banner.

sentiment

Hmmm…needs something. Pearls! I used a row of 8 of the Pearls Basic Jewels for the body and a larger one for the head. Then, because I could, I added one to the sentiment banner.

This was adhered to the Pacific Point mat and onto the Tempting Turquoise card base. Yeah, I know, it sounds like it took forever, but really, it went together quickly.

For the inside I VERY LIGHTLY sponged some Tempting Turquoise over the inside Whisper White mat and sponged a 3-step smaller butterfly in the corner. OOPS! Mistake!

inside

Instead of Pacific Point, stamped off once Tempting Turquoise, full strength TT, I forgot to close my PP classic stampin’ pad and used it for the second step. Oh, well, it is ART! Not supposed to be perfect. It is handmade. I did use the stamped off once TT for the third part, and full strength PP for the body and antennae.

This sentiment is also from the Thoughts and Prayers set in Pacific Point. I laid the sentiment panel on the Pacific Point mat and it just needed sumpin’ sumpin’. I didn’t want anything that would cause a bump, so embellishments were out. I had this little corner punch, so I punched the corners, which I think looks sort of like the doily on the front. Then I had to do a bit more sponging and the inside is ready to adhere. First, I glued it to the Pacific Point mat, then into the card base. Whew! Another card for the ‘finished’ pile.

Except, we can’t have a naked envelope. I am really pretty lazy and didn’t want to stamp a bunch of 3-step butterflies, so I only stamped one small one on the front, doing it correctly this time, except my registration is a bit off.

envelope frontNow, what to do with the flap? I didn’t use any DSP and didn’t want to stamp more butterflies. So, I used the smaller, more detailed Bold Butterfly framelit and cut three from Tempting turquoise, adhering them to the flap.

envelope flap

I hope you like this card, though it has a bit more detail than most.

Card Cuts: Tempting Turquoise: card base 5-1/2″ x 8-1/2″ scored at 4-1/4″; Pacific Point: outside and inside mat (2) 4-1/8″ x 5-3/8″; Whisper White: outside art piece and inside panel (2) 4″ x 5-1/4″, butterfly  3-1/2″ x 2-3/4″,  sentiment scrap; Vellum: 3 butterflies 3-1/2″ x 7″

If you need supplies and do not have a demonstrator, please click on the shop online button at right to shop in my store.


Save
Product List

Uncategorized

Stampin’ Up! Pocketful of …….

I wanted to give a monetary gift in a more creative way than just sticking it in an envelope, so I chose the Pocketful of Sunshine bundle for my card today.

front

I began by stamping the pocket stitching in Cajun Craze on a piece of paper that sort of looked like old and faded denim that came in a book of papers from Hobby Lobby, perhaps Paper Studio. I then stamped the stitched design on the pocket as well as the rivets. Using the Pocket from the Pocket framelits in the bundle I cut it on the Big Shot.

This has nice little edges and score marks to make folding it to leave an open pocket much easier. Stampin’ Up! thinks of all the details to make our creative lives easier.

I used a very narrow tape on these edges to secure the pocket to my Cajun Craze panel.

Next is the sentiment, also from the Pocketful of Sunshine set, which I stamped in Night of Navy in the upper left corner. In the lower right corner is the ‘For You’ sentiment, also from the set.

I used a couple of brads over the stamped rivets for a little textural interest. For more texture I roughed up the edges of the Cajun Craze panel and added a strand of Night of Navy Bakers twine, tying it in a very small bow. To make sure it stayed where I wanted it, I taped the twine on the back and used a folded glue dot to secure the bow.

detail

This panel is glued to a piece of Night of Navy and onto my Smokey Slate card base.

The inside is for a personal message, but since this gift is to help with their vacation expenses, I stamped a small compass in the upper right corner. This stamp is from an older Stampin’ Up! set called The Open Sea and is now retired.

inside


The Medium Whisper White envelope is stamped with the compass in Night of Navy, once on the front and multiple times on the flap.

envelope flap

Pretty quick and easy for a more interesting way to present a monetary gift. I hope you like it as much as I will like giving it.

Card cuts: Cajun Craze: Art mat, 3-3/4″x 5″;  Night of Navy: front mat 4″ x 5-1/4″;     Smokey Slate: card base 5-1/2″ x 8-1/2″ scored at 4-1/4″

Supplies for this card:

Product List

Uncategorized

Stampin’ Up! Flourishing Phrases and more

Today’s card is a sympathy card with a stamped background, painted vellum and embossing. Here are the details.

front

I began by deciding to use Tranquil Tide and Mint Macaron (retired) for my colors. Originally I thought Berry Burst and Powder Pink, but it was too bright and too feminine looking for a sympathy card.

I have to tell you that this is my second iteration…the first was TOTALLY not what I was aiming for. I used the rose from Graceful Garden and didn’t like it at all. I stamped the vellum, embossed it in silver, painted it and it was just too big and cumbersome looking. I then settled on this little flower from Flowering Fields, another retired set from the Occasions catalog.

Again, I stamped the flower on vellum in Versamark ink and heat embossed it with Silver Embossing powder. After it cooled I turned it to the back side and colored in the image with Berry Burst and Powder Pink Stampin’ Write markers for the flower, and Tranquil Tide for the leaves and stem. I think however, that next time I will try the flower in the Butterfly Basics set, or maybe purchase another set with the perfect flower!

detail

OK, on with the show. I Snailed the vellum to a piece of Whisper White card stock, then set it aside to make the frame.

Flourishing Phrases has a nice swirly floral that I stamped in Mint Macaron on Mint Macaron card stock. It looked a little plain, so I used a white gel pen to color in the berries, or buds, or whatever they are. I liked that effect. I cut a window in this piece with the largest oval in the Layering Ovals framelits.

Using the two largest ovals I cut a narrow frame from Mint Macaron Card stock, which I adhered to the stamped piece with liquid glue, carefully aligning it with the opening.

Using Fast Fuse, I adhered the vellum art panel to the back of the stamped frame and liquid glued this to the card base.

For the sentiment, I used the Thoughts and Prayers stamp set, stamping it in Tranquil Tide on Whisper White card stock. Using the Pretty label punch, I punched out the sentiment, then made two more in Tranquil Tide.

sentiment

Offsetting the Tranquil Tide, I dry arranged them at the back of the sentiment. It just didn’t quite look the way I wanted, so I cut a rectangle from Tranquil Tide, liquid glued it to the back of the sentiment and fussy cut around it. Oh, so much better! Adding some Stampin’ Dimensionals to the back, this was placed on the front of the card just below the flower. This finished the front. I saved the Tranquil Tide pieces for a future project.

The inside received a stamped off once Flourishing Phrases design in Mint Macaron on Mint Macaron card stock. Over this I stamped the sentiment from the Thoughts and Prayers set in Tranquil Tide.

inside

This panel was glued to a Whisper White mat and into the card base. The card is finally done!

The envelope got the same stamped off once image and the flap was finished with a piece of stamped Mint Macaron card stock.

envelope flap

I hope you like this card. While it is not exactly what I saw in my mind’s eye, the finished product is acceptable.

Card Cuts: Tranquil Tide:  card base 4-1/4″ x 11″ scored at 5-1/2″; Mint Macaron:  stamped panel 4″ x 5-1/4″, inside 4″x 5-1/4″, oval frame 3-1/2″ x 4-1/2″, Envelope flap 2-1/4″ x 5-3/4″; Whisper White: backing for vellum 3-3/4″ x 5″, inside mat 4″ x 5-1/4″;  Vellum: art piece 3-3/4″ x 5″.

Product List

Uncategorized

Experimental technique

Hello Everyone,

I hope you are having a Marvelous Monday! It is the beginning of a new week, or was yesterday the beginning? I never know for sure, but my calendar says Sunday is the first day of the week. Oh, well, either way, I hope it is going well for you!

Today I bring you an experiment I first saw on Splitcoast Stampers. It was called Duoprinting with Chlorophyll and I believe the author was Lydia Fiedler. Basically you imprint a leaf onto your cardstock and use that instead of a stamp. To get the details on how to do it, go here.

In a nutshell, I went to my yard and in about 15 minutes I had gathered a dozen or so leaves. This is really experimental as some leaves are rather dry, while others are too ‘juicy’. An example was a hosta leaf that was too dry to make much of an imprint, but a ferny leaf from a weed (Queen Anne’s Lace?) was VERY juicy. You just have to play around with them.

Once you have your leaves gathered, you will need your Big Shot/Kick/Vagabond/ whatever; copy paper; card stock or watercolor paper. Yep, that’s it.

Fold the copy paper in half and lay it open (for now) on your cut plate. Your sandwich will be pretty much the same as for when you are embossing. Depending on the thickness of your leaf/leaves, you might need a shim of another sheet of paper or card stock. As stated before, this is experimental.

Lay a piece of card stock on the open copy paper, arrange your leaf, add another piece of card stock and close the copy paper. Add your other plate and run it through your Big Shot. You will have 2 monochromatic green prints, usually a ‘positive’ and a ‘negative’. You can use either or both, depending on your personal preference. Discard the smashed leaf. If some of the leaf stick to the paper it will flake off when it is dry.

Let this image dry before using it on a card.

Here is my first card using this technique. Once you have your imprints, the rest is super easy peasy and really quick to make. DISCLAIMER: This may not be for everyone as it is very natural and organic looking. If your taste runs to the ‘perfect’ then maybe you better stick to stamps. Personally, I like the look for something different, but wouldn’t use it all the time. And, I think next time I will try one using torn edges. You could even just tear out the leaf imprint and use that on a mat.

front

I started with a Crumb Cake card base with an Old Olive mat liquid glued to it.

YES!!! IT IS LEMON LIME TWIST! I know, I know, I claim to not like this color. And, I don’t. In fact I almost hate it. However, sometimes you gotta do what you gotta do, and in this case, it goes perfectly with the chlorophyll imprint of the leaf. So there! I know when to not cut off my nose to spite my face!

I stamped the sentiment from One Big Meaning in Old Olive onto the watercolor paper with the leaf impression. This was adhered to the Lemon Lime Twist mat with Fast Fuse as the paper had curled a bit in the drying. I was not sure the liquid glue would be strong enough to hold it flat.

I used Stampin’ Dimensionals to adhere this to the Old Olive mat and the front was done.

Inside, I cut a piece of Old Olive (I had already had enough of that other so-called green) for a mat.inside

Using a ferny leaf from Butterfly Basics,  which I thought was similar to my impression, I stamped off once, again in Old Olive, then stamped the image on a piece of Very Vanilla card stock. It looked a bit plain, so I used a scrap of O So Succulent (I think) DSP to add a strip to the bottom of the liner and the inside was done. For this kind of thank you card I usually hand write a message, so I didn’t want a sentiment.

There! I told you it was easy peasy.

On the Medium Very Vanilla envelope, I stamped the same ferny leaf full strength on the front and used a larger scrap of the DSP on the flap.

This is a really easy, fun project you could do with kids. I hope you enjoy.

If you are in need of supplies and do not have a demonstrator, just click on the ‘shop online’ button at right.

Thanks for stopping by.

Card cuts: Crumb Cake: card base 5-1/2″ x 8-1/2″ scored at 4-1/4″;  Old Olive: first mat 4-1/8″ x 5-3/8″, inside mat 4″ x 5-1/4″;  Very Vanilla:  inside liner 3-5/8″ x 4-7/8″; Lemon Lime Twist: 4″ x 5-14″

Product List

Uncategorized

Saturday Challenge

Today my card is inspired by the Global Design Project 096

CASE = Copy And Selectively Edit

Remember that when you CASE a project you can take what you like from the design and make it your own. It might be the stamp set – the colors, the layout, the flowers, whatever you like that has inspired you to make a card of your own. I like the subtle colors and the  simple design, so I adapted it for a thank you card I need to send to a fisher person.
All supplies are Stampin’ Up!.
I began with a Pool Party card base and a piece of the retired By the Shore DSP that looks like water. I could have used the embossing folder, and did consider it, but I like this paper. For the largest square I cut a piece of Pool Party card stock with the largest Layering Squares die. Using the second largest die I cut a Very Vanilla square and adhered it to the larger square.
card front
The topmost square is the third largest size die and cut of Pool Party. The Anchor, fish and sentiment are stamped on Very Vanilla in Pacific Point from the Seaside Shore stamp set and fussy cut with my Paper Snips scissors.
The anchor is attached with Mini Stampin’ dimensionals and the fish is liquid glued to the square. The square is then adhered to the Very Vanilla square with Stampin’ Dimensionals.
card-front-angle.jpg
I stamped the ‘Ahoy There’ on Very Vanilla and was going to leave it as a banner, but decided it looked better fussy cut. It is glued just below the largest square.
This finishes the front of the card.
The inside is a panel of Very Vanilla  and stamped with fish, bubbles and seaweed in Pool Party Classic Stampin’ pad.
inside
After first stamping the seaweed, I stamped one on a Post-it Note to make a mask and fussy cut it. I laid the mask over the seaweed to stamp the fish so it would look like they are swimming in among the weeds. I then added the bubbles, sometimes not re-inking. There was no rhyme nor reason to this, just whatever struck me.
The sentiment, from the One Big Meaning stamp set, is stamped in Pacific Point. The panel was then glued into the card base.
For the Medium Very Vanilla envelope, I stamped an anchor in the front corner and ‘Ahoy There’ on the flap, both in Pacific Point.
envelope frontenvelope flap
I hope you like this Global Design Project 096 inspired card as much as I enjoyed making it.
Card cuts: Pool Party; Card base 5-1/2″ x 8-1/2″ scored at 4-1/4″; Large square 2-7/8″; Small square 2-3/8″; By the Shore DSP: 4-1/8″ x 5-3/8″; Very Vanilla: Middle square 2-5/8″, Inside panel 4″ x 5-1/4″

Product List

Uncategorized

Friday’s Challenge Vintage Leaves

Today I am playing along with the challenge from Freshly Made Sketches #297

FMS Final 297-001

This is a square card, so I chose to make it a 5″ square with Early Espresso as my card base. The next layer is Very Vanilla providing a contrasting mat for the top layer of the base.

For this layer, I stamped the small leaf from the Colorful Seasons set in Versamark ink on a piece of Cajun Craze card stock. These images are random, upside down, sideways, some partly off the edge. This then became my background for the art. You can see them peeking out from behind the art piece.

front closeup

I stamped my sentiment from Background Bits in Versamark on Early Espresso and heat embossed it with copper embossing powder. Before stamping I had a decision to make as to where to place the sentiment. Or, more accurately, HOW to place it. Should it be straight with the panel on which it was stamped, or straight with the card base? In the end, I stamped it square with the card base and think this was the best option.The panel was then glued to a Very Vanilla mat.

Using a scrap of Very Vanilla, I sponged it randomly in Cajun Craze, Old Olive, Elegant Eggplant and Crushed Curry. After it dried I stamped the maple leaf from Vintage Leaves in Versamark and heat embossed it with Copper embossing powder. Using the matching die from Leaflets I cut it out. While I still had the die handy, I sponged, very lightly in the same colors, another piece of Very Vanilla and cut it. Then, I cut one in Copper foil and one from a piece of dark brown foam. You will soon see how I used this.

Before adhering the leaves to the sentiment panel, I glued the sentiment panel to the background, turning it on an angle

Because I wanted the leaves raised off the background, I chose to use the brown foam instead of dimensionals, so it wouldn’t show. I glued the copper leaf to the brown foam leaf, then put strips of Fast Fuse on the back.

front detail

To this I added several loops of Copper Metallic thread, then adhered it to the sentiment panel. Using more Fast Fuse, I adhered the heat embossed leaf to the copper leaf, offsetting it a bit. Woo-Hoo! The card front is done!

For the inside, I stamped another piece of Cajun Craze with Versamark, using the same small leaf from the Colorful Seasons set.

The lightly sponged Very Vanilla Leaflets die cut was stamped with another sentiment from the Background Bits set in Versamark and heat embossed with copper embossing powder.

inside

This was glued to the Cajun Craze panel and on a Very Vanilla mat. The completed inside was then glued into the card base.

Almost finished….but this is a square card. I don’t have square envelopes. So, I made one, using my Envelope Punch Board. I had some paper in my stash that appeared to be pretty close in color to the Early Espresso, so that became my envelope. Or maybe not Early Espresso, but brown anyway!

envelope

I love the simplicity of this card and the touches of copper. I hope you like it as well. Thank you for stopping by.

Card Cuts: Early Espresso: Card Base 5″ x 10″, scored at 5″; Art panel 4-1/8″; Very Vanilla: First mat 4-7/8″; Art panel mat 4-1/4″; Inside mat 4-3/4″; Cajun Craze: Front 4-3/4″; Inside 4-1/2″; For the Leaves Copper foil scrap and (2) Very Vanilla scraps.

Product List

Product List