Uncategorized

Stampin’ Up Dragonfly Dreams

Good Saturday, All. I suppose you are gearing up for celebrating Christ’s resurrection by going to your choice of church, then celebrating more with family get-togethers.

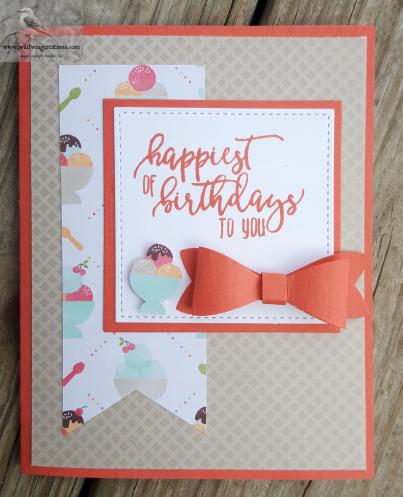
My card today is for a friend who has recently been hospitalized. I hope this is uplifting and cheering to her.

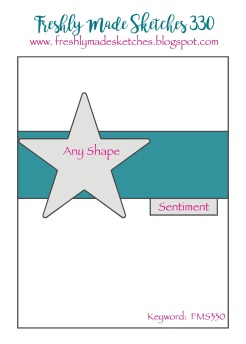
My inspiration was a You Tube video by Stampin’ Up demonstrator Linda Bedinger and challenge #330 from Freshly Made Sketches seen here.

freshly made sketches #330

You can see Linda’s video here.

Now, on with my version of Dragonfly Dreams.

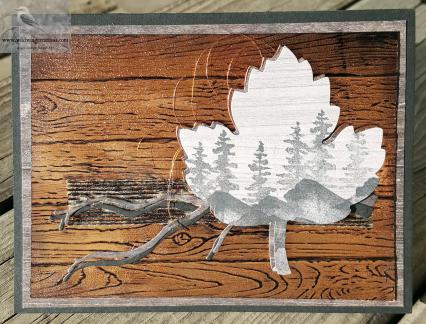
I began by cutting my card base from Marina Mist Card Stock. The next step was to die cut the large dragonfly using the large one in the Detailed Dragonfly Thinlits from Whisper White card stock. I used this as a stencil on Vellum. A sponge dauber was perfect for applying the ink. I used Bermuda Bay, Marina Mist and Emerald Envy, sometimes applying one color over the other, sometimes just using one color. I used the same dauber for all the colors, stamping it off on scratch paper between colors. At any rate, all this inking colored my die cut dragonfly beautifully. wild wing creations-3

I then used two strips of Tear and Tape to adhere the Vellum to the card base, placing the tape under where the Soft Sky strip would go. I then cut a strip of Soft Sky and stamped it with a background stamp from Impression Obsession (IO). Using the ink left in the dauber I sponged around the edges and smeared a little ink over the rest to just take off the ‘fresh, clean’ edge. You can see that here:

wild wing creations-1

I wrapped a piece of Pool Party Shimmer Ribbon (free in Sale-A-Bration, but order today as SAB ends tonight!) around the panel and taped it to the back. This was Liquid Glued to the Vellum.

I used the die from Petals and More to cut the sentiment tag and sponged it the same as the larger panel. The sentiment is from Teeny Tiny Wishes and is stamped in Marina Mist. This is adhered with Stampin’ Dimensionals.

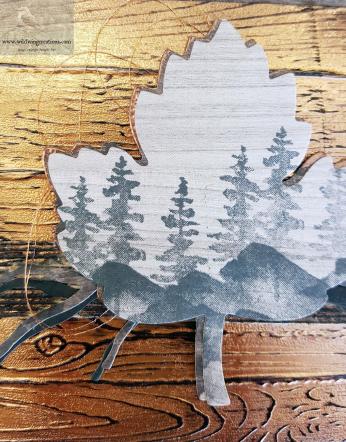
I die cut another dragonfly in Vellum and liquid glued it to the panel. My ‘stencil’ became my focal point, and I went over it with Wink of Stella to add some sparkle, but not too much. This is adhered over the Vellum dragonfly with a strip cut from the edge of the Stampin’ Dimensionals and applied only to the body, leaving the wings free.

A trio of the Glitter Enamel Dots completes the front.

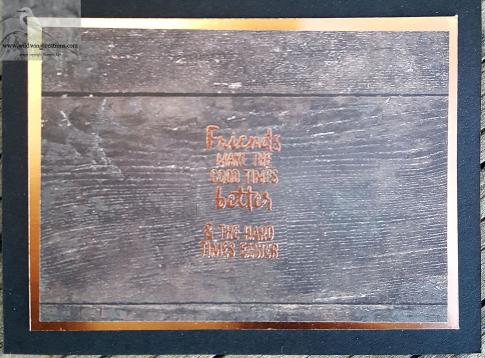
For the inside, I background stamped, in Marina Mist, another panel of Soft Sky for the mat. Without re-inking, I stamped it again to give a sort of smudged look. The sentiment liner is also Soft sky sponged around the edges with the dauber I used previously. I had die cut a smaller dragonfly to use for some of the stenciling on the front, so it, too, was a beautiful blend of blue/green colors. I adhered this completely with Liquid Glue. The sentiment is from Our Daily Bread and stamped in Marina Mist. wild wing creations-4

This panel was adhered with Liquid Glue to the mat and into the card base. Now, on to the envelope. I used the detailed stamp and Marina Mist ink to stamp one on the flap, extending it down onto the lower part of the envelope. The front also has one dragonfly in the corner. wild wing creations-2

This completes the card and envelope. Enjoy making one of these for yourself.

Don’t forget the Sale-A-Bration sale which ends tonight. Any $50 order will earn you a free gift of your choice. A $100 will get you 2, or one gift from the second category requiring a $100 order. There is a second release as well as a third, all of which you can find by clicking on the ‘order online with me’ button at right. So many wonderful choices.

The host code good until midnight is UJWYGVQJ.

What is a host code? Go here for all the details on my customer rewards program.

If you don’t have a demonstrator, I would be happy to be yours. If there is anything I can do to help you in your crafting, please leave a comment below.

Card Cuts: Marina Mist: card base 7″ x 10″ scored at 5″; Soft sky: front stamped panel 2-1/2′ x 5″, sentiment banner 1-1/2″ x 3″, inside stamped mat 4-3/4″ x 6-3/4″, inside sentiment panel 4-1/4″ x 6-1/4″; Vellum: front 5″ x 7″, dragonfly 3″ x 4″; Whisper White: 2 dragonflies 3″ x 6″.

Product List

Uncategorized

Stampin’ Up Happy Inkin’ Thursday Thank You

Blog hop headerGood Thursday mornin’ Everyone! Another week has FLOWN by. Where does the time go anyway? Today is Maundy Thursday. It is Holy Week for Christians, and Easter will be upon us in a couple of days. Tomorrow is end-of-the-work-week Friday for most people, Good Friday for Christians, and the day to plant potatoes for gardeners! On top of that, it is probably National Something-or-Other Day as well. But, that is off the subject, so let’s move on to today’s Hop.
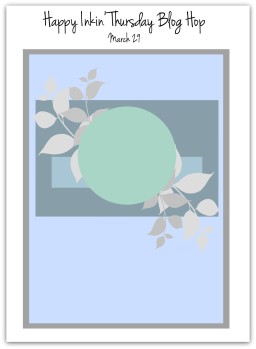
Our challenge for today is this sketch.

mar 29 sketch

I really like this sketch and will use it again soon. For today however, I chose to make my card base from Always Artichoke. The rectangle is a light piece of Wood from the Wood Textures DSP Stack. I didn’t want the sentiment to take center stage, so I used the Thank You from Teeny Tiny Wishes and stamped it in Early Espresso. To give the panel more texture, I ran it through the Big Shot in the Pinewood Planks Dynamic Textured Embossing folder. This was Liquid Glued to a mat of Crumb Cake. I wrapped a strand of Linen Thread around this piece about 5 times, taping it on the back. I then adhered this to the card base with Stampin’ Dimensionals.

wild wing creations-5

From a dark piece of Wood Textures DSP I die cut a circle using one of the Layering Circles, I think the second or third largest, to provide a background for the ‘bird’s nest’. For the nest, I cut one each of the swirly things from Swirly Scribbles from the same dark Wood Textures DSP. To add more dimension to the nest, I cut 2 more of each from Crumb cake and Liquid Glued them together. I then glued the one with the ‘leaves’ to the one without leaves, then to the circle.

At this point I needed to dry fit everything. Using the branch from Seasonal Layers I cut 2 of these from Early Espresso. From a scrap piece of striped green from Delightful Daisy DSP, I cut several leaves with the leaf from Flourish Framelits, and cut a couple from Vellum as well. I never know for sure how many I will need, and any extras can be kept for another project. (In the end I used one branch, 2 Daisy DSP leaves, 1 vellum leaf, 1 Pear Pzazz leafy branch, 1 vellum leafy branch, and saved the rest)

wild wing creations-2

Then from Vellum and Pear Pzazz I cut some of the leafy branch from the Petals and More die set. (Purchased as a bundle with the Petal Palette stamp set you save 10%.) Then I  stamped the bird in Early Espresso from the same set on Sahara Sand,  die cut it  and painted it with my Basic Black and Melon Mambo markers. I tucked the bird in the nest and adhered it with Stampin’ Dimensionals.

I dry fit everything, then used Liquid Glue to tack down all the elements, leaving some of the leaves floating free. The card front is now finished.

On the inside, I stamped an Old Olive leafy branch and the sentiment in Early Espresso, both from the Petal Palette stamp set, onto a light colored panel of Wood Textures DSP. This was Liquid Glued to a Dark Panel of Wood Textures and onto a Crumb Cake mat. The whole was Liquid Glued into the card base.

wild wing creations-6

For the envelope I stamped the bird on the front in Early Espresso and left it plain, then used more of the Wood Textures DSP on the flap.

I like this card, but wondered how it would look if I changed out the card base and gave it some texture. This is the result.

wild wing creations-1

I added a couple of flowers stamped from Petal Palette and colored with Melon Mambo and Pear Pzazz Stampin’ Write Markers. Card base is Old Olive. Which do you like better?

Host Code: UJWYGVQJ good through March 31. Don’t forget…..Sale-A-Bration ends Saturday. You don’t want to miss out on the free goodies you can get when you order from me.

Please, now click on the “Next Blog” image and see what Amy has created. Each participating team member is listed below so you can link directly to each one if you prefer.

Blog hop next button

Amy Koenders

Shelagh Freemantle

Mary Deatherage

Kristi Gray

Jaimie Babarczy

Sue Prather

Karen Finkle

Julie Johnston-you are here

Card Cuts: Always Artichoke: card base 7″ x 10″ scored at 5″; Crumb Cake: front rectangle mat 3-1/4″ x 4-1/4″, inside mat 4-1/4″ x 6-1/4″,  backing for swirly pieces 6″ x 6″, bird 1-1/2″ x 2″; Wood Textures Designer Series Paper Stack: Light: front rectangle 3″ x 4″, inside panel 3-3/4″ x 5-3/4″; Dark:  circle 2-1/2″ x 2-1/2″, swirly pieces 3″ x 6″, inside mat 4″ x 6″; Delightful Daisy Designer Series Paper (green): leaves 1-3/4″ x 5″; Pear Pzazz: leafy branch 3′ X 3″; Vellum: leaves 3″ x 6″; Early Espresso: branch 1-1/2″ x 4″

(The above pieces listed for the leaves are for what I actually used on the card. I cut more than I used, so saved them for later.)

Product List

Uncategorized

Stampin’ Up! Hedgehugs Birthday for Inkin’ Thursday Blog Hop

Good Thursday to you all. All this hopping keeps one on her toes, does it not? Welcome to our Happy Inkin’ Thursday Blog Hop. When you are finished here, I hope you visit all the other blogs as we have some very talented women on this hop.

Blog hop header

We were challenged to use the following colors for today’s hop. I really groaned when I saw this, as one of them is my all-time-most-disliked color! YUK! How can I make a card using THAT?!

Well, you will be happy to know that I did it, and it didn’t turn out badly at all. Of course, I minimized the amount of it that is visible, so that helped. Here are the colors for today.challenge

I started with a Basic Gray card base and added a mat of Dapper Denim.

I chose to do a birthday card for a pre-teen boy, and decided that an Eclipse card would work, as would the Hedgehugs. All kids like animals, don’t they? Going for whimsy, I didn’t want anything straight except for the Letters, cut with the Large Letters Framelits.

wild wing creations-2

Before stamping everything on the front of the card with images and sentiments from the Hedgehugs stamp set in Versamark, I went over the panel with my Embossing Buddy. I stamped the images then added White Embossing Powder and heat set it. Oh, so cute! Seems a shame to cut them up. But cut them I did.

Then, to raise up the letters, I cut 4 more of each in (do I have to say it?) Lemon Lime Twist. These were all glued together with Liquid Glue. Also using Liquid Glue, I adhered the stamped panel to a mat of Lemon Lime Twist, leaving a VERY narrow edge. I told you I minimized  it.

Now that all my letters were glued together, I replaced them in their respective spaces on the card front adhering them with Liquid Glue.

wild wing creations-1

Next, I dragged some White Bakers’ Twine through the LLT ink pad to color it and wrapped it around the art piece, taping it on the back. I tied a small bow and added it to the front with a Glue Dot.

This panel was adhered to the card base and mat with Stampin’ Dimensionals. The letters ARE straight, though with the angled images they don’t look straight.

For the inside, I stamped another sentiment from Hedgehugs, and the squirrel (or is it a skunk?) on the stump. Reminds me of a childhood silly poem, “A skunk sat on a stump…..”, but I digress.

wild wing creations-3

These were stamped in Versamark and embossed in white on Dapper Denim the same as the front. I added the Happy Birthday sentiment from Eclectic Expressions, also in Versamark and White Embossing Powder, heat set it, then Liquid Glued the panel to a Lemon Lime Twist mat and into the card base. This card is DONE!

The envelope, never to be nekkid, is simply Dapper Denim Hedgehugs on the flap and a row of vertical marks from the Eclectic Expressions stamp set across the bottom of the front. Though the Hedgehogs were well inked, I think the impression would have been better if I had had my Stamp-A-Ratus and could have stamped them a second time. I then went over the flap edge with my Dapper Denim Stampin’ Pad to sort of frame the Hedgehogs

It was pretty quick to do with the cutting and gluing of the letters taking the most time. I think it was time well spent. This card actually is better than I expected it to be with, you know, that color. Now, hop on around to see what the rest of the team has done.

Blog hop next button

Amy Koenders

Shelagh Freemantle

Mary Deatherage

Kristi Gray

Jaimie Babarczy

Sue Prather

Karen Finkle

Julie Johnston (You are here)

Card Cuts: Basic Gray: 5-1/2″ x 8-1/2″; Lemon Lime Twist: front mat 3-3/4″ x 5″, inside mat 4″ x 5-1/4″, letters 6″ x 10″; Dapper Denim: front mat 4″ x 5-1/4″, art panel 3-5/8″ x 4-7/8″, inside 3-7/8″ x  5-1/8″

Product List

Uncategorized

Stampin’ Up WOOD

I hope you are all having a Fabulous Friday. And, why not? Friday is the day before the weekend, which makes nearly everyone happy, right?

My card for today is another one using the Happy Inkin’ Thursday Blog Hop sketch from yesterday, with a totally different take on it.

Here is the sketch we used, and that I am using again today.

3-15 graphic

And here is the card I created using that sketch

wild wing creations-4

This technique, called Black Ice, was developed, or invented if you prefer, by Melissa Kerman. You can see her video on this technique here

I wanted this to be all about trees and wood, so I used the Waterfront stamp set, Wood Textures Designer Series Paper, Leaflets Framelits and Pinewood Planks Dynamic Textured Impressions Embossing folder.

To begin, I took a panel of Copper Foil Sheets and ran it through the Big Shot in the Pinewood Planks DTIEF. With the Classic Basic Black Stampin’ Pad (regular ink pads won’t stick to the foil) and a light touch, I simply dragged it over the embossed copper. This really brought out the wood grain. This is the black of the black ice.

wild wing creations-4

I left this to dry thoroughly while I went on to other parts of the project.

I tried stamping the trees and mountains then die cutting with the maple leaf from the Leaflets Framelits, which didn’t work very well. Then, I cut first, then stamped my design and that was much better. Initially, I used a dark wood (like the mat), rubbed my Versamark pad over the edges and heat embossed it in copper. Hmmm. A little dark, but maybe ok once it is on the copper.

wild wing creations-4

To be certain the copper piece was dry I did use my Heat Tool for a brief time. To do the ice technique, simply drag the Versamark pad over your panel, cover it in Clear Embossing Powder and heat emboss. Lovely. I really do like this look!

This was Liquid Glued to a piece of the dark Wood Textures DSP and onto my card base. Using Tear and Tape, I adhered a strip of Burlap Ribbon to the card front. I also die cut two branches from the Seasonal Layers Thinlits, one in Basic Black and one in the dark Wood Textures DSP. I offset these and Liquid Glued them over the Burlap Ribbon.

I put several Stampin’ Dimensionals on the back of my stamped and embossed leaf, wound some Copper Metallic Thread around and adhered it over the ribbon and branches. Remember I said it was a little dark? Well, it was a LOT dark and I really didn’t like it. The remedy was to die cut the leaf from a lighter Wood Textures DSP, then stamp the design. I simply Liquid Glued this over the darker leaf, offsetting it a bit so the copper edge would show. AHA! Much better.

wild wing creations-1

Now, the ribbon is wrong! Oh. My. Gosh. Now what? Well, I don’t like this, so what harm can it do to try to fix it before it goes in the trash? I took my Basic Black Stampin’ Write Marker and went over the ribbon. I had to do this twice to get it really black, but I am thinking you could use a black permanent marker too, which might be darker.

This helped enough that the card was salvaged, but, if I do it again I will use a strip of black card stock instead. But then, the black branch won’t show up. I will think of something!

On the inside I ran my Embossing Buddy over the paper before I stamped the sentiment in Versamark. This is also from the Waterfront stamp set, stamped  on the dark Wood Textures DSP, covered in Copper Emboss Powder and heat set. This panel was liquid glued to a Copper Foil Sheets panel and into the card base.

wild wing creations-5

For the envelope, I stamped the same trees and mountains on the front, then added a piece of the Wood Textures DSP to the flap. All done. I think this needs improving, but I like the basic idea. Must try it again.

Card Cuts: Basic Black: card base 5-1/2″ x 8-1/2″ scored at 4-1/4″, branch 2″ x 5″, Copper Foil Sheets: embossed panel 3-3/4″ x 5″, inside mat 3-11/16″ x 4-15/16″; Wood Textures Designer Series Paper Pack  front mat 4″ x 5-1/4″, inside sentiment panel 3-3/8″ x 4-5/8″, leaf 4″ x 4″, branch 2″ x 5″

Product List

Uncategorized

Stampin’ Up! Happy Inkin’ Thursday Blog Hop

Blog hop header

Here it is Thursday and time for another Blog Hop. We have a full roster today, so come along and join the fun. We are working from this sketch today.

3-15 graphic

And, based on that sketch, here is what I created for the hop today.

wild wing creations-3

I started with a Whisper White heavy card stock base and added a mat of Elegant Eggplant, topped with another mat of Perfect Plum. Using Tear and Tape, I taped down a length of Pear Pzazz Chevron ribbon.

Now for the fun part. I cut two crosses from the Hold on to Hope Bundle, a plain Elegant Eggplant one, and one using the fancy die out of Whisper White. These were adhered together with Liquid Glue.

I cut a Stitched Shapes large oval in Whisper White, and the large scalloped one out of Pear Pzazz. There is a nice sun ray (at least that is what it looks like to me) in the Amazing You stamp set. I stamped this in Daffodil Delight on the Whisper White oval so it would be behind the cross, then turned the oval upside down and stamped a mirror image of the first one. Liquid Glue adhered the ovals together as well as the cross to the oval.

Using Pear Pzazz ink, I stamped off the flower spray from Hold on to Hope onto scrap paper, then stamped it on a panel of Whisper White. Using my Old Olive, Elegant Eggplant, Daffodil Delight, and Calypso Coral Stampin’ Write markers, I colored the leaves and flowers. This was cut with the die from the bundle.

wild wing creations-3

I liquid glued it to the back of the ovals positioning it to lay over the ribbon, then used Stampin’ Dimensionals and Mini Stampin’ dimensionals to adhere this focal point to the card front.

wild wing creations-5

Moving on to the inside, I again stamped off once in Pear Pzazz the floral image onto Whisper White card stock. The sentiment is from the Easter Message set from last year, and is stamped in full strength Elegant Eggplant.

wild wing creations-4

This panel was Liquid Glued to an Elegant Eggplant mat, then onto a Pear Pzazz mat and into the card base.

The envelope has the same floral image on the front and the plain cross stamped over the flap.

I had fun with this sketch today. In fact, I made 3 cards using this sketch and may post them at a later date. It makes a clean, relatively simple card and I think it is lovely.

On with the hop! Click the ‘next’ image to go on to see what beautiful creation Amy has for you today.

Blog hop next button

If you prefer to hop around, here is the list for today.

Amy Koenders

Shelagh Freemantle

Mary Deatherage

Kristi Gray

Jaimie Babarczy

Sue Prather

Karen Finkle

Julie Johnston

Don’t forget, Sale-A-Bration ends March 31. Don’t miss out on the opportunity to get free goodies! More items you can get for free were added today from the Annual Catalog. Check it out. And now is a good time to sign up to be a demonstrator, too. Not only do you get whatever you want in your kit, you get free stamp sets as well. Go for it!

03.15.18_FLYER_3RD_RELEASE_SAB_US

CARD CUTS: Heavy Whisper White: card base 5-1/2″ x 8-1/2″ scored at 4-1/4″; Whisper White: oval 2-1/2″ x 3-1/2″, cross 2″ x 3″, floral spray 2-1/2″ x 3-1/2″, inside sentiment panel 3-1/2″ x 4-3/4″; Elegant Eggplant: front mat 4′ x 5-1/4″, cross 2″ x 3″, inside mat 3-1/2″ x 4-3/4″; Perfect Plum: front 3-1/2″ x 4-3/4″; Pear Pzazz: scalloped oval 2-3/4″ x 3-3/4″, inside mat 4″ x 5-1/4″

Product List

Uncategorized

Stampin’ Up Iced Beautiful Day ‘Monarch’ for the Inkin’ Krew Blog Hop

inkin-krew-blog-hop-banner2Good Tuesday to You All! Welcome!

Today is our monthly Inkin’ Krew Blog Hop. Thank you for joining us as we bring you projects with a “Celebrate Spring” theme. I had several ideas in mind for this one,  but in the end, the Beautiful Day butterfly stamp won the contest. Not much of a contest, I admit, but I did argue with myself for a little bit.

I am a Master Gardener and one of my group’s projects for the past 3 years has been to go into the Middle School and talk to the sixth grade students about the importance of pollinators, their plight, and what we can do to help, in particular, the Monarch Butterfly. We also help them plant milkweed seeds, as this is the ONLY plant on which the adult Monarch lays its eggs, and thus, the ONLY plant the larvae will eat.

This species has seen an 80% reduction in population in the past 20 years, so we are educating people a little at a time to do what we can to help them return to previous levels. Habitat destruction, pesticides and weather have the most impact on these fragile insects. But I digress.

Having been to school just last week, Monarchs were on my mind and in my heart. While this stamp is not a monarch, I made it look as much like one as I could. Enjoy, then continue the hop to see what the rest of our talented team has done. Below is an image of a REAL Monarch butterfly. It is a female….yes, you can tell the difference if you know how.monarch for dear Iris column

The Monarch deserved special treatment I thought, and I used Melissa Kerman’s You Tube video on her ‘black ice’ technique as my inspiration. Only for this particular version she called it ‘clear ice’. You can view that here.

I began by rubbing my Embossing Buddy over the Gold Foil Sheets before stamping the butterfly from the Beautiful Day stamp set in Basic Black Archival ink. I then heat embossed it in Clear Stampin’ Emboss Powder.  Stampin’ Blends in Pumpkin Pie Light and Dark were used to color in the wings. There are white dots also on the Monarch, so I used my White Gel Pen to make dots around the outside edges.

wild wing creations-3

After completing the coloring and letting it dry thoroughly, I tapped my Versamark ink pad, very gently over the whole panel, added clear Stampin’ Emboss Powder and heat embossed it. Voila! Instant texture, which Ms. Kerman calls ‘ice’. (the black ice is done by dragging Basic Black over the foil, and dragging the Versamark instead of tapping it.) I think it is a lovely technique, and will be using it again. This panel was Liquid Glued to a Basic Black mat.

My card base is Basic Black. I cut a panel of Whisper White to fit, minus 1-1/2″ vertically. I cut a piece of Tangerine Tango to fit that space and ever-so-lightly, dragged my Basic Black stamp pad from either end to add some texture to the orange, then Tear and Taped them together. I used NO pressure, just the weight of the stamp pad.

This panel was adhered to the card base with Tear and Tape. I centered the butterfly panel over the card front to get the placement for a length of Black Shimmer Ribbon with the ends cut on an angle. This ribbon was Tear and Taped to the card front, then the butterfly panel was adhered with Liquid Glue. I sort of wished later that I had used Stampin’ Dimensionals. Next time I will do that, and perhaps add some Basic Jewels to the butterfly body, but this card was to be simple and highlight the ‘ice’ technique.

wild wing creations-4

On the inside, I stamped the sentiment, butterfly and the border on a panel of Whisper White, all in Basic Black Archival Ink. The butterfly stamp is from Kinda Eclectic (retired), the sentiment and border from Butterfly Basics. The die cut butterfly, in Tangerine Tango and colored with my Basic Black Stampin’ Write Marker, is from the You Move Me Bundle and attached with Liquid Glue. I also used my Tangerine Tango Stampin’ Write Marker to color in the stamped butterfly.

This panel was adhered to a Gold Foil Sheets panel, then onto a Tangerine Tango mat and into the card base. An Enameled Dot finished the inside.

I don’t like a plain envelope, but don’t usually spend too much time decorating it. However, I thought my Monarch deserved better, so I stamped the Beautiful Day butterfly on the back, putting most of it on the flap. I did this in Basic Black, then colored it. To do this I used my Aqua Pen and Tangerine Tango Classic Stampin’ Pad with ink in the lid to give a watercolor effect and keep it light in tone. To make the black veins darker, I went over each one with my Basic Black Stampin’ Write Marker.

wild wing creations-2

The envelope front received 3 of the small butterflies from Kinda Eclectic in Basic Black, then colored in with the Tangerine Marker.

wild wing creations-1

I hope I did our Monarch Butterflies justice here. I am pretty sure Monarch butterflies qualify as ‘Celebrate Spring ‘ for this hop. If you desire more information on their plight, go to Monarch Watch for a plethora of ways you can help if you choose to do so.

Now, on with the hop. By clicking the ‘next’ button you will go directly to our team leader Amy’s blog. The ‘back’ button with return you to Shirley’s project. Or, you can click on any of the team names  below to go to their blog and just ‘Hop’ around.

Thanks for stopping by, and be sure to join us again next month. Information on card cuts and products are below.

inkin-krew-blog-hop-previous2inkin-krew-blog-hop-next2

Jaimie Barbarczy

Nanette Tracy

Karen Finkle

Linda Richenberg

Sue Prather

Mary Deatherage

Shirley Gentry

Julie Johnston (You are here)

Amy Koenders

CARD CUTS: Basic Black: card base 5-1/2″ x 8-1/2″, scored at 4-1/4″; Whisper White: top front panel 2-3/4″ x 5-3/8″, inside panel 3-3/8″ x 4-5/8″; Tangerine Tango: lower card front 1-3/8″ x 5-3/8″, inside mat 4″ x 5-1/4″, butterfly-scrap; Gold Foil Sheets: front butterfly panel 3-3-16″ x 4-7/16″, 3-3/4″ x 5″

Product List

Uncategorized

Happy Birthday with the Bees!

Happy Awesome Sunday, Folks! I hope you remembered to turn your clocks forward last night and didn’t miss church or anything because you forgot!

My card for today is for a bee-keeper, and since Stampin’ Up doesn’t have any bee hives, I used a set from Our Daily Bread Designs to stamp the bee skep. The bee is also from that set, but everything else is SU.

I began by taking a piece of the Wood Textures DSP and randomly stamping the bees in Versamark ink. I heat embossed these in copper, then, using the Hexagons Dynamic Textured Impressions Folder, I dry embossed it. After all, the bees make honeycombs which are hexagonal in shape. wild wing creations-4

A piece of 1/4″ Copper trim spread out and wrapped around the bee-embossed Wood Textures DSP is taped to the back. This panel was then adhered to the Early Espresso card base with Liquid Glue.

I sponged a panel of Very Vanilla with Soft Suede using a Sponge Dauber, then stamped the bee skep image also in Soft Suede. The bee was stamped next, then the honeycomb design from Butterfly Basics. Using my Stampin’ Write markers I colored the flowers, leaves, bee skep and bees with Pink Pirouette, Pear Pzazz, and Daffodil Delight. I filled in the wings of the bees with my Wink of Stella to give them a translucent look. The sentiment, stamped in Versamark and heat embossed in copper, is from Butterfly Basics.

The ground beneath the hive needed something, so I used my Blender Pen and Pear Pzazz ink from the Classic Stamp Pad lid to give it a green wash.

wild wing creations-1

Having decided to offset this panel so more of the embossed bees would show, I used Stampin’ Dimensionals along the left edge to add several loops of Metallic Copper Thread, then adhered this panel to the card front. The finishing touch is found in the 3 Glitter Enamel Dots scattered over the panel.

For the inside, I again dry embossed a panel of the same Wood Textures DSP and adhered it to the card base with Liquid Glue. I sponged another Very Vanilla panel around the edges with Soft Suede ink, then stamped several of the honeycomb design without re-inking the stamp,wild wing creations-5

Using my Stamp-A-Ma-Jig to get the sentiment (from Picture Perfect) straight, I stamped this also in Soft Suede. Next I stamped 3 bees in Soft Suede and colored them with my Daffodil Delight Stampin’ Write marker. The wings are Wink of Stella. The Bee Happy sentiment is from the same Our Daily Bread Designs stamp set. This panel was Liquid Glued to the embossed mat.

For the envelope flap, I randomly stamped the honeycomb design, again without re-inking, a couple of times, then added one bee, colored the same as the ones inside the card.

The front received flowers (bees need flowers!) from Background Bits, stamped in Soft Suede ink. Then, three more bees hover over the flowers, stamped and colored the same as the others. This card and envelope are finished, and I am happy with the result.

HOST CODE UJWYGVQJ good through March 15

Check out my Customer rewards page for more information on how to get FREE stuff!

Click here for customer rewards.

If you need product to make this, or any other project, and need a demonstrator, I would be happy to help you. And, now is a good time to join our Stampin’ Up team for even more savings and free items.

Card Cuts: Early Espresso: card base 5-1/2″ x 8-1/2″ scored at 4-1/4″; Wood Textures Designer Series Paper: front 4-1/4″ x 5-1/2″, inside 4″ x 5-1/4″; Very Vanilla: front and inside 3-1/2″ x 4-3/4″

Product List

Uncategorized

Stampin’ Up Happy Inkin’ Thursday Blog Hop Birthday Card

Blog hop headerTerrific Thursday to you All! Today’s Hop is based on color, and these are the colors we are using to create our cards.Image may contain: text

And this is what I made to share with you. So please, enjoy the hop and be sure to check out what the others on our team have done.

wild wing creations-4

This is sort of a normal color combination for me, but still a difficult one. For starters, I needed to make yet another masculine card (6 male birthdays this month!!!) so I decided these would be good colors for it.

As this is for a younger man, I chose to use the guitar from Country Livin’ as my primary image. For the background I sponged Pool Party ink over the top approximately 2/3, and Garden Green over the bottom 1/3. Over this I stamped the cluster of dots from Perennial Birthday in Soft Suede, sometimes stamping off once first, and sometimes just stamping until the ink is gone.

Next, I stamped one guitar in stamped off once Garden Green and one in stamped off once Soft Suede. I also spritzed the guitar stamp with water and stamped in a couple places to remove some of the sponged ink, as well as spritzing the dots. These were randomly stamped over the panel. It is hard to see this, but it does add some texture to the panel. This was  then adhered to a Soft Suede mat with Liquid Glue. Set this aside for the moment.

wild wing creations-1

My card base is Soft Suede. Over this I used Tear & Tape to adhere the Whisper White/Green panel. To make this panel, I cut the Whisper White at 4″ tall x 4-1/4″ wide, and a Garden Green piece at 1-1/2″ x 4-1/4″. These two pieces are joined by a piece of Tear & Tape, leaving the protecting paper on for the time being. Add more Tear & Tape to the rest of the perimeter of the panel.

I cut  a strip of Pool Party Shimmer Ribbon to cover the joint, and wrapped it to the back, securing it with the Tear & Tape. Now, remove the top 1″ of the protective paper on either side of the front panel, just pulling it back and folding it out to make ‘handles’. You will see why in a minute. Also, remove the paper from across the top.

Lining up the panel with the card base, check to be sure everything is as you want it. THEN, attach the top edge. Those little handles you made will prevent this from sticking until you are ready for it to be stuck down permanently. Once the top is adhered, then pull away the paper on the sides, using your ‘handles’. Now, peel away the protective paper from the bottom and complete the adhesion.

I used Stampin’ Dimensionals to adhere the focal panel to the card front.

wild wing creations-4

Next, I cut another piece of the Pool Party Shimmer ribbon, flagging the ends with scissors, and used Fast Fuse to adhere it, lining it up with the ribbon under the focal panel. I stamped the Happy Birthday in Soft Suede on a scrap of Pool Party sponged Whisper White and cut it with a die from the Bunch of Banners Framelits.   A couple of Stampin’ Dimensionals adhere this to the ribbon. Card front..DONE!

On the inside, I sponged another panel in the same manner as the front and stamped a Garden Green guitar. This was stamped off twice before stamping on the panel. Over this I stamped two sentiments from Perennial Birthday in full strength Soft Suede, then adhered it to a Garden Green mat with Liquid Glue. This was then Liquid Glued to a Whisper White mat and into the card base.

wild wing creations-5

No naked envelopes, please! I stamped another Garden Green guitar on the front and three on the flap in Soft Suede, not re-inking between stamps. I then randomly stamped those little dots same as the front, only in Pool Party.

I hope you like this card. It was a bit of a challenge, but I am happy with it.

Now, please Hop on around the group to see what their creative minds have done with this challenge. By clicking on the NEXT button, you will go to Amy Koender’s blog. Below is a list if you get lost or want to skip around.

Blog hop next button

Amy Koenders

Shelagh Freemantle

Mary Deatherage

Kristi Gray

Jaimie Babarczy

Karen Finkle

Julie JohnstonYou are here

Card Cuts: Soft Suede: card base 5-1/2″ x 8-1/2″ scored at 4-1/4″, mat 3-1/2″ x 4-3/4″; Whisper White: upper front 4″ x 4-1/4″, focal panel 3-3/8″ x 4-5/8″, inside mat 4′ x 5-1/4″, sentiment panel 3-1/2″ x 4-3/4″, front sentiment-scrap; Garden Green: lower front 1-1/2″ x 4-1/4″, inside mat 3-3/4″ x 5″

Product List

Uncategorized

Stampin’ Up Wood Textures Birthday

Good Sunday Morning All

Today is supposed to be another beautiful day, so after church I am going out with camera to see what goodies I can find. In the meantime, I want to share a card with you that I first found on Pinterest. I went to Su Mohr’s blog, https://aromasandart.com/lovely-as-a-tree/, and since it uses a couple of my favorites, I thought I would CASE for my nephew’s birthday.

wild wing creations-1

I am definitely going to play around with this idea some more, so who knows what may be in the future!

For starters, I made the card base from Early Espresso, then, with sheets from the Wood Textures Designer Series Paper Stack, I proceeded to make the card front.

I cut the top piece to 4-1/4″ x 5-1/4″, then centered the leaf from Leaflets Framelits and ran it through the Big Shot. On a sheet of the plainer wood grain sheets from Wood Textures, I stamped the image from Lovely as a Tree in Soft Suede. These two pieces were adhered together with Foam Adhesive Strips, then to the card base with Liquid Glue. I placed the Foam Strips very close to the edges of the back of the tree rings, and around the leaf. Since I didn’t like the look of the white edges of the foam, I used my Early Espresso Stampin’ Write Marker to color them.

This completes the card front. Easy Peasy.

wild wing creations-1

For the inside, I used the tree rings paper for a mat, then stamped my sentiment and the Lovely as a Tree image on a plainer  wood grain panel. The sentiment is from Perennial Birthday and stamped in full strength Soft Suede. The trees were stamped off once before stamping on the liner panel. I used my Stamp-A-Ma-Jig to line up the sentiments. All were adhered with Liquid Glue.

On the envelope, never to be naked, I again stamped the Lovely as a Tree image on the front in Soft Sued, and used more of the tree rings DSP on the flap.

This card is quick and simple, yet, I think it is lovely. Try one for yourself.

The current HOST CODE, good through March 15 is UJWYGVQJ

Use this code when placing your order through my website for a free gift. Details can be found on the customer rewards page.

If you don’t have a demonstrator, and need supplies, just click on the Shop Online button at right. Be sure to check out the rewards page to receive free goodies.

Cuts: Early Espresso: 4-1/4″ x 11″ scored at 5-1/2″; Wood Textures Designer Series Paper Stack: tree rings die cut 4-1/4″ x 5-1/2″, tree rings mat 4″ x 5-1/4″, plain (front) 4″ x 5-1/4″, plain (inside) 3-3/4″ x 5″

Product List

Uncategorized

Stampin’ Up! Cool Treats Birthday

Good Friday Morning Everyone! We have had some springlike weather the past couple of days, but the meteorologist says we are back to ‘normal’ winter weather next week, whatever THAT is! Colder for sure, and windy. He also said we can have warmth, cold, rain, snow, and wind. In other words, Mother Nature can throw just about anything, or all of it, at us!

My card today is for a guy whose business is Frozen Custard, so I thought I would use the now retired Cool Treats Designer Series Paper (you can substitute whatever for your card) for his birthday. He also wears, get this, ORANGE BOW TIES! I am never sure whether or not I should claim him! 🙂

wild wing creations-4

Anyway, the card is kind of cute, I think, and I hope he likes it.

I started with a Calypso Coral card base and adhered a mat made from the DSP that resembles a waffle cone to it with Liquid Glue. To the left of center I attached a strip from the DSP with the sundaes all over it, after I had cut the end with my Triple Banner Punch. I use this punch a lot.

Using the Layering Squares Framelits I cut a square a little less than 3″, but I don’t remember which die I used. Measure it. From Whisper White I cut a slightly smaller square, maybe 2-3/4″? with the stitched Shapes Framelits. It was the largest of the stitched shape squares. To this I stamped the sentiment in Calypso Coral with a stamp from the Picture Perfect Birthday. Liquid Glue holds it to the Calypso Coral mat.

From a scrap of the Sundae paper (not the Sunday Paper!), I fussy cut one sundae, attached a couple of Mini Stampin’ dimensionals and adhered it to the square. At this point I Liquid Glued the focal squares to the front of the card.

wild wing creations-1

Since he wears orange bow ties, I wanted to get a bow tie on there somehow, so I cut one from Calypso Coral card stock, softened it up some with my bone folder and put it together with Glue Dots. It is adhered to the square with Liquid Glue. Stampin’ Up! has a very informative video on how to use this punch. You can find it here.

Now that the front is done, let’s tackle the inside of the card. I think the inside should show as much care as the front, so I try to make them look really nice. For this one, I again used the ‘waffle cone’ paper for the base mat, and the sundaes for the second mat.

wild wing creations-5

For the sentiment panel, I used Whisper White, stamped with a Calypso Coral sentiment from the Picture Perfect Birthday stamp set. To help it stand out from the mat, I simply ran the edge of the panel over my Calypso Coral ink pad. Makes a nice, neat edge, not too wide.

For the envelope I fussy cut a row of the sundaes in their little squares and Liquid Glued them across the bottom of the front of the envelope. The Waffle Cone paper covers the flap.

It is a bit of an unusual card for a guy, but perfect for this particular guy I think.

HOST CODE: UJWYGVQJ Good through March 15. Use this code when placing an order of at least $50 and you will get a free gift from me. A $50 order placed through my online store will also qualify you for Bird Eggs and a free item from the Sale-A-Bration catalog.

For more details on my customer rewards program, click here

01-03-17_cmain_sab_us.jpg

Sale-A-Bration is even better now….with a $100 order you can get 2 of the level one items or 1 level two item. And, there is a second release that gives you even more choices. WOW! Free stuff is GOOD! Remember, these are only good through March 31, so don’t delay as the more popular items may go quickly.

Card Cuts: Calypso Coral: card base 5-1/2″ x  8-1/2″ scored at 4-1/4″, square mat 3″ x 3″, bow tie 4″x 4″(punch out 2 ties); Cool Treats Designer Series Paper: (waffle cone)front mat 4″ x 5-1/4″, inside mat 4″ x 5-1/4″, envelope flap 2-1/2″ x 6″, (sundaes)front banner 1-1/2″ x 4-1/2″, inside mat #two 3-1/2″ x 4-3/4″, cut out sundae from scrap for sentiment panel, 6″ strip fussy cut for front of envelope; Whisper White: stitched square 2-3/4″ x 2-3/4″, inside panel 3″ x 4-1/4″.

Product List