sympathy

Stampin’ Up! Peaceful Boughs Sympathy for Happy Inkin’ Thursday Blog Hop

Good Morning Everyone! I hope your week is going well, and that you have all your Christmas cards mailed out already. Sorry to say, I still have a few to send. Gosh, where did this year go? In some ways it went on far too long, thanks to Covid19, and in other ways it flew by.

At any rate it is Thursday and my creative, talented team mates have some lovely things to show. Our inspiration this week is color. We can use all of them, but must use at least 3. Here is our inspiration:

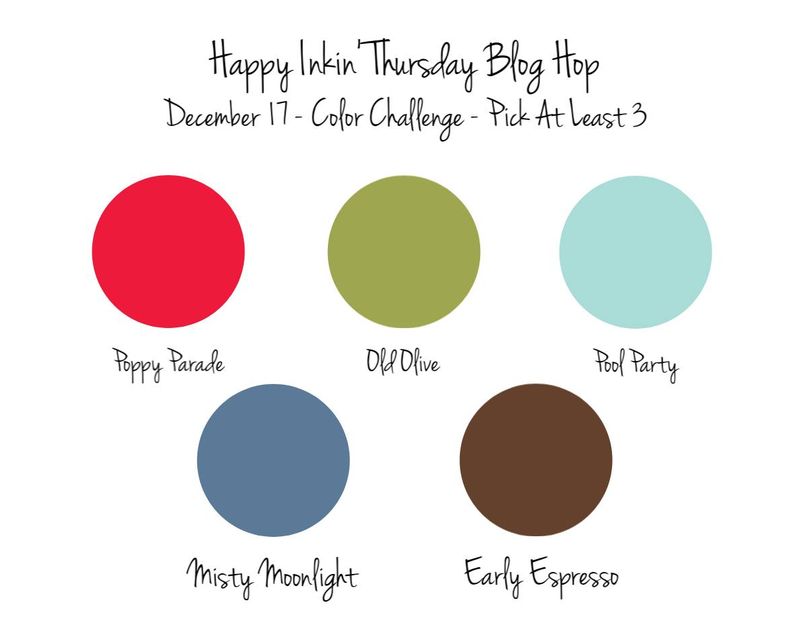
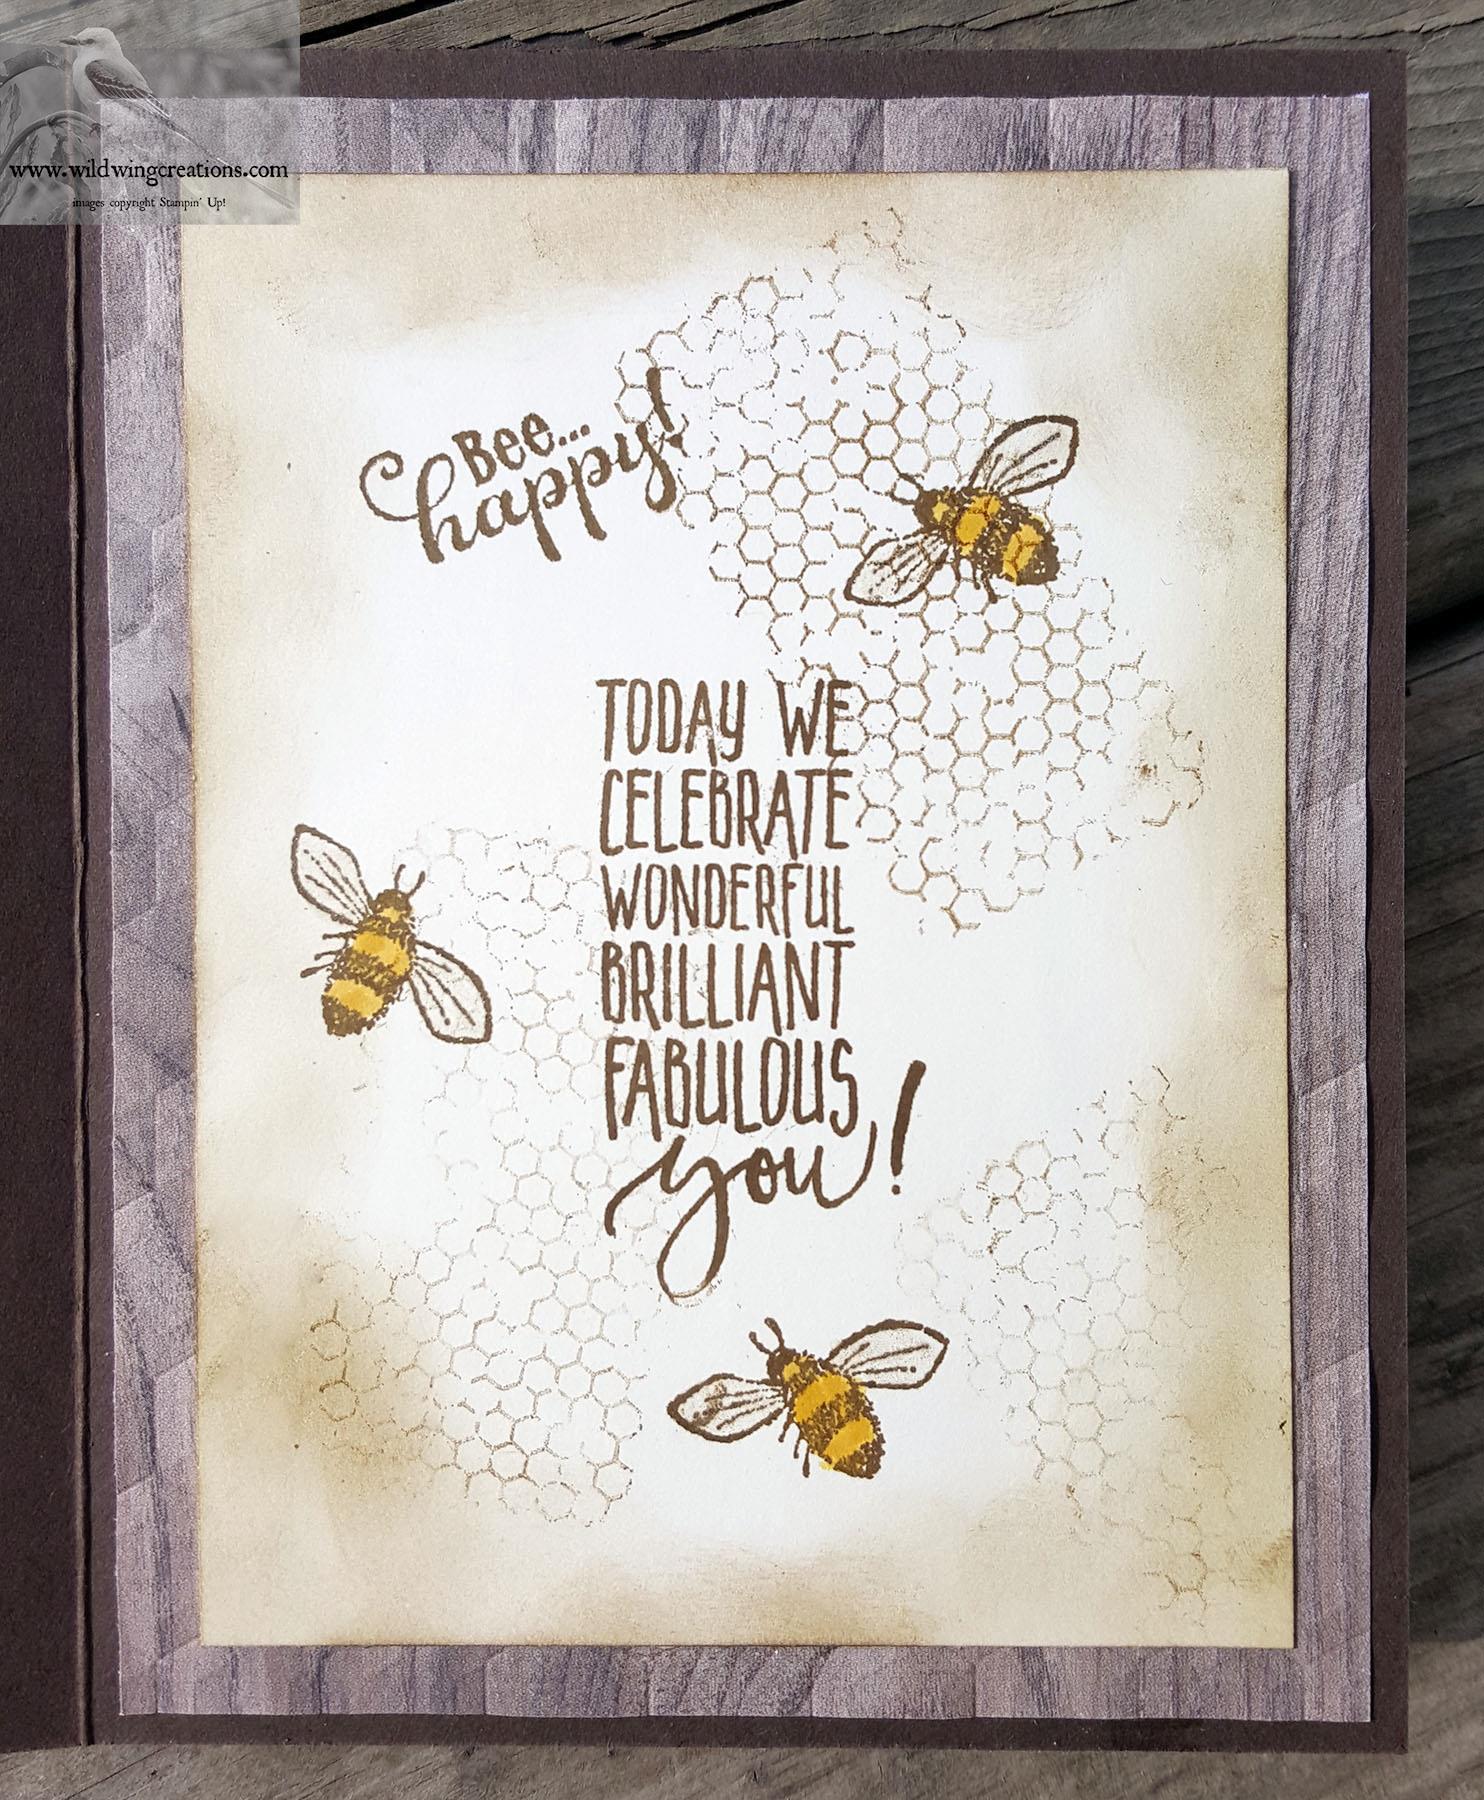
I chose to use Pool Party, Early Espresso and Old Olive for my sympathy card today. Here it is:

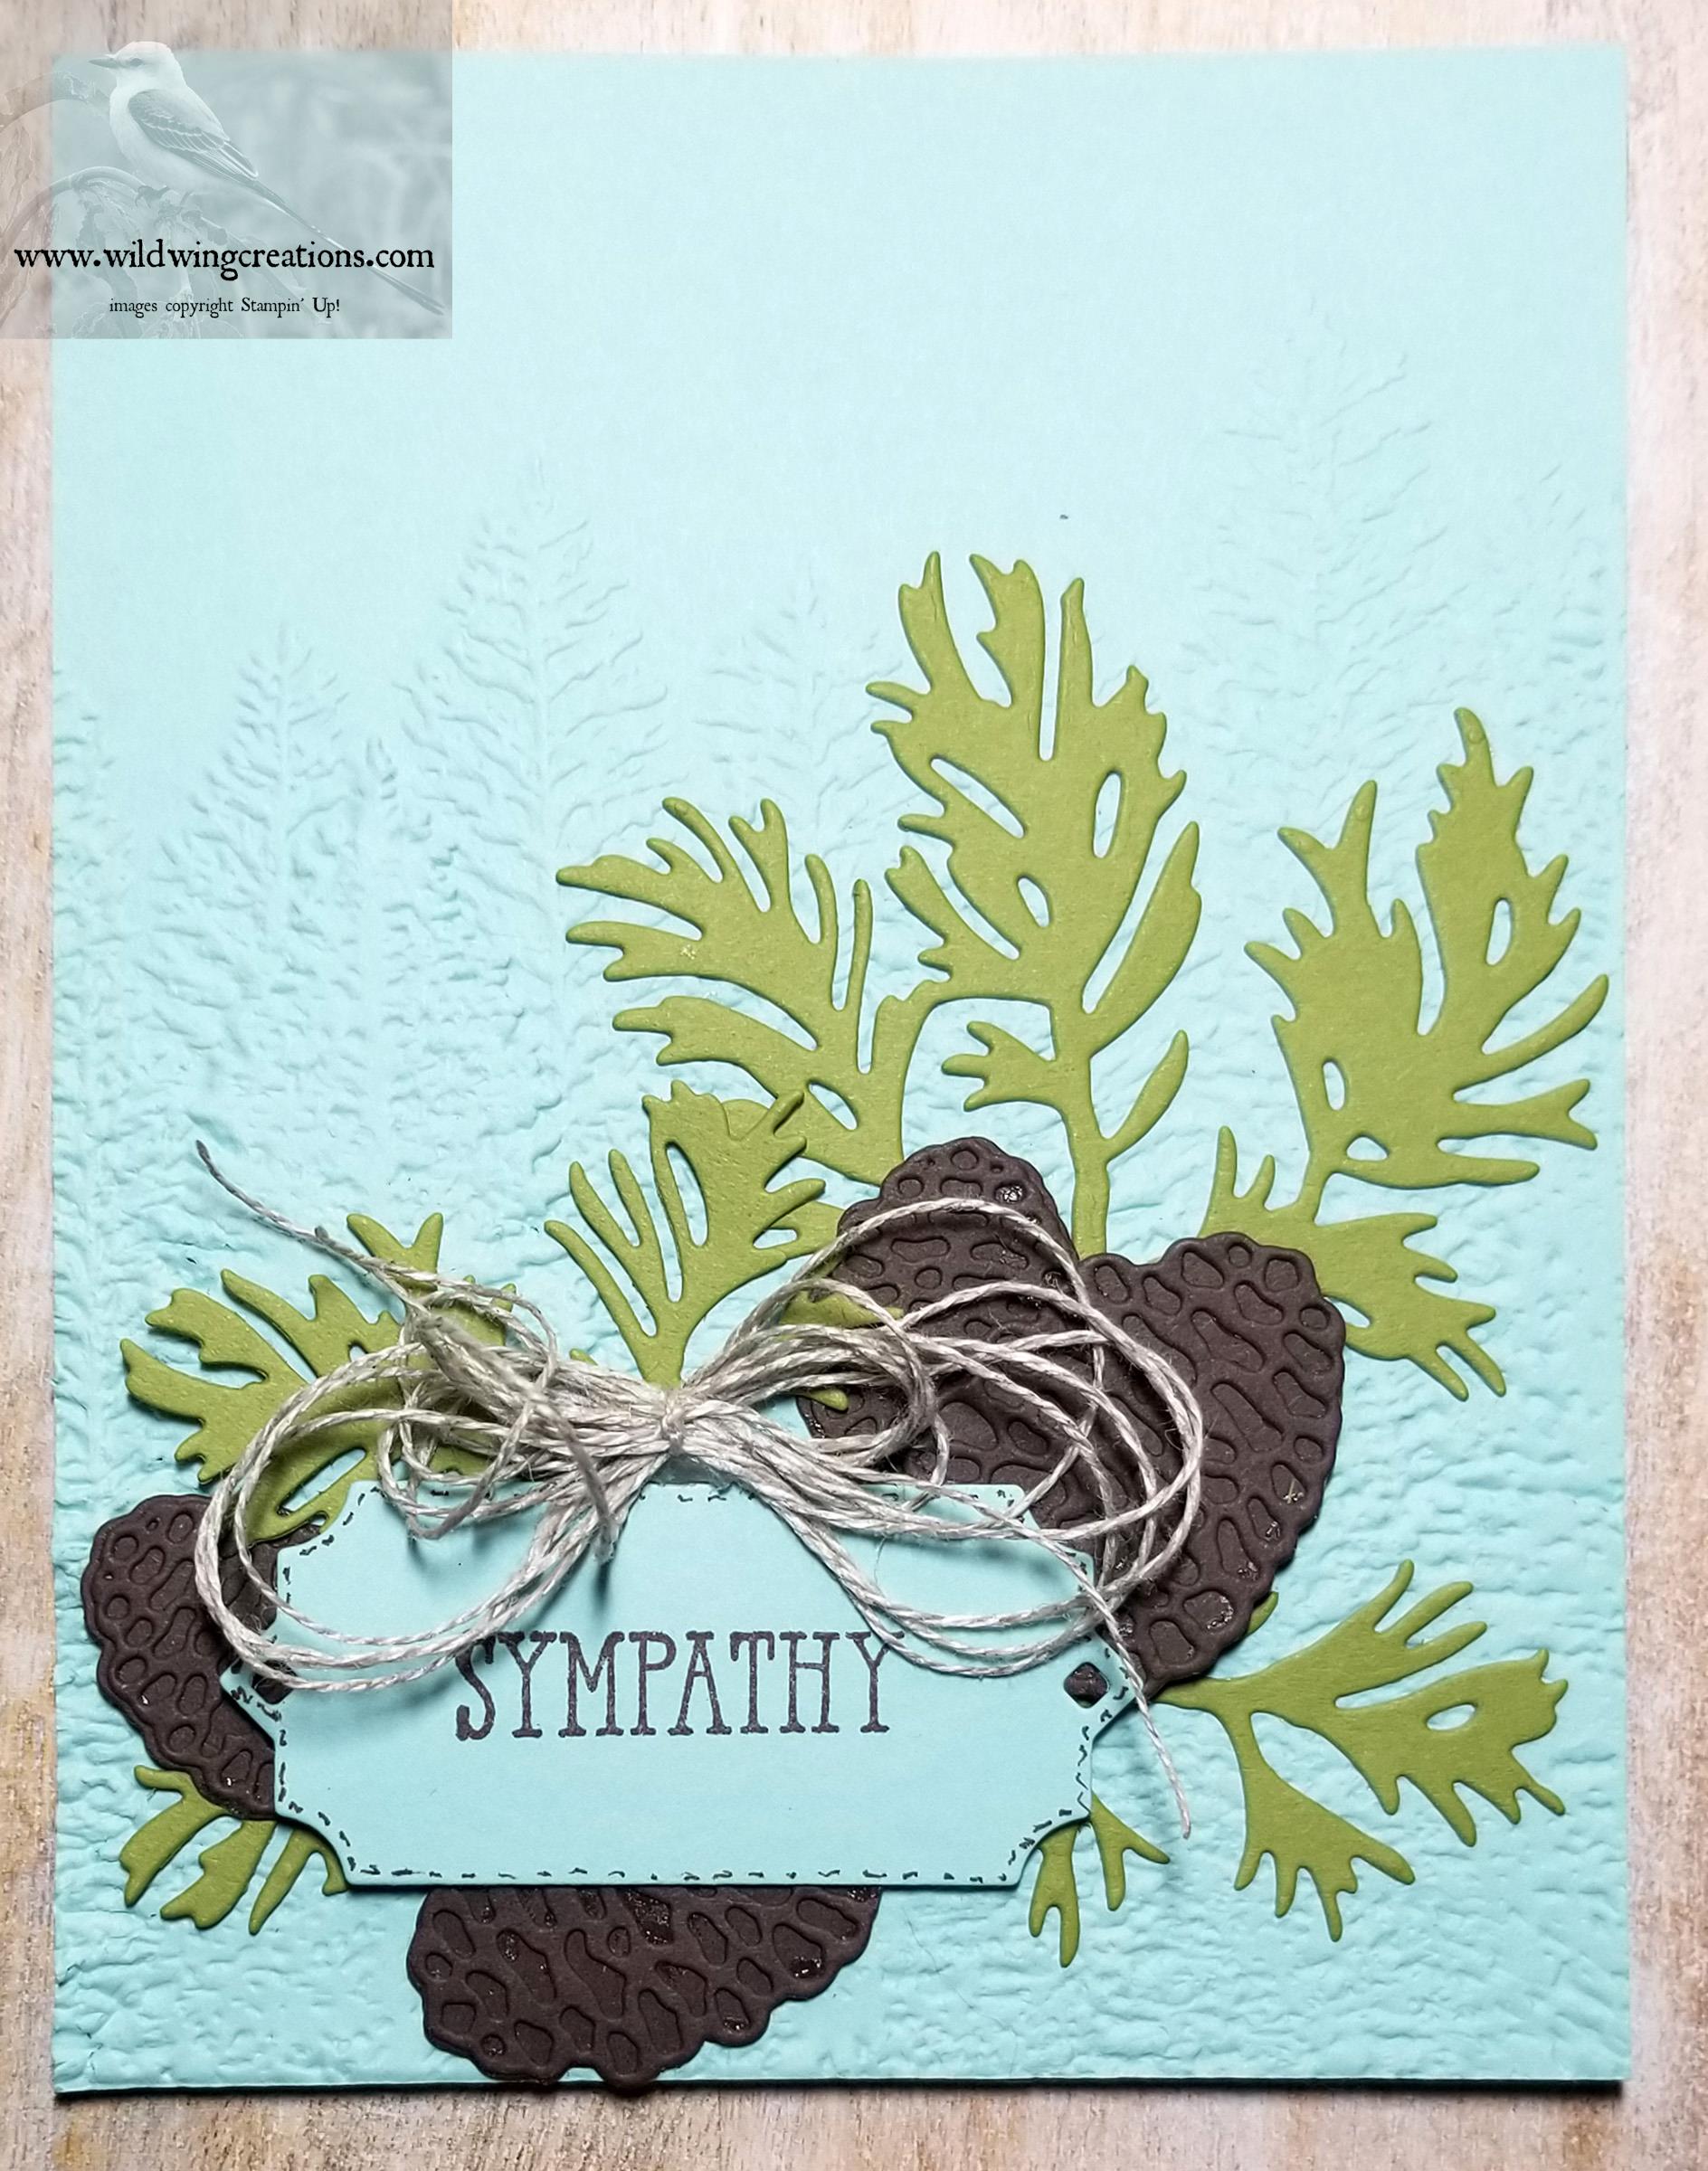
The card base is Pool Party (5 1/2″ x 8 1/2″) as is the front of the card. I cut a separate panel of Pool Party (4 1/4″ x 5 1/2″) to emboss with the Evergreen Forest Embossing Folder, then used Liquid Glue to adhere it to the card front.

Using the Beautiful Boughs dies, I cut one large and one small bough from Old Olive. For these you will need a piece of card stock about 3″ x 5″. I then cut 2 large and 2 small pine cones and 2 large and 2 small pine cone details from Early Espresso ( 2 1/2″ x 5 1/2″). In hind sight, I think I should have used a sponge and some ink to highlight them, but, I didn’t. Just an idea you might want to try.

The smaller label die in that die set was used to cut the Pool Party sentiment panel (1 1/2″ x 3″) AFTER I stamped it in Early Espresso. The sentiment is from the Well Said stamp set. Using my Early Espresso Stampin’ Write Marker, I penned some stitches around the edge.

The elements were dry fit, that is, laid out without any adhesion. When I was satisfied, I took a photo with my phone to ensure that I could repeat the layout. The larger bough was Liquid Glued to the card front. Over this I glued a small pine cone, then used Stampin’ Dimensionals to adhere the larger one over the small one.

The smaller pine branch was partially adhered with Liquid Glue to leave some of the needles loose. The other small pine cone was adhered with Liquid Glue. Over this, Liquid Glue was used on the sentiment corner that overlaps the 2 pine cones, and Stampin’ Dimensionals adhere the other corners. Liquid glue was used to stick down the last pine cone under the sentiment.

The finishing touch is a Linen Thread, loopy, casual bow, which is attached with a couple of Glue Dots.

For the inside I cut a panel of Early Espresso (4″ x 5 1/4″) as a mat for the sentiment liner. ThisĀ  liner was cut from a 3 1/2″ x 5″ piece of Pool Party with the third largest Stitched Rectangles die.

I laid this on a piece of scrap paper so I could stamp off the edge without getting my mat all inky. The Peaceful Boughs stamp set coordinates with the Beautiful Boughs dies and is just simply beautiful. Using Old Olive ink, I stamped off the larger bough once, then stamped it in the upper left corner. The middle sized bough was used twice in the lower right, and was also stamped off once each time. The pine cones are the smaller ones and stamped full strength in Early espresso. Lastly, with the sentiment from Woven Heirlooms and Early Espresso Ink, I stamped the sentiment.

This liner was glued to the Early Espresso mat and into the card base. This finishes the card, but we can’t have naked envelopes, now, can we?

I put the flap in the Evergreen Forest Embossing Folder and embossed it. Then, with Old Olive Ink I stamped a couple of pine boughs, full strength, from Peaceful Boughs, on the front.

I hope you enjoyed this card, and will want to make one yourself. Now, on with the hop. Just click the button below to go to the Amy’s blog, or any individual’s name to go directly there.

Amy Koenders

Mary Deatherage

Kristi Gray

Jaimie Babarczy

Sue Prather

Karen Finkle

Akiko Sudano

Karen Ksenzakovic

Julie Johnston – You are Here

Product List

Christmas

Stampin’ Up Poinsettia for Happy Inkin’ Thursday Blog Hop

Good Day Everyone! It is a good day here, in fact we are having a whole string of gorgeous fall days. I love it! Autumn is my favorite season, so I am ready for this.

Today our challenge is that of a sketch. It looks pretty simple, but I struggled with it a bit until I decided to use the Poinsettia Petals Bundle and the coordinating Poinsettia Place Designer Series Paper. What fun, and so easy to let the paper do the work. AND….today is the first day of the Stampin’ Up! Designer Series Paper sale.

That’s right, 15% off select Designer Series Papers for the whole month of October. More about that later.

Here is the sketch 
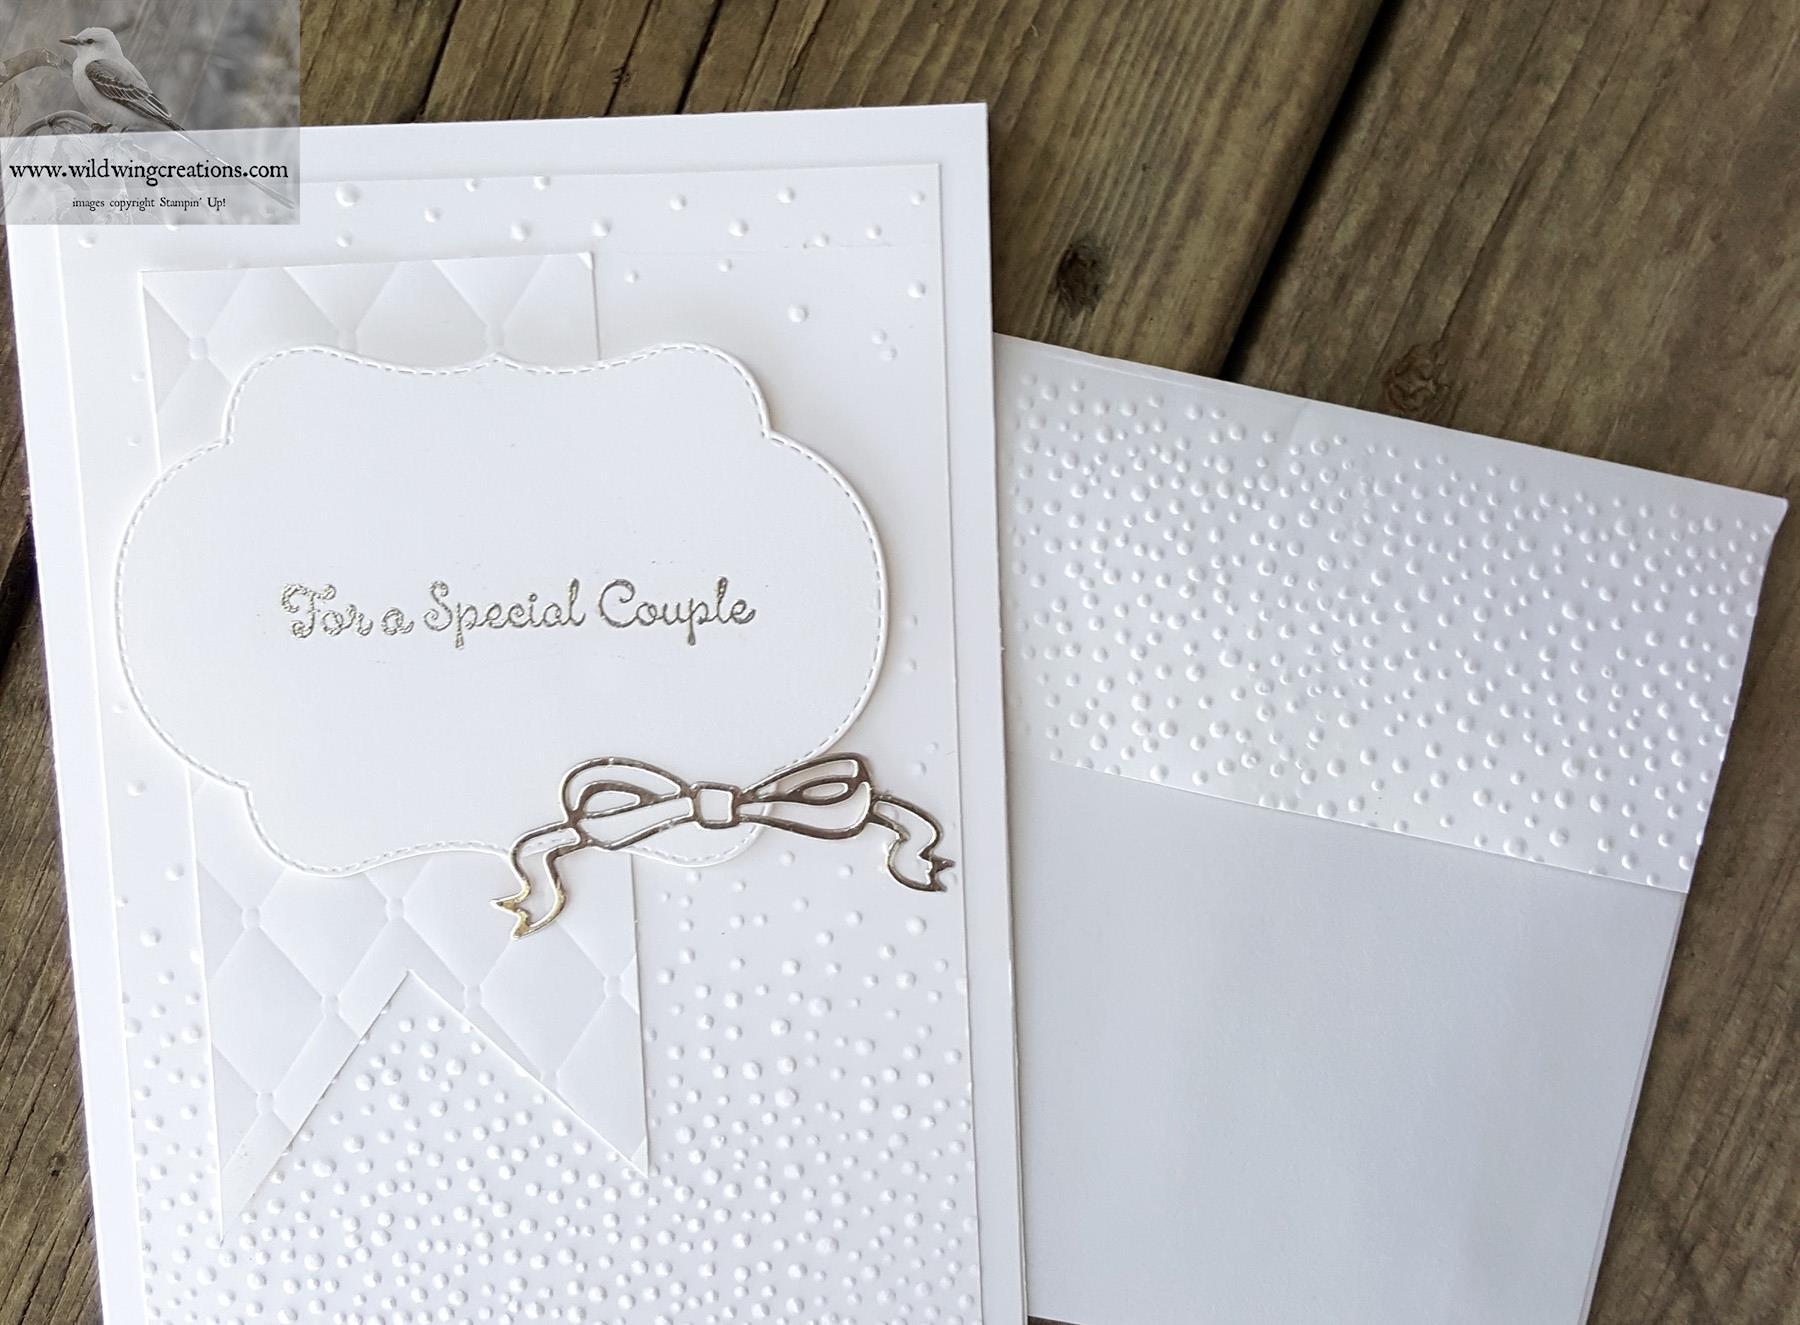
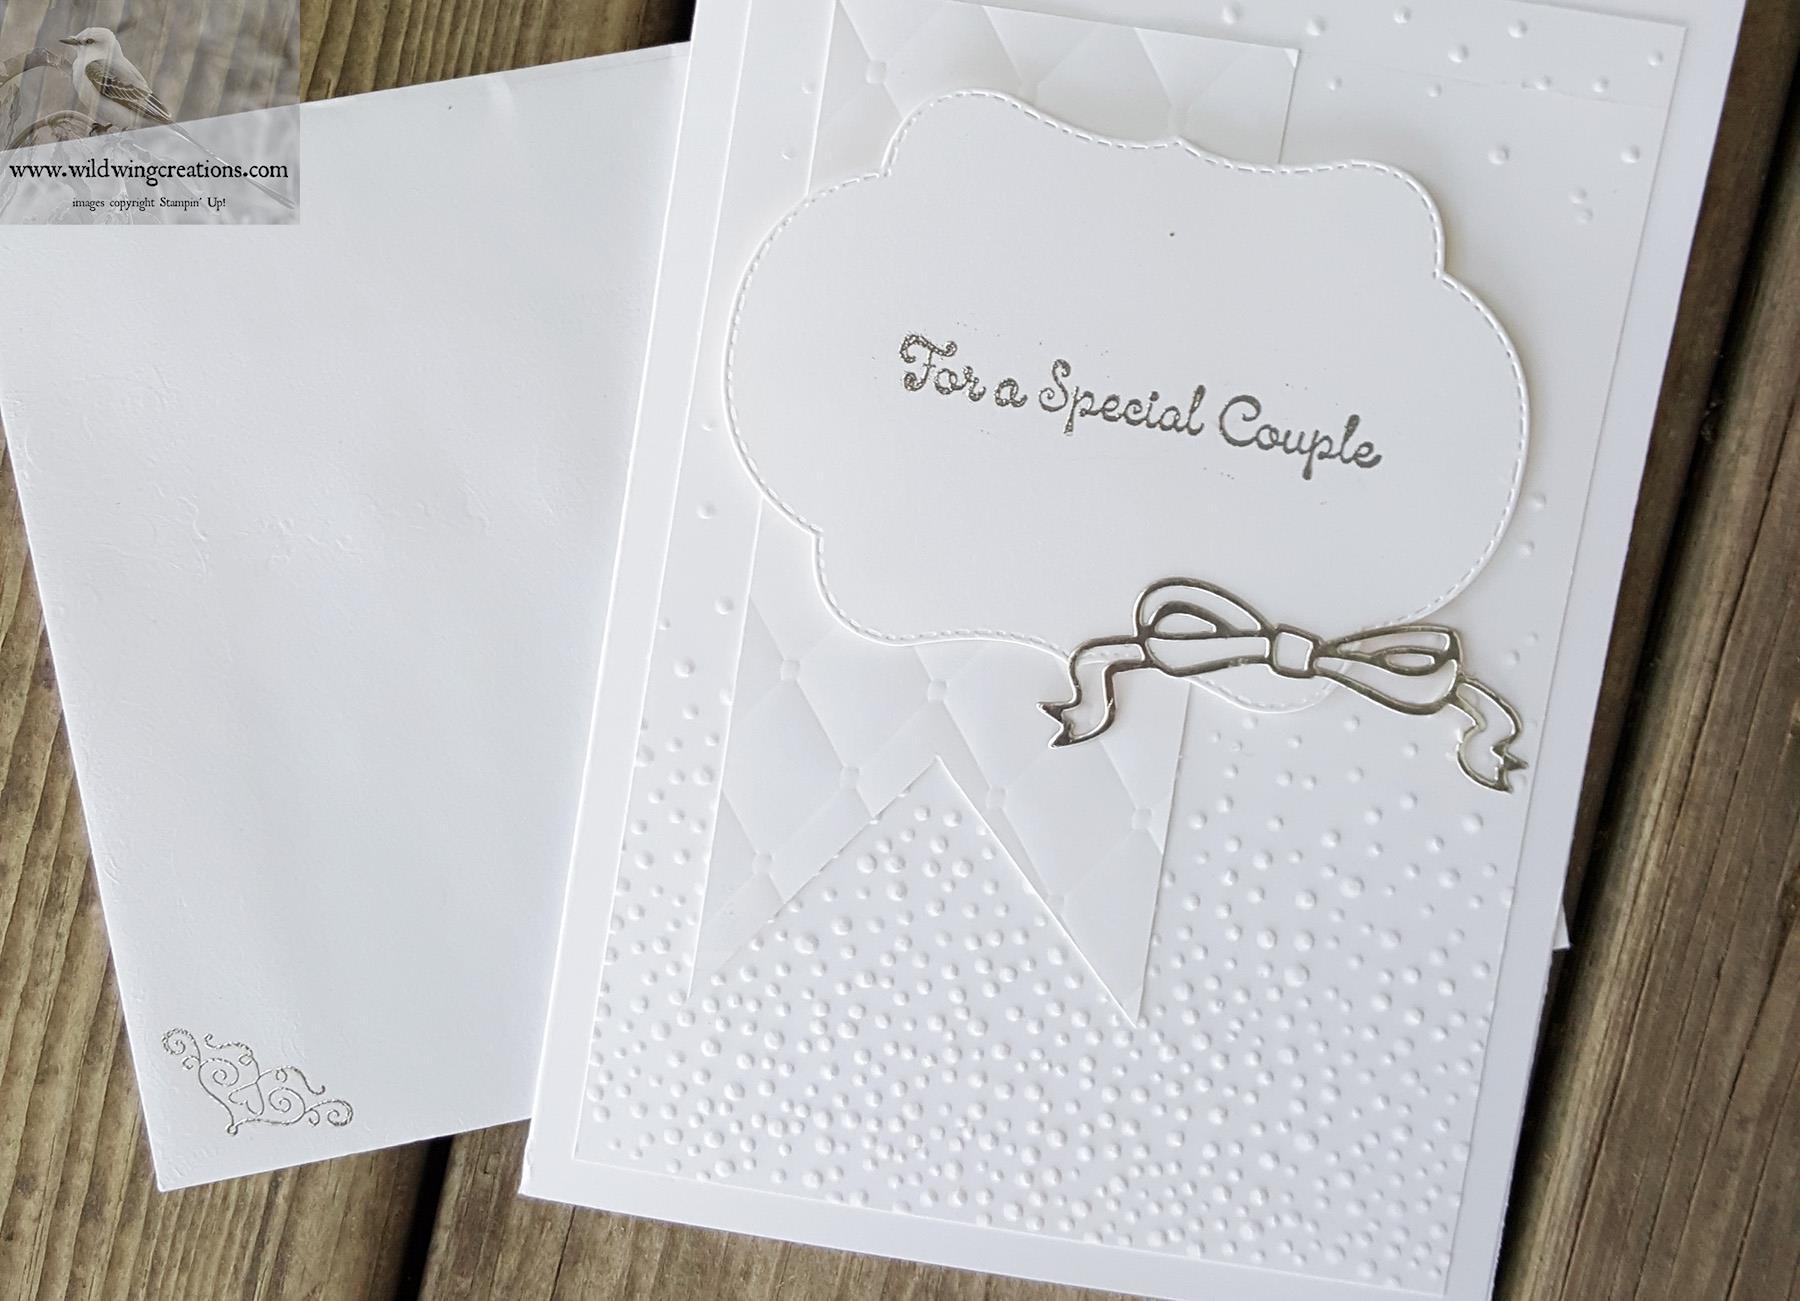
and here is my card.

Using Designer Series Papers makes it easy to choose a color scheme, in this case Old Olive, Real Red and Whisper White. These are my favorite colors to use for a Christmas card. I love holly, pine, and poinsettias, all of which lend themselves to this color theme. Here is how I made it.

My card base is Thick Whisper White. To dress it up a bit, I cut a Thick Whisper White panel and dry embossed it with the Parisian Flourish 3D embossing folder. I cut it to fit the card front and used Liquid Glue to adhere it to the card base. This is such an elegant embossing folder.

Real Red mats fill the supporting role for the Poinsettia Place Designer Series Paper. I used the Holly paper, and the design on the reverse side. These are Liquid Glued to the card front, both on an angle.

The sentiment from Celebration Tidings was stamped in Old Olive on Whisper White. This was cut with an oval from the Layering Ovals dies, offsetting the sentiment to allow room for the holly leaves. I cut a second oval from Real Red, using a slightly larger scalloped die for a mat for the sentiment. Liquid Glue also adhered this to the card front.

Using the smaller holly leaf dies from the Poinsettia Petals Bundle, I cut and embossed 3 leaves in Old Olive. The Real Red berries also are in this bundle. I dry fit them, then used Mini Stampin’ Dimensionals and Liquid Glue to attach them to the sentiment oval.

For the inside, a Real Red mat is behind a panel of Poinsettia Place DSP. A Whisper White liner was stamped with Old Olive using a sentiment from the Poinsettia Petals stamp set. I considered embellishing the Whisper White panel, but decided that sometimes less is more, so I left it plain. More room that way for writing a note.

The envelope front sports a few holly leaves fussy cut from the Poinsettia Place DSP, and the flap has a whole strip of it!

I mentioned that Stampin’ Up! has a sale on Designer Series Papers, starting today. Yep, 15% off select papers.

  • Sale runs 1 Oct ā€“ 31 October 2020 at 11:50 pm (MT)
  • All order types qualify for this promotion.
  • There is no limit to how many packages of Designer Series Paper may be purchased during this promotion.
  • Only select Designer Series Papers are available at a 15% discount during this promotion.
  • Orders must be placedā€”and closedā€”during the promotion period for the 15% discount to apply.
  • Designer Series Paper ordered as part of a Starter Kit or with Stampinā€™ Rewards qualify for the 15% discount.


Amy Koenders

Mary Deatherage

Kristi Gray

Jaimie Babarczy

Sue Prather

Karen Finkle

Akiko Sudano

Karen Ksenzakovic

Julie Johnston – You are here

CARD CUTS: Thick Whisper White: card base 5 1/2″ x 8 1/2″ scored and folded at 4 1/4″, embossed front 4 1/2″ x 5 3/4″, emboss then trim to fit card front; Whisper White: front oval 2″ x 3 1/2″, inside liner 3″ x 4 1/4″; Real Red: front mats (2) for DSP 3 1/2″ x 4 3/4″, inside mat 4″ x 5 1/4″, berries, scrap approx. 1 1/2″ x 3″; Poinsettia Place Designer Series Paper: fronts (2 from coordinating paper) 3 3/8″ x 4 5/8″, inside 3 3/4″ x 5″, envelope front scrap, envelope flap 2 1/4″ x 6″.

Product List

sympathy

Stampin’ UP! Rooted in Nature Sympathy

Good Sunday Morning Everyone! Hallelujah! It is a great day to be alive. Perhaps I say that because I just celebrated a milestone birthday and attended the funeral of a friend who died at age 104. That said, every day is a Great Day, and one given to me to sing praise to my Lord.

For today, while celebrating life, I have another sympathy card for you. After all, death is part of life, and we should not forget that. Our emotions are sad at the passing of someone we love, but joyful at the same time when we know that loved one has gone on to their eternal home.

3

I began with a panel of Very Vanilla Card stock as my card base. I embossed the front with my Pinewood Planks 3D Textured Embossing Folder. To this I added a panel of Mossy Meadow embossed with the Corrugated 3D embossing folder and torn to give it a more rustic look, then used Liquid Glue to adhere it to the card front.

With Mossy Meadow ink, I stamped the large tree from Rooted in Nature on a panel of Old Olive, and tore it around the tree. MANY Stampin’ Dimensionals on the back allowed me to wrap some Copper Metallic Thread around and still have enough sticky left to adhere it to the corrugated panel. I made a major mistake in not ordering more of this before SU retired it. I can’t believe they did that!!

I went over a Very Vanilla scrap with my Embossing Buddy before stamping the sentiment from the retired Thoughts and Prayers in Versamark Ink. Copper Stampin’ Emboss Powder and my heat tool finished the sentiment, which I punched out using the Tailored Tag Punch. More Stampin’ Dimensionals were used to adhere this to finish the card front.

On the inside, I used Mossy Meadow card stock embossed with the Pinewood Planks 3D Embossing Folder and torn to replicate the front, as a mat for the sentiment panel. Versamark Ink and the Embossing Buddy prepared my Very Vanilla Panel for the Copper Emboss Powder and the heat tool. Again, I tore this panel before adhering it to a mat of Old Olive. I had run the edges of the Old Olive panel through the Versamark Ink Pad and embossed it with Copper Stampin’ Emboss Powder before adhering the sentiment to it with Liquid Glue. The completed panel was Liquid Glued into the card base. I chose to angle the Old Olive sentiment panel for a bit more interest. The sentiment is from Path of Petals.

The front of the envelope was stamped in Mossy Meadow with a single leaf, while the back got the whole big tree! I like this tree. The photo of the front didn’t turn out very well, so you will just have to imagine it.

I hope you enjoy this card. Rooted in Nature is one of my very favorite stamp and die sets, and I use it often.

CARD CUTS: Very Vanilla: card base 4-1/4″ x 11″ scored at 5-1/2″, front sentiment 2-1/2″ x 3″, inside sentiment 3″ x 4-1/2″; Mossy Meadow: front 4-1/4″ x 5-1/2″, inside mat 4-1/2″ x 5-3/4″,Ā Old Olive: tree 3″ x 4-1/2″, inside mat 3-1/2″ x 4-3/4″

Product List

Uncategorized

Stampin’ Up! Meant to Be for Amy’s Inkin’ Krew Team Blog Hop

I hope you are all having a Terrific Tuesday as we head into the second week of the new year. And, before we can blink, we will be looking at the end of this same year. My, how time does fly!

Today’s team blog hop theme is ‘Love’, which we can interpret any way we choose. I have chosen the bundle that is all about love in the new Occasions catalog, “Meant to Be“, and have paired that with elements from “Beautiful Promenade“. If you are into romance, these sets are sure to be on your wish list.

For my card base, I have chosen the new red color, Lovely Lipstick, which I think isĀ  perfect for this card.

4

Next, I stamped (in Lovely Lipstick), hearts from the Meant to Be set all over a panel of Lovely Lipstick card stock. I first stamped off each heart on scrap paper so the image would be very light, then stamped the second, lighter image on my card front. Repeating this technique, I stamped the sentiment from Beautiful Promenade in each heart, and filled in blank spots with it as well.

Next up, I ran the card front through my Big Shot in the Subtle Dynamic Textured Impressions Embossing Folder.

1

For the focal image, I rubbed my embossing Buddy over a panel of Lovely Lipstick, stamped the sentiment from Meant to Be in Versamark ink, and heat embossed it with White Stampin’ Emboss Powder. I then ran this through the Big Shot in the Lace Dynamic Impressions Embossing Folder. Using the coordinating Framelits in the bundle, I cut this out using the ruffled edge large heart and used only the center heart. I then cut a second heart in Whisper White and layered the Lovely Lipstick embossed heart over this, allowing the white ‘ruffle’ to show. Liquid Glue adhered these together and Stampin’ Dimensionals were used to attach this to the card front.

I used the Detailed Trio corner punch to round the corners of the card. Then, I thought it looked a little plain, so I added 3 Pearls Basic Jewels on the embossed heart.

4

For the inside, I used the long, scalloped edge framelit to cut the edges of my Whisper White panel to coordinate with the ruffled heart on the front. On this, I stamped the sentiment from Meant to Be in Lovely Lipstick. This panel was adhered into the card base with Liquid Glue. Card done.

5

The envelope received 3 of the smaller hearts, as on the front of the card, on the flap, and one on the front. I messed up 3 envelopes before I got smart and used my Stamparatus to stamp the envelope. Call me slow to learn!

ON WITH THE HOP!! You know the drill, click on ‘previous’ to go to Jaimie’s blog, or ‘next’ to see what Karen K has done. Or, to just jump around, click on any name.

Shirley Gentry

Jaimie Babarczy

Julie Johnston – You are here

Karen Ksenzakovic

Mary Deatherage

Sue Prather

Connie Troyer

Karen Finkle

Amy Koenders

Product List

Uncategorized

Stampin’ Up! Thank You for Happy Inkin’ Thursday Blog Hop

Happy New Year to all of you who follow this blog!! For some of us, we look forward to a better 2019. For others, 2018 was a good year and the hope is for an equally good, or better, 2019.

I don’t make resolutions, but I do hope to do a better job of making and sending more cards, because I think it is VERY appreciated by the recipients. We have become so commercialized and accumulating of STUFF, that we tend to forget the simple pleasures of making and giving of ourselves. That said, ON WITH THE HOP!

Today we have a sketch challenge, and I, having many thank you cards to send, chose to use that design for special thanks.

I haven’t done an outside challenge for awhile, but my card fits the Sunday Stamps Challenge this week, so I have entered this challenge also.sunday stamps 195

On with the HOP! Here is my card using the above challenges.

4

My card base is Early Espresso. To that I have added a mat of Calypso Coral, which I textured with the Subtle Dynamic Textured Impressions Folder. Over this is a panel of Crumb Cake, which is stamped with the new Crackle Paint background stamp (found on page 44 of the Occasions catalog) in Crumb Cake. I like this look!

My sentiment is from All things Thanks and is stamped in Early Espresso on So Saffron. There are more words to this sentiment, but I blocked them off with a piece of tape, inked the part I wanted, removed the tape and stamped. This was cut using the largest oval from the Stitched Shapes Framelits.

1

The leaf is from Falling for Leaves (which retired yesterday from the Holiday catalog) and was stamped in Early Espresso on Very Vanilla card stock, then colored with my Stampin’ Blends in Dark Calypso Coral, Dark Crumb Cake and Light Daffodil Delight. I fussy cut this with my Paper Snips Scissors. Liquid Glue adhered this to the sentiment oval.

A length of Burlap Ribbon was adhered with strips of Tear & Tape. Stampin’ Dimensionals adhere the sentiment over the ribbon. Card front done.

Inside the card I layered Crumb Cake, Calypso Coral and So Saffron using Liquid Glue. Early Espresso ink was used to stamp the sentiment from Falling for Leaves. The little flower stems, or are they leaves?, are stamped also in Early Espresso and come from Falling for Leaves as well. 5

My sister gave me an extra special gift for Christmas (which will be the subject of a future blog) and this card is for her. I am so grateful for my family.

The Very Vanilla medium envelope flap got the Crackle Paint treatment in Early Espresso. A couple of the same flowers as on the inside decorate the front.

Now, on with the hop. Just click the ‘next’ button to go to the very talented Amy’s blog, or click on any name to go directly to that blog.

Amy Koenders

Shelagh Freemantle

Mary Deatherage

Kristi Gray

Jaimie Babarczy

Sue Prather

Karen Finkle

Julie Johnston -You are here

Host code for January: XMW3QDQ6Ā 

To learn more about my customer loyalty program just click here.Ā You will see that you can earn free stuff, and who doesn’t like free stuff??

Ordering from the new Occasions catalog and the ability to earn even more freebies from the Sale a bration catalog begins today. If you don’t have these catalogs and don’t have a demonstrator, please contact me and I will send them to you. There are many wonderful products in these, and I am sure you will want to get some of those products.

Product List

Uncategorized

Stampin’ Up! First Frost Get Well for Happy Inkin’ Thursday combined Hop

{HOLD EVERYTHING!!! Today’s blog is NOT part of the combined Inkin’ Krew/Happy Stampers hop! I don’t know what happened. I had a deadline by which to post my link for the rest of the hoppers, and I posted well ahead of the deadline. However, for some never-to-be-known reason, my link disappeared. It is probably floating around somewhere out there in cyberspace, which does my hopping friends and me no good at all! At any rate, by the time this was discovered, it was too late to join the hop. My apologies to everyone. I will put a link at the bottom for the person who follows me on the hop, so if you care to hop along, you can do so without me.}

Good Morning, Everyone. I hope this finds you all done with your Christmas cards and they are all in the mail. What? You still have a few to do? Join the club..I do, too!

Today’s card is not a Christmas card though. I have a couple of friends who are ill and hospitalized, though they are improving and should be dismissed sooner rather than later. I took time out from my Christmas activities to make cards for them.

Today we are joined with our friends from Canada, and have both a color and and a sketch we can use. I chose only the sketch this time, as I just wasn’t ready to make a bright, springlike card. Here is our sketch

sketch

And here are the colors colors

I created my card from colors my friends like, rather than using the challenge colors.

I began today’s card with a Smoky Slate base and added Blackberry Bliss, Whisper White, Soft Sea Foam and Petal Pink. This is a top-folding card. Here is my creation.

4

To make the two toned front, I cut one piece of Blackberry Bliss and a smaller one of Petal Pink, then taped them together on the back. I then used my Tufted Dynamic Textured Impressions Embossing Folder to dry emboss the front. Before I embossed this panel, I VERY lightly spritzed it with water. This seems to make a clearer, deeper impression. I then set this aside to dry.

After it had dried, I wrapped a length of Gray Granite 1/2″ Textured Weave Ribbon around the joint, taping it on the back also. This panel was then adhered to the card base with Tear & Tape.

The sentiment is from Healing Hugs and is stamped in Blackberry Bliss on Whisper White, then cut with the third largest Stitched Shapes Framelits oval. I backed this with a scalloped Smoky Slate oval from Layering Ovals Framelits. To this, I placed several Stampin’ Dimensionals and wound some Silver Metallic Thread around. Set aside for the moment.

1

Behind the sentiment I arranged pieces of die cuts from the First Frost Bundle, cut from Soft Sea Foam, Gray Granite, Petal Pink and Whisper White. The only piece NOT from First Frost is the detailed embossed leaf, which is from the Wonderful Romance Bundle (available Jan. 3). It is such a pretty leaf, I will use it a lot. Oh, yes, and one of the die cut pieces was stamped (First Frost) first in Blackberry Bliss on Whisper white. I cut several of each piece, not knowing exactly what I would want in the final production and will save the leftovers for another project.

I dry arranged these over the ribbon, then used Glue Dots to secure them before attaching the sentiment oval. Add the sentiment oval and the card front is finished.

For the inside, I stamped a single image, a duplicate of the die cut one on the front, from First Frost Bundle, in Blackberry Bliss on whisper White and matted it on a panel of Petal Pink. This was then adhered into the card base. Liquid Glue did both panels. As this card would be signed by several people, I did not add a sentiment, thus leaving room for multiple messages.

5

The envelope received the same stamped image on the front and a piece of the First Frosted Floral Specialty Designer Series Paper on the flap. 2

3

{To join the hop, click here}

Host Code for December: KUCX27E2

Just click here for information on my customer loyalty program and when to use the host code.

Don’t forget the Year End Closeout. There are some great things to be had here, some at reduced prices.


closeout


CARD CUTS:Ā Smoky Slate: card base 4-1/4″ x 11″ scored at 5-1/2″, sentiment oval mat 2-1/2″ x 4-1/2″, die cuts 1-1/2″ x 4″; Petal Pink: top of front 1-1/4″ x 4-1/8″, die cuts 1-1/2″ x 4″, inside mat 4-1/8″ x 5-3/8″; Blackberry Bliss: bottom of front 4″ x 4-1/8″; Whisper White: sentiment oval, die cuts 3″ x 5″, inside liner 4″ x 5-1/4″;Ā Soft Sea Foam: die cuts 3″ x 4″; Frosted Floral Specialty Designer Series Paper:Ā envelope flap 2-1/2″ x 6″

Product List

Uncategorized

Stampin’ Up! Happy Thanksgiving

Good Thursday morning Everyone! It is time once again for our monthly Blog Hop with our friends in Canada. We have a color challenge and a sketch challenge. It is up to the individual whether to use one or both challenges. I am using both. Our Colors for this hop are:

And here is the sketch:

With these in mind, I opted to make a Thanksgiving card. Here goes! I hope you enjoy this hop as we have several very creative women participating today.

My card base is Tranquil Tide with a mat on the front of the Joyous Noel Specialty Designer Series Paper. This paper has the 3 required colors.

4

I love the Copper Foil Sheets embossed, whether dry embossed or heat embossed. For today I dry embossed it with the Layered Leaves 3-D Dynamic Textured Embossing Folder, and mounted it on a mat of Tranquil Tide with Liquid Glue.

For the sentiment, I cut the word Happy with the Happy Birthday Thinlit from Tranquil Tide three times and stacked them. I used Liquid Glue to adhere this to the copper. I stamped the Thanksgiving portion of the sentiment from Pleasant Pheasants in Versamark ink and heat embossed it in Copper. This was cut with a Lakeside Framelit and adhered to the copper with Stampin’ Dimensionals.

After it was adhered, I wished I had edged the die-cut with Versamark and dipped it in the Copper Emboss Powder. Hindsight, you know. I might remove it and do that, but time doesn’t allow it right now. I do think it will improve the card.

1

The small leaves are Tranquil Tide, embossed and cut with the dies from Nature’s Roots. One is also stamped and heat embossed with Copper Emboss Powder. The copper leaves are also from Nature’s Roots, dry embossed and cut. The berry branches are cut from Merry Merlot. The dies for these are from the First Frost Bundle

I dry fit everything then Liquid Glued them in place. This finishes the front.

On the inside a mat of the same Joyous Noel DSP as on the front frames a Whisper White sentiment panel. I flipped the mat over and die cut a berry branch (First Frost Bundle) from the center of it. This was attached to the sentiment panel with Liquid Glue. A leafy branch was cut from Merry Merlot card stock with another die from the First Frost Bundle, trimmed and adhered with Liquid Glue.

5

The sentiment is from Pleasant Pheasants and is stamped in Merry Merlot. This sentiment panel is adhered to the mat with Liquid Glue.

The envelope has the trio of leaves on the front embossed with Copper Emboss Powder and more of the Joyous Noel DSP on the flap .

Now, to move on through the hop, just click on the ‘next’ button, or on any of the names to skip around.

Don’t forget to leave a comment, as I do appreciate that. Thanks for hopping with us!

Amy Koenders

Shelagh Freemantle

Mary Deatherage

Kristi Gray

Jaimie Babarczy

Karen Finkle

Julie Johnston-you are here

Sandi MacIver

Eva Dobilas

Host Code: EV7ETS99 good through the end of October.

Go here to learn the details on using the host code and my customer loyalty rewards program.

If you don’t have a demonstrator and need products or have questions, please contact me. Or if you would like a catalog, let me know.

clearance rack

Check out the Clearance Rack. There just might be something there youhave been needing, like Fast Fuse refills? When they are gone, they will be gone for good.

Fingers crossed that my order with the Snowflake Showcase arrives tomorrow. You will be able to order on November 1. These products will be available through November 30 or as long as supplies last.

CARD CUTS: Tranquil Tide: card base 5-1/2″ x 8-1/2″ scored at 4-1/4, mat for copper 3-1/8″ x 4-3/8″, Happy (cut 3) sentiment 3″ x 6″, leaves and sentiment banner 1-1/2″ x 3-1/2″; Joyous Noel Specialty Designer Series Paper: front mat 4-1/8″ x 5-3/8″, inside mat 4″ x 5-1/4″; Copper Foil Sheets: embossed panel 3″ x 4-1/4″, triple leaf, 2-1/2″ x 3″;Ā Merry Merlot:Ā berry branches and inside leaf 3″ x 4″

Product List

Uncategorized

Stampin’ Up! Pleasant Pheasants for Combined Thursday Blog Hop

joint blog hop header

Once again we are joining some Stampin’ Up! friends from north of the border (Canada, not Minnesota) for a combined Blog Hop. Lots of talent here folks, so come on along.

We usually have a choice (or you can use both) of a a sketch or a color challenge. For today we only have a sketch.

Aug 16 sketch

For my contribution, I chose the new (available September 5 in the Holiday catalog) Pleasant Pheasants stamp set. I used everything in the set EXCEPT for the pheasants! Next card, I promise. They are gorgeous.

wild wing creations-4

I began with a Cajun Craze card base. Next up, I added a Sahara Sand mat, which I ran through the Big Shot using the brand spankin’ new Tin Tile Dynamic Textured Embossing Folder. Gotta love this TIEF! Reminds me of the old tin ceilings, with which I am enamored. To distress it, I used a TINY bit of Soft Suede ink on my Stampin’ Sponge (cut into sixths) and sponged over the highlights.

This embossing folder will be available to you on September 5 in the Holiday catalog. It is part of the Country Lane Suite of products. I am told that if you mist your card stock with water before embossing, that it makes a deeper impression. I did not do that for this card.

I wrapped a length of Copper Metallic Thread around this panel three times, taping it on the back. This panel was then adhered to my card base with some Liquid Glue.

A scrap from Sahara Sand was stamped with the leaf border in Cajun Craze. I then fussy cut with my Paper Snips Scissors along one side, not too precisely, but enough to make a nice edge. Using what ink was left in the sponge, I sponged this edge too, to take off the ‘newness’ of it. This was Liquid Glued to the back side of a Mossy Meadow square.

wild wing creations-1

A smaller square of Sahara Sand was sponged around the edges, again without re-inking my sponge. The ole wooden bucket of pumpkins was stamped in the corner with Soft Suede. I used my Blender Pen to sort of blend in the brown on the bucket, then used Pumpkin Pie, Crushed Curry and Mossy Meadow Stampin’ Write Markers to color it.

The Embossing Buddy was wiped over this square before I stamped the sentiment in Versamark ink, to keep the Copper Embossing Powder from sticking where I didn’t want it. I heat set it with my heat tool, then Liquid Glued this square to the Mossy Meadow square. Stampin’ Dimensionals adhere it to the card base and tin tile mat.

The copper thread is HARD to maneuver into a bow, so I wrapped it around 3 fingers a few times, pinched and twisted it in the middle, then used a glue dot to hold it together. This stuff has a mind of its own and wants to spring away if you don’t control it. The glue dot does a fine job of this. I then could wrap another piece around the bow and tie it to secure it firmly. The glue dot holds it in place on the card.

Card front: Done

wild wing creations-5

On the inside I again sponged the Sahara Sand panel very lightly with Soft Suede, then stamped the image and sentiment in Soft Suede also. The Blender Pen softens the wooden wheelbarrow and some Pumpkin Pie Stampin’ Write Marker colored the pumpkins. A bit of Mossy Meadow for the grass and this panel is ready to Liquid Glue to the Mossy Meadow mat and into the card base.

For the envelope, I dry embossed the flap of a Medium Very Vanilla Envelope with the Tin Tile TIEF and stamped the wheelbarrow on the front in Soft Suede.

I hope you like this card. I have several Thanksgiving cards to make, and this Pleasant Pheasant stamp set will get used a lot.

Now, on with the hop! You know the drill. Click the button or each name to continue. And, don’t forget to leave your comments. Thank you for hopping with us.

Blog hop next button

Julie Johnston: You are here

Don’t forget Bonus Days. For every $50 (before taxes and shipping) you spend by the end of August, you earn aĀ  $5 coupon to spend in September.

08-01-18_bonus-days_demo-main_en

08.01.18_BONUS-DAYS_CUSTOMER-FAQ_NAEN

CARD CUTS: Cajun Craze: 5-1/2″ x 8-1/2″, scored at 4-1/4″; Sahara Sand: panel to emboss 4″ x 5-1/4″, front sentiment 3-1/4″ x 3-1/4″, inside liner 3-1/2″ x 4-3/4″, leaf border 1″ x 4″; Mossy Meadow: front 3-1/2″ x 3-1/2″, inside mat 3-3/4″ x 5″

Product List

Uncategorized

Happy Inkin’ Thursday wedding card

Good morning Everyone! What a beautiful week we have had. Though we missed all the rains, we also missed the tornadoes, which is okay by me. The tornadoes we don’t need, the rain we do. Very dry here.

Today’s Happy Inkin’ Thursday Blog Hop centers around a sketch challenge, which I have chosen to do as a wedding card. Here is the sketch:

And here is my contriubution:

wild wing creations-4

I like a tone on tone card, especially for a wedding, so decided on a totally white card, using texture to dress it up. Well, maybe a little silver also. I also like a larger card for a wedding. This one is 5″ x 7″. The only stamping on this card is the sentiment.

My card base is Whisper White. The first layer is dry embossed with the Softly Falling Textured Impressions Embossing Folder. The banner was also dry embossed using the new Tufted TIEF. For the banner, I used a strip cut from the card stock when I cut the card base. The ends were cut with my Paper Snips Scissors.Ā  This was Liquid Glued to the Softly Falling mat. I thought I embossed it straight, and cut it straight, but the lines are off. Not sure why, but I am not losing sleep over it.

wild wing creations-1

For the sentiment, I used the Special Celebrations stamp set, stamping it with Versamark ink and heat embossing it Silver Stampin’ Emboss Powder. To get the placement of the sentiment perfect on the already-die-cut piece, I used my Stamparatus. Works great every time. I tend to get things on a slant if I just eyeball it, so the Stamparatus is a great tool for me.

This sentiment piece was cut with one of the dies from the Stitched Seasons Framelits. I love this shape and the little ‘stitches’. All of the die cutting for this card was done with dies from this set. The bow was cut from Silver Foil Sheets and Liquid Glued to the sentiment piece.

(If you like the dies used on this card, you are IN LUCK, because yesterday was the first day customers could order this limited edition Color Your Season stamp set/dies/bundle. You can order them separately of course, but if you order both the stamps and the coordinating dies in the bundle, you will save 10%. In addition, there are 10 new colors of watercolor pencils, which are wonderful. They are NOT part of the bundle. This offer is good ONLY during the month of August. Just sayin’. More info below.)

Stampin’ Dimensionals were used to adhere this sentiment/bow over the banner and onto the mat. The mat was then Liquid Glued to the card base.

On the inside, I rounded the corners using my Envelope Punch Board, then used a small flourish die from Stitched Seasons to cut 3 of the corners. The fourth corner is dry embossed using the Lovely Floral TIEF.

wild wing creations-5

Finally, I stamped the sentiment, again from Special Celebrations, in Versamark and, using my Heat Tool, heat embossed it in Silver. Liquid Glue adheres this panel into the card base.

For the envelope, since there is no stamped image and no DSP to use, I dry embossed the flap with the Softly Falling TIEF.Ā  The little silver design on the front was stamped with one of the smaller stamps in Accented Blooms. It is perfect for a corner, and the wee small heart makes it a great image for a wedding card. Even if I do have it upside down!

wild wing creations-3

wild wing creations-2

This was a quick and easy card to do, but looks much more complex. At least I think it does. Sometimes I have to s-t-r-e-t-c-h myself to create a lovely card using no Designer Series Paper and very little ink/stamping.

I really like the layers of embossed pieces and may do more of that in the future. Thanks for stopping by, and don’t forget to leave a comment.

Now, on with the hop. Just click the ‘next’ button to see what lovely creation Amy has for you, or click on any name to go directly to that site.

Blog hop next buttonAmy Koenders

Shelagh Freemantle

Mary Deatherage

Kristi Gray

Jaimie Babarczy

Sue Prather

Karen Finkle

Julie Johnston: You are HERE

HOST CODE for August: 6C9SNHPK

By using the above code, you will be eligible for my Loyal Customer Rewards. Just click here for all the details, including how to earn free goodies with my Bird Egg program.

Here are some images of the wonderful Color Your Season. There are images for fall, wedding, Christmas, and sentiments for all that and more. Take a look. Remember, you can only get this in August.

0718_FLYER_COLORYOURSEASON_US-10718_FLYER_COLORYOURSEASON_US-2

The BRAND-SPANKIN’ NEW HOLIDAY CATALOG is now available for us demonstrators (sorry, only demonstrators. Contact me to become one) to order until September 4. On September 5 it will go LIVE for all of you to order. Believe me, there is some pretty wonderful product in this catalog. I will be previewing some of the stamps sets and bundles in the coming weeks. There is something for all the end-of-the-year holidays, and I am certain you will love it. Certain sure!

Card Cuts: Whisper White: card base 7″ x 10″ scored at 5″, mat 4-1/2″ x 6-1/2″, banner 2-1/4″ x 5″, sentiment piece 3″ x 4-1/2″, inside 4-3/4″ x 6-3/4″; Silver Foil Sheets:Ā  bow 1-1/2″ x 3″

Product List

Uncategorized

Happy Birthday with the Bees!

Happy Awesome Sunday, Folks! I hope you remembered to turn your clocks forward last night and didn’t miss church or anything because you forgot!

My card for today is for a bee-keeper, and since Stampin’ Up doesn’t have any bee hives, I used a set from Our Daily Bread Designs to stamp the bee skep. The bee is also from that set, but everything else is SU.

I began by taking a piece of the Wood Textures DSP and randomly stamping the bees in Versamark ink. I heat embossed these in copper, then, using the Hexagons Dynamic Textured Impressions Folder, I dry embossed it. After all, the bees make honeycombs which are hexagonal in shape. wild wing creations-4

A piece of 1/4″ Copper trim spread out and wrapped around the bee-embossed Wood Textures DSP is taped to the back. This panel was then adhered to the Early Espresso card base with Liquid Glue.

I sponged a panel of Very Vanilla with Soft Suede using a Sponge Dauber, then stamped the bee skep image also in Soft Suede. The bee was stamped next, then the honeycomb design from Butterfly Basics. Using my Stampin’ Write markers I colored the flowers, leaves, bee skep and bees with Pink Pirouette, Pear Pzazz, and Daffodil Delight. I filled in the wings of the bees with my Wink of Stella to give them a translucent look. The sentiment, stamped in Versamark and heat embossed in copper, is from Butterfly Basics.

The ground beneath the hive needed something, so I used my Blender Pen and Pear Pzazz ink from the Classic Stamp Pad lid to give it a green wash.

wild wing creations-1

Having decided to offset this panel so more of the embossed bees would show, I used Stampin’ Dimensionals along the left edge to add several loops of Metallic Copper Thread, then adhered this panel to the card front. The finishing touch is found in the 3 Glitter Enamel Dots scattered over the panel.

For the inside, I again dry embossed a panel of the same Wood Textures DSP and adhered it to the card base with Liquid Glue. I sponged another Very Vanilla panel around the edges with Soft Suede ink, then stamped several of the honeycomb design without re-inking the stamp,wild wing creations-5

Using my Stamp-A-Ma-Jig to get the sentiment (from Picture Perfect) straight, I stamped this also in Soft Suede. Next I stamped 3 bees in Soft Suede and colored them with my Daffodil Delight Stampin’ Write marker. The wings are Wink of Stella. The Bee Happy sentiment is from the same Our Daily Bread Designs stamp set. This panel was Liquid Glued to the embossed mat.

For the envelope flap, I randomly stamped the honeycomb design, again without re-inking, a couple of times, then added one bee, colored the same as the ones inside the card.

The front received flowers (bees need flowers!) from Background Bits, stamped in Soft Suede ink. Then, three more bees hover over the flowers, stamped and colored the same as the others. This card and envelope are finished, and I am happy with the result.

HOST CODE UJWYGVQJ good through March 15

Check out my Customer rewards page for more information on how to get FREE stuff!

Click here for customer rewards.

If you need product to make this, or any other project, and need a demonstrator, I would be happy to help you. And, now is a good time to join our Stampin’ Up team for even more savings and free items.

Card Cuts: Early Espresso: card base 5-1/2″ x 8-1/2″ scored at 4-1/4″; Wood Textures Designer Series Paper: front 4-1/4″ x 5-1/2″, inside 4″ x 5-1/4″; Very Vanilla: front and inside 3-1/2″ x 4-3/4″

Product List