Uncategorized

Stampin’ Up! Rooted in Nature Congratulations for Happy Inkin’ Thursday Blog Hop

Blog hop header

Good Thursday to you all. Time for another Happy Inkin’ Thursday Blog Hop with my friends and teammates. Start hopping to see what wonders they all have for you. Today we are working with a color challenge. color challenge

Here is the card I created using these parameters.

4

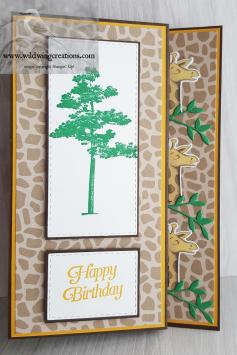
I began with a Night of Navy card base. This is a top fold card. Using the Rooted in Nature large tree and Call Me Clover Classic Stampin’ Pad, I stamped the image near the bottom of the whitewashed Wood Textures Designer Series Paper Pack.

I adhered this to a Call Me Clover mat, but instead of centering it on the mat, I placed the top edges even, just for something different. Who says everything has to be straight and centered all the time? It is straight, and it is centered side to side. I like the way this looks for a top fold card. My friend Mary likes all the border edges the same, and usually, I do also. However, on this top fold, I like the larger border at the bottom and none at the top.

With my Banners For You stamp set, I stamped the sentiment in Lovely Lipstick, and the border in Night of Navy. This was stamped on the strip I had cut off the Wood Textures Designer Series Paper. Using a scrap of Call Me Clover and two dies from the Rooted in Nature Bundle, I embossed and cut a triple leaf design, then liquid glued it under the sentiment. Stampin’ Dimensionals were used to mount this on the card front.

1

To finish, I made a loopy bow with Linen Thread and adhered it to the sentiment with a Glue Dot.

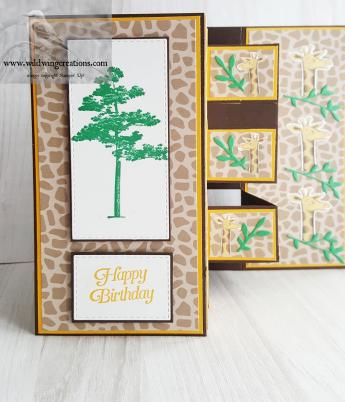
For the inside, another panel of Wood Textures DSP was stamped in the corners with the triple leaf from Rooted in Nature in Call Me Clover . The sentiment is in Lovely Lipstick with a stamp from Needle and Thread. A Call Me Clover mat is adhered with Liquid Glue and the whole thing into the card base.

5

This card is destined for a middle school aged young man who earned an outstanding student award recently. I think this sentiment sends a perfect message to a special young person.

At this point, I thought it looked a little plain, so I added some ‘stitch’ marks in Night of Navy around the edge, then added a few more to the front of the card.

The envelope has a Call Me Clover big tree on the front, and randomly stamped triple leaves on the flap. I deliberately kept the leaves inside the edges so I could add more ‘stitches’ around the edge of the flap. I did not put them on the front as I decided that would be a bit of overkill.

I hope you like this card and our colors today. Now on with the hop! Just click the ‘Next’ button to continue the hop to see what the uber creative Eva has done for you.

Blog hop next button

Amy Koenders

Shelagh Freemantle

Mary Deatherage

Kristi Gray

Jaimie Babarczy

Sue Prather

Karen Finkle

Julie Johnston – You are Here

Eva Dobilas

CARD CUTS: Night of Navy: 4-1/4″ x 11″ scored at 5-1/2″; Call Me Clover: front mat 4-1/8″ x 5-3/8″, inside mat 4″ x 5-1/4″, leaf 2″ x 2″; Wood Textures Designer Series Paper Pack: front and inside liner 3-3/4″ x 5″, banner scrap from trimming the front.

Product List

Uncategorized

Stampin’ Up! Animal Outing Fancy Fold

Well, my friends, as promised (or threatened, whichever the case may be) I have another fancy fold based on the same techniques as the Botanical Butterlies the other day. For all the card cuts and method, just click on the link:

https://wildwingcreations.com/2019/02/15/stampin-up-botanical-butterflies-birthday/

I love this card, thanks to Jan B, a Stampin’ Up! demonstrator from the UK. The link to her video on how to make this card is here

So, drum roll please! Here is my new version of this fancy fold.

5

Not as stunning as butterflies for sure, but cute nonetheless. And, it is more suitable for my young nephew than the butterflies would be.

I won’t give all the measurements again. Just a few things I did differently will go here. And the color changes. Go to the link for all the measurements.

Where I used Garden Green for the Butterflies, I used Early Espresso here. I substituted Crushed Curry for the Whisper White except for the pieces for the sentiment and floral panels. Instead of windows, I used the giraffe skin die from the Animal Outing Bundle. I knew I would need to trim some off the sides, so I did not use the Adhesive Sheets. I simply dabbed on a bit of Liquid Glue.

1

The Designer Series Paper is Animal Expedition. I used the die to cut the larger giraffes from this paper (the back side of which is the background for this card), and fussy cut the little ones.  The fussy cutting was the most time consuming part of this card. I used some Call Me Clover for the branches, again, die cut with the Animal Outing Thinlits in the Bundle. A comment on the Botanical Butterfly card was that she would need to set aside 2 hours to make this. I timed this one, and it took a total of 1 hr 35 minutes, including all the fussy cutting and decorating the envelope. Not bad.

2

The Crushed Curry sentiment is from All That You Are and the Call Me Clover tree is Rooted in Nature. It isn’t an Acacia tree, but sort of has those flat branches of an Acacia. It is just taller, which I needed for the size and shape of the card. The die cut Call Me Clover branches symbolize the main food source of the Giraffe, as well as adding some color to the project.

6

Liquid Glue was the adhesive used throughout except for the Stampin’ Dimensionals under the tree and sentiment panels on the front.

For the envelope, I have dozens of envelopes given to me by a friend who used to stock the card sections of a local store. She thought I might have a use for them. (Really, I think she knew I am a sort of pack rat who hates to waste anything if it might have a future use. I have cut these up to use for smaller cards sometimes). One of these Kraft envelopes suited just fine for this card, so I put the DSP on the flap and stamped a couple of giraffes in Crushed Curry on the front.

I had fun re-making this fun fold into a very different kind of card. Stay tuned, you may see more of this in future posts.

Product List

Uncategorized

Stampin’ Up! Botanical Butterflies Birthday

Good Morning My Peeps,

I haven’t been posting very much because I haven’t had anything much to say. Well, I always have something to say, but sometimes it is not worth the bits and bytes to post it.

Today, however, I think I have a beautiful card for you. I can take NO credit for it, however, as it came from the UK. Jan B to be specific. You can see her video here on how to make this card. I plan to do another with a totally different look, but using the same techniques.

6

Jan called this an ‘inside block’ card, but I just think it is a wonderful fancy fold. And, it is really easy! I will give you the basics, but you really should watch Jan go through the steps.

    1. Cut Granny Apple Green card stock to 6″ x 10″.
    2. Using Scoreboard, and with long side at the top, score at 3″, 4-1/2″, 6″and 7-1/2″.
    3.  Fold 6” x 10” card stock on 6” score line. With fold at top of scoreboard, and the short side facing (i.e. so the 7 ½” score line is facing you), make a small pencil mark at ¾”, 2”, 2½”, 3¾”, 4¼”, 5½”.
    4. Fold  on 7½” score line. With fold at top of scoreboard, and the long side facing (i.e. so you can see the first row of pencil marks) make pencil mark at ½”, 1¾”, 2¼”, 3½”, 4”, 5¼”.
    5. Use a ruler to connect these lines.
    6. Re-fold on the 6″ scoreline. Cut on lines.
    7. Erase pencil marks. They will be on the back and won’t show, but I like to erase them anyway.
    8. Use bone folder to crease the large sections forward, and smaller sections backward. Standing up, it will look like this:8
    9. Use Liquid Glue to adhere Designer Series Paper to Whisper White card stock pieces, then adhere these to the card base.
    10. Use Light Highland Heather and Light Granny Apple Green Stampin’ Blends to color 3 large black and white butterflies (Botanical Butterfly Designer Series Paper).
    11. Do a rough cut out from the larger paper sheet, then punch them out using the Duet Butterfly Punch.
    12. I used some removable tape to hold the butterfly to a ‘handle’ of card stock to more easily insert it into the punch and line it up.
    13. Close the card and line up the butterflies where you want them. I put mine so that 1/2 would show when the card is closed. Jan B did this also.2
    14. Stamp the floral image from Beauty Abounds and sentiment from Golden Afternoon stamp sets in Memento Tuxedo Black ink.
    15. Color the floral image with Granny Hpple Green and Highland Heather Stampin’ Write Markers.
    16. Die cut using largest skinny rectangle for floral image and smallest squarish rectangle from the Stitched Rectangles Framelits.5
    17. Adhere with Liquid Glue to Granny Apple green card stock pieces.
    18. Use Stampin’ Dimensionals to adhere to left card front.
    19. Rough cut small butterflies from Botanical Butterfly  DSP, then punch out with Duet Butterfly Punch.
    20. Use Liquid Glue to adhere 6 small rectangles of DSP to Whisper White.
    21. Adhere to cut squares on card base.
    22. Put a dab of Liquid Glue on body only of little butterflies and adhere to each of the 6 large squares on the card..1
    23. Finally, adhere strip of Multipurpose Adhesive Sheets to back of Whisper White card stock.
    24. To prevent gumming up your Big Shot acrylic cutting pads, lay the backing strip you removed from the adhesive over the die and paper. If you cut your adhesive to EXACTLY the size of the card stock you won’t need to do this. Mine was bigger and sticky around the edges.
    25. Use window die from Stained Glass Thinlits to cut 2 windows.
    26. These are now stickers. Peel off backing and adhere to panel.
    27. One more thing….use the Butterfly Gala stamp set to stamp the antennae in Memento Tuxedo Black.

Your card is done! How easy was that? Yes, there are some time consuming steps, but once you have done one, it doesn’t take long to do the next one. It will probably take longer to decide which papers to use!

Since there is no ‘inside’ on which to write or place a sentiment, I simply wrote on the back of the panel with the 3 butterflies. You can do as you like. When closed the card measures 4″ x 6″. Instead of making an envelope, I used a 5″ x 7″ white one.

The envelope has another of the floral images on the front, colored the same as the one on the card. The flap has more of the Botanical Butterfly Designer Series Paper on the flap.

34

I think this is a stunning card and can’t wait to try some different stamps and colors.

CARD CUTS: Granny Apple Green: card base 6″ x 10″ scored as above, floral panel 1-3/4″ x 3-3/4″, sentiment panel 1-5/16″ x 1-3/4″ ,Whisper White: panels to fit between score/fold lines 2-3/8″ x 5-7/8, 1-3/8″ x 5-7/8″, 2-7/8″ x 5-7/8″, 6 pieces 1-1/8″ x 1-3/8″ Floral panel 2″ x 4″, sentiment 1-1/2″ x 2″, windows 1-1/2″ x 5-1/2″; Botanical Butterfly Designer Series Paper: panels to adhere to Whisper White panels 2-1/4” x 5-3/4”, 1-1/4″ x 5-3/4″, 2-3/4″ x 5-3/4″, 6 pieces 1″ x 1-1/4″, enough to punch out 3 large and 6 small butterflies.

Product List

Uncategorized

Stampin’ Up! Climbing Roses Birthday for Happy Inkin’ Thursday Blog Hop

Another week has gone by and I spent nearly all of it at home. What a shocker! ‘Tis true, everything on my schedule was cancelled due to snow/ice/wind/extreme cold..any and/or all of the above. So, from last Wednesday until, maybe tomorrow, I have been home except for a very quick trip Monday to get some groceries and bird seed and suet between storms. It was actually freezing rain before I got home.

You might think I would have done something really important, like – uh, taxes? I am the world’s best at procrastinating when that is looming, so, no, I watched the birds at my feeders, read 4 books, played some solitaire, made a few cards, watched birds, made some jewelry, watched some You Tube tutorials, watched the birds at my feeders. (do you see a trend here?) And, yes, I did actually do some work…vacuumed, did laundry, cooked more than usual, did dishes (cooking makes a lot of dishes), did some paperwork, paid bills, and got a small start on spring cleaning by cleaning out 3 or 4 kitchen cabinets and washing down the fronts. Also, of course, is the clearing of sidewalks of ice/snow/sleet. I am not a TOTAL shirker!

But, my week’s work, or lack thereof, is not why we are here. It is time for our talented Krew to share some lovely cards with you. We have a sketch for today, and I have chosen to implement it with the climbing Roses stamp set. On with the hop!

I like soft colors when I am making something for a woman, and I have several birthdays upcoming, most of which are of the feminine type. One of my favorite Stampin’ Up colors is Soft Sea Foam, so that is my card base. I also like layers, so layers you get.

4

I stamped the roses in Basic Gray on Whisper White and used my Stampin’ Blends and Stampin’ Write Markers to color them. Colors used for this were Rich Razzleberry Light Stampin’ Blends, and Soft Sea Foam, Mint Macaron and Powder Pink Stampin’ Write Markers.

The Climbing Roses Bundle has everything I needed except the birthday sentiment and the inside sentiment, and the embossing folder.

The mat behind the roses is Powder Pink and I ran it through the Big Shot with the Tufted  3D Dynamic Textured Impressions Embossing folder. This was attached to a Blackberry Bliss mat with Liquid Glue. Liquid Glue is the only adhesive used on this card except for the Stampin’ Dimensionals under the sentiment.

The extra leaves and the rose on the sentiment are also from the Climbing Roses Bundle. The Powder Pink flower and the Blackberry Bliss berries were some die cuts I had cut for another project and didn’t use. They may have been from the holiday catalog, but I am not sure. Anyway, I like to save things like that as you never know when they will come in handy.

1

The sentiment from All That You Are was stamped in Rich Razzleberry on Whisper White, then die cut with the die in the Climbing Roses Bundle. It looked too small and too plain, so I adhered it to a scrap of Soft Sea Foam and fussy cut around it, leaving a narrow margin. Hmmm…still too plain, and still too small. OK, let’s mount it on a scrap of Blackberry Bliss and fussy cut it, leaving a larger margin. Oh, yes. Much better. The little rose adds a finishing touch. This was afixed to the front, then the whole was Liquid Glued to the card base.

On the inside, my Powder Pink liner was stamped with a sentiment from Golden Afternoon in Rich Razzleberry. The corner adornments are also from Climbing Roses and stamped in Basic Gray using the second generation stamping method. I left these un-colored.

5

This was adhered to a mat of Blackberry Bliss and into the card base. I don’t know if you can tell from the photo, but the mat is embossed with the Tufted Dynamic Embossing Folder. I don’t usually emboss the mat, but I originally thought I would put it on the front of the card, then decided it was too dark. Rather than add it to my stash of paper-to-be-used-later, I just used it as a mat.

Card finished.

The envelope also got the small rose spray on the front, stamped in Basic Gray and colored with Powder Pink and soft Sea Foam Stampin’ Write Markers. Since I had not used any Designer Series Paper to also use on the flap, I simply stamped the large rose spray on the flap, letting it extend down onto the envelope.  I then colored it with Powder Pink, Rich Razzleberry, Soft Sea Foam and Mint Macaron Stampin Write Markers.

2

3

My apologies for the appearance of some of the photos. All were taken at the same time with the same lighting, so I don’t know why some of them look striped. It is a mystery. Let me assure you….they are NOT striped!

Now, to see what the rest of this talented Krew has for you, just click the next button to see what Eva has done for you. Or, just click on any name hop to her blog. Enjoy!

Card cuts and products used are below.

Blog hop next button

Amy Koenders

Shelagh Freemantle

Mary Deatherage

Kristi Gray

Jaimie Babarczy

Sue Prather

Karen Finkle

Julie Johnston

Eva Dobilas

CARD CUTS: Soft Sea Foam: 5-1/2″ x 8-1/2″ scored at 4-1/4″, extra leaves 1-1/4″ x 3″, sentiment mat 2-1/2″ x 3-1/2″; Blackberry Bliss: front mat 4″ x 5-1/2″, sentiment mat 3″ x 4″, inside mat 4″ x 5-1/4″, scrap for berries; Powder Pink: embossed mat 3-3/4″ x 5-1/2″, inside liner 3-3/4″ x 5″; Whisper White: rose spray 3-1/2″ x 5″, sentiment 2″ x 3″

Product List


Uncategorized

Stampin’ Up! Butterflies and Doilies for Happy Inkin’ Thursday Blog Hop

Hello again! Last week I didn’t get to participate in the weekly blog hop due to a lack of internet service. We were in the midst of WAY below zero temperatures, and though my provider knew what needed to be done to fix the issue, it involved someone climbing a tower….not a good idea with those temperatures and 40 mile an hour wind. Thus, I was without service for 4 days. AND, I SURVIVED!! It can be done folks. Just turn off the computer. Actually, other than not being able to join in the hop, I enjoyed the freedom from the internet.

Today we have a color challenge, which makes me think SPRING, which makes me think butterflies. The Occasions catalog has some beautiful butterflies offered, so today is a butterfly day! Come on along and hop with us. We have several VERY talented ladies joining us, so without further ado, let’s go!

Here is our challenge:

And here is what I created using that challenge. To me this shouts “SPRING” and with recent cold, snowy, icy days, spring can’t come too soon for many. I really don’t mind the cold and snow, but don’t much care for ice, unless it is in my water or soda.

1

While this is a bit outside my comfort zone, I had fun creating this card. I began with a Coastal Cabana card base and used a mat of Botanical Butterfly designer Series Paper as a mat, set on an angle. This was adhered with Liquid Glue.

I used the thinlits in the Dear Doily Bundle to die cut a Melon Mambo doily and a Whisper white one. The Melon Mambo one was adhered over the front mat with Liquid Glue.

Using a Blender Pen and both Coastal Cabana and Melon Mambo ink, I colored 3 butterflies on the black and white side of the DSP. A fourth one was stamped on Whisper White card stock in Melon Mambo, using a stamp from the Butterfly Gala Bundle. All were punched out with the Butterfly Duet Punch, which is part of the Butterfly Gala Bundle.

2

The sentiment, from Itty Bitty Birthdays, was stamped in Coastal Cabana on Whisper White and punched out with the Classic Label Punch. A Coastal Cabana Marker was used to edge the label. Stampin’ Dimensionals were used to adhere the butterflies and label.

To add a bit of bling and more dimension, I added some Basic Jewel Rhinestones to the butterflies. This completes the front.

For the inside, I used Liquid Glue to adhere the Whisper White Doily and one of the butterflies, instead of using a mat as I usually do. In retrospect, I think I like using a mat better, but I was trying to think outside my usual way of doing things. The sentiment is from Humming Along and is stamped in Melon Mambo.

5

Moving along to the envelope, another piece of the DSP covers the flap and a couple of butterflies in Coastal Cabana from the Butterfly Gala Bundle grace the front.

On with the hop.

Amy Koenders

Shelagh Freemantle

Mary Deatherage

Jaimie Babarczy

Sue Prather

Karen Finkle

Julie Johnston – You are here

Eva Dobilas

CARD CUTS: Coastal Cabana:card base 5-1/2″ x 8-1/2″ scored at 4-1/4″; Whisper White: butterflies 3″ x 5″, front sentiment scrap approx. 1″ x 3″, doily 4-1/2″ x 4-1/2″; Melon Mambo: doily 4-1/2″ x 4-1/2″; Botanical Butterfly Designer Series Paper: front mat 3-3/4″ x 5″, envelope flap 2-3/4″ x 6″, butterflies as many as you want to color and punch out.

Product List