Uncategorized

Stampin’ Up! Leaves and Plaid Thank You

Are you surprised it is Friday again? Seems like the weeks just spin by, or am I just getting old and it is just my perception? Anyway, time marches on and I have to try to keep up.

Here is my card for today, which is playing along with the Words 2 Craft By Challenge.

4

W2CB #58: Now for October Eves

For this challenge, the words come from Humbert Wolfe.
Listen!
The wind is rising, and the air is wild with leaves,
We have had our summer evenings,
now for October eves.

I like that quote. Fall, or Autumn if you prefer, is my favorite season. I love the cooler temperatures, the colors as the trees change from their summer dress to their party frocks. There are many more reasons for this to be my favorite season, but I won’t go into all of them. ON WITH THE CARD!

My order with the new Snowflake Showcase items came the other day, so I thought I would check out the lovely VELVET paper. It feels SO nice, soft and velvety. I wondered if it would work to make a ‘flannel’ shirt plaid and thought I should try it. It is only paper, right?

The Buffalo Check stamp is large, so I stamped a panel of the Velvet Paper that was as large as the stamp, mainly so I would have room to manipulate it if necessary. I used the Stamparatus, stamping it three times with Crushed Curry. I was extremely careful to have everything straight and still managed to stamped crookedly! Unbelievable. Well, at least I had room to trim it so it was straight.

1

Stamps ‘n’ Lingers has a great video on making plaid, so I won’t re-invent the wheel here. Just click on the link above to go to her video. Suffice it to say that I used my Mossy Meadow, Soft Suede, Pumpkin Pie and Cajun Craze Stampin’ Write Markers for the plaid lines. I used the brush end of the Soft Suede and Cajun Craze for the ‘fat’ lines, and the bullet end of Pumpkin Pie and Mossy Meadow for the fine lines. I do think it looks like flannel, and it certainly feels like it.

This panel was adhered with Tear & Tape to a Mossy Meadow mat, and onto the Cajun Craze card base.

I stamped a few leaves with the Colorful Seasons stamp set with Cajun Craze on Cajun Craze, Mossy Meadow and Mango Melody card stocks. These were die cut with the thinlits from the Seasonal Layers. The large detailed leaf is Mango Melody. All the leaves were sponged lightly with Cajun Craze and Mossy Meadow to give them a ‘changing color’ look, which fits in with October leaves.

4

These were attached to the plaid with Glue Dots, after arranging them so that they mimicked “the air is wild with leaves” portion of the quote.

The sentiment, from Love What You Do, was stamped in Mossy Meadow on Crushed Curry, then punched out with the Tailored Tag punch. I used my Mossy Meadow Stampin’ Write Marker to go around the edge before adhering it to the card front with Stampin’ Dimensionals. Card front-done! I like it.

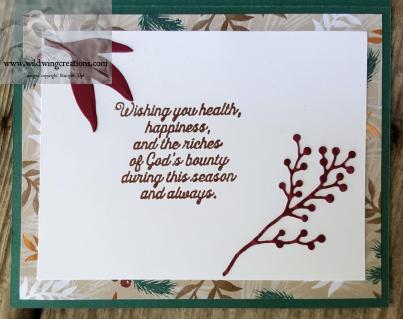
For the inside, I inked the sentiment stamp from All Things Thanks with Mossy Meadow, Cajun Craze and Crushed Curry Stampin’ Write Markers. To do this, simply apply the markers directly to the stamp. I wasn’t too careful how I did it, just made sure to cover all of the stamp. I then huffed on it to re-moisten and stamped it on a panel of Whisper White card stock.5

Remember I had to trim the plaid to straighten it? I decided to not waste those pieces, so used Liquid Glue to adhere them above and below the sentiment. Yes, they are stamped crookedly, but, so what? I think with the cut angles it looks fine. Tell me what you think.

The envelope flap was stamped directly. To do this I inserted a scrap of copy paper under the envelope on my Stamparatus and another under the flap. This ensured that the stamping only went where I wanted it to be. The Buffalo Check is stamped in Crushed Curry and I did the same with markers as for the front piece.

The front simply has a stamped-off-once Cajun Craze leaf, then the detail is stamped in full strength Cajun Craze.

I hope you will try making plaid, and enjoy it as much as I enjoy it.

The Host Code for the remainder of October: EV7ETS99

Go here to learn the details on using the host code and my customer loyalty rewards program. You can earn bird eggs toward free stuff, and more! Check it out.

You will be able to purchase the Velvet Paper November 1 when the Snowflake Showcase becomes available to everyone. Remember though, this is only good while supplies last, so get yours early!

CARD CUTS: Cajun Craze: card base 5-1/2″ x 8-1/2″ scored at 4-1/4″, leaves 2-1/2″ x 3″; Mossy Meadow: front mat 3-1/2″ x 4-3/4″, inside mat 4″ x 5-1/4″, leaves 2-1/2″ x 3″; Velvet Paper: for plaid finished at 3-1/4″ x 4-1/2″; Whisper White: inside liner 3-3/4″ x 5″; Crushed Curry: sentiment tag 3″ x 4″; Mango Melody: leaves 2-1/2″ x 3″

Product List

Uncategorized

Stampin’ Up! Wood Textures Vintage for Happy Inkin’ Thursday Blog Hop

Good Morning Everyone! I trust your Thursday is off to a good start. We have a blog hop today, just like we do every Thursday, so won’t you join me in hopping to see what everyone has created today?

We are working from a sketch today. Here is the sketch

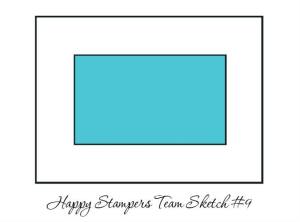
And here is my card inspired by that sketch. It is pretty basic, plain and simple. Sometimes you just need to do one of those. Plain and simple, that is.

This also plays along with the Card Concept 100th Challenge. The challenge is elegant, fall or special celebration. I chose the elegant. Somehow I can’t see pink and gold pumpkins. And there are flowers in the inspiration photo, so I also used a floral stamp.

I began by going over my Petal Pink card stock for all the pieces of this card with my Embossing Buddy. This helps keep the embossing powder from sticking where you don’t want it. I then stamped the floral image from Very Vintage with Versamark on Petal Pink and heat embossed it in gold. This was cut with the largest Stitched Shapes Framelits circle.

The bottom mat is Gold Foil Sheets from which I cut a gold circle from with a scalloped circle from Layering circles, using one just large enough to show behind my focal piece. Liquid Glue adhered the two circles together.

A sheet of the Wood Textures Designer Series Paper Stack was Liquid Glued over the Gold Foil mat, and the mat to the card base. The large circles were then Liquid Glued to the Wood Textures mat.

1

The smaller sentiment circle was also cut from Stitched Shapes circle Framelits and  adhered on the next largest size of Gold Foil Sheets scalloped circle with Liquid Glue. The gold circle was cut from the inside mat. The sentiment is from Merry Christmas to All and stamped in Versamark then heat embossed in Gold Stampin’ Emboss Powder. This was adhered to the card front with Stampin’ Dimensionals.

For the inside, the sentiment, also from Merry Christmas to All stamped in Versamark on Petal Pink, was then heat embossed in Gold. The corners of this liner were then punched with the Detailed Trio Punch. Liquid Glue was used to adhere this layer to the Gold Foil Sheets mat and into the card base. This finished the card. On to the envelope, as we cannot have naked envelopes!5

The flap has more of the Wood Textures Designer Series Paper Stack while another of the Very Vintage floral images is stamped and heat embossed in gold on the front. I think Gold embossing raises the level of any card to an elegant level, don’t you?

This could easily be a non-traditional Christmas card, or New Year’s.

Thanks for stopping by, and I appreciate any comments. Let’s go on with the hop.

Card Cuts below

Amy Koenders

Shelagh Freemantle

Mary Deatherage

Kristi Gray

Jaimie Babarczy

Sue Prather

Karen Finkle

Julie Johnston – You are here

CARD CUTS: Crumb Cake: card base 5-1/2″ x 8-1/2″; Gold Foil Sheets: (2)front mat and inside mat 4″ x 5-1/4″ Use these to cut the circles before you glue them to the card base; Wood Textures Designer Series Paper Stack: front 3-7/8″ x 5-1/8″, envelope flap 2-1/2″ x 6″; Petal Pink: large circle 3-1/2″ x 3-1/2″, small circle 2-1/2″ x 2-1/2″

Product List

Uncategorized

Stampin’ Up! Time to PARTY!

10-23-18_dmain_birthdaystampsale_na

Good Wednesday everyone. My apologies for no post yesterday, and no card in today’s post. I was traveling and without internet access for most of 30 hours. Thus, no post. Anyway, with time being limited I am not posting a card today, just information you all need to know.

Stampin’ Up! is celebrating its 30th birthday this year. Yep! 30 years. Who knew? Anyway, Stampin’ Up! is letting all of us in on the party, for ONLY 24 HOURS!

Starting today (I wanted to post this yesterday) and only until 11:59 p.m., Mountain time,  tonight, many stamp sets are 15% off.

10.01.18_FLYER_BirthdayStampSale_US-1

10.01.18_FLYER_BirthdayStampSale_US-2

So, Don’t delay. Get those stamps while you can save $$$. And you will be eligible for freebies from me as well. Click here for the details.

Uncategorized

Stampin’ Up! Wood Textures and Vintage Leaves

Here it is Sunday again, and I hope all of you are enjoying this day the Lord has made! My card today uses current Stampin’ Up! products as well as the retired Vintage Leaves and coordinating Leaflets Framelits. I love these leaves and can’t bear to give them up.

In the Wood Textures Designer Series Paper Stack there are some pieces I wondered what on earth I would do with them. I think today’s card effectively showcases one of the difficult ones.

I am loosely following the challenge from Freshly Made Sketches #359 for my design.

Freshly Made Sketches sketch #359

The color scheme comes from Handstamped Sentiments Challenge #300

Hand Stamped Sentiments Challenge 300

I began with a panel of the tree rings Wood Textures Designer Series Paper Stack, Liquid Glued to my card base. Using one of the Layering Circles Framelits, I cut the center from another piece of the tree rings. This was adhered to my Cajun Craze mat with Liquid Glue.1

DISCLAIMER: Vintage Leaves is retired from the catalog. I love this set and had to use it one more time. Any individual leaf stamp would accomplish the same end result. (Colorful Seasons or Falling for Leaves come to mind)

The focal piece is a set of 3 leaves from Vintage Leaves, stamped with Merry Merlot on Mango Melody, Crushed Curry and Mossy Meadow, then die cut with the coordinating Leaflets Framelits. Liquid Glue adheres these to one another and a length of 3/16″ Braided Linen Trim is tied around the stems. This assemblage is attached to the card front with Stampin’ Dimensionals. (If you don’t have Vintage Leaves, any individual leaves will do nicely). This card front was then attached to the matted card base with Liquid Glue.

I considered dry embossing the Cajun Craze mat with the Pinewood Planks, but didn’t do it as I thought it might look ‘too busy’. Your thoughts?

The sentiment is from Pleasant Pheasants and is stamped in Soft Suede on the Cajun Craze mat. This focal panel was then adhered to the tree rings mat with Liquid glue.

3

For the inside, I attached the leftover piece of tree rings DSP from the Wood Textures Stack to a panel of Cajun Craze, with Liquid Glue, and used more glue to adhere the panel into the card base. One of the Vintage Leaves was inked with Cajun Craze and stamped off twice before stamping my Very Vanilla panel. The sentiment, also from Pleasant Pheasants, was stamped in full strength Cajun Craze.

2

The envelope, never to be naked, was given the same leaf as on in inside, and more of the tree rings DSP on the flap.

I love the colors of Autumn and the crisp, cool days. A walk in the woods during this wonderful season is an excellent way to spend a little time. Short of that, perhaps an autumn colored, woodsy card will fill the bill!

Thanks for stopping by. Try this easy one for yourself.

CARD CUTS: Early Espresso: card base 5-1/2″ x 11 scored at 4-1/4″; Wood Textures Designer Series Paper Stack: front mat 4″ x 5-1/4″, inside strip 2″ x 5″, 3″ circle; Cajun Craze: front panel 3-3/4″ x 5″, inside mat 4″ x  5-1/4″; Very Vanilla: inside liner 3-1/4″ x 4-1/2″; Mango Melody, Crushed Curry: maple leaves 3″ x 3-1/2″; Mossy Meadow: oak leaf 2″ x 4-1/2″

Product List

Uncategorized

Stampin’ Up! Very Vintage

Good Saturday, Everyone! I hope you are on your way to a great weekend.

Today my card fits the Color Throwdown Challenge #515

color Throwdown 515

I am using Crumb Cake, Soft Suede, Whisper white and Old Olive today. The first order of business was to rip apart a piece of White copy paper and wad it up. I had 2 pieces, one for the card and one for the envelope. After crunching it up I spread it out as flat as it would go and stamped the Sheet Music stamp on the pieces in Soft Suede. I used the Stamparatus to do this, so if I didn’t get a good stamping the first time I would be able to repeat it. Of course, I needed to repeat it.

4

When I had a good enough image (I wanted it to look distressed and old) I tore it to fit the card, then sponged all over it with Soft Suede ink. I started with a very light hand, then added more as I thought it needed it. There is a little bit of Early Espresso sponged on here and there as well. Some of the edges got curled up a bit, also adding to the aged look.

My Thick Whisper White card base has an Olive Green mat adhered to it with Liquid Glue.

Next, my base panel of Crumb Cake was stamped all over with Versamark in in the pattern of the Very Vintage flowers. More sponging with Soft Suede around the edges  add to the aged look. I did not re-ink to sponge this panel. To this I adhered the music with Liquid glue.

4

Across the bottom of the panel I added a bit of old cotton crocheted lace and taped it on the back. Some Linen Thread was wound around a couple of times and tied in a bow. To make sure the bow stayed in place, I put a Glue Dot under it.

Another piece of Crumb Cake was the basis for my focal point…the flowers again from Very Vintage, this time embossed with White Stampin’ Emboss Powder. I then cut it out with one of the Layering Ovals Framelits. Again, Soft Suede sponged all over, and darker at the edges. I then used a tissue to wipe the color off the flowers. Stampin’ Dimensionals adhere this to the card front.

1

For the sentiment, I chose to stamp it on Old Olive in Soft Suede, using the square and sentiment from Very Vintage. I do not have the Darling Label punch, so I used my trimmer to cut it to size, then fussy cut the corners with my Paper Snips Scissors. More sponging with Soft Suede ages this piece as well. Stampin’ dimensionals on 3 corners adhere this in place over the oval. This card front was then adhered to the Old Olive mat with Stampin’ Dimensionals.

For the inside of the card, I adhered a mat of Old Olive with Liquid Glue after sponging this with Soft Suede and my trusty Stampin’ Sponge. On a panel of Crumb Cake, I stamped the Very Vintage flowers and sentiment in Versamark Ink, then heat embossed them in White Stampin’ Emboss Powder and heat set it.

5

I used one of the dies from the Delicate Lace Edgelits to cut the bottom of the Crumb Cake panel to coordinate with the lace on the front of the card. More sponging with Soft Suede ages this panel, which was then adhered to the mat with Liquid Glue.

To finish the front, I attached a wooden butterfly (also sponged with Soft Suede) with a Glue Dot and this card is finished.

The Whisper White Medium Envelope has a Soft Suede floral image from Very Vintage on the front, and more stamped, distressed, and sponged Sheet Music on the flap. The sheet music stamp isn’t wide enough, as it turns out, to cover the flap, so I put it sideways. It was either that, or make a new piece, and I didn’t have time to do that. Next time I will remember to stamp the image side by side using the Stamparatus for placement., I am ok with it sideways. To me, the important thing is the distressing.

The Host Code for the remainder of October: EV7ETS99

Go here to learn the details on using the host code and my customer loyalty rewards program. You can earn bird eggs toward free stuff, and more! Check it out.

CARD CUTS: Thick Whisper White: 5-1/2″ x 8-1/2″ scored at 4-1/4″; Old Olive: Cut 2 for mats 4″ x 5-1/4″, front sentiment 1-1/4″ x 1-1/4″; Crumb Cake: front panel and inside liner 3-3/4″ x 5″, front art oval 3″ x 4″

Non Stampin’ Up! products used: copy paper to stamp Sheet Music, wooden butterfly embellishment, old lace

Product List

Uncategorized

Stampin’ Up! Christmas Roots and Baubles

It’s FRIDAY! Busy weekend coming up for me! How about all of you? Great plans? Or just relaxing and enjoying some quiet time?

Well, let’s get on with today’s card, shall we? I know that is why you all came. I chose pretty traditional Christmas colors for today’s card-green and red.

4

It also fits in with the Holly and Ivy Challenge #38 – Anything Christmas Goes

holly and Ivy

My thoughts went to the recently received Beautiful Baubles Bundle and I thought I would use the big, beautiful bauble, and even put the stamp on a block ready to use. But wait! My thoughts turned to trees and a forest scene. (What? Me? make a forest scene?) I looked more closely at the thinlits in that bundle and came up with this card.

The first thing I did was to use the large wreath (or whatever it is) thinlit to cut a circle from my Old Olive panel. Not wanting this to be too plain, I used the Subtle Dynamic Textured Impressions Folder to dry emboss it. Perfect!

I then centered this over my Real Red mat and very lightly marked in pencil this circle on the panel. Using my grid paper I then marked the center and extended the marks out to the edge of the circle.

4

To line everything up perfectly I put the Layering Circles Framelit on my grid paper to mark the centers on it with a permanent marker the same way I had marked the paper circle. (Since there is no center in the die, the marks are across from each other, but centered, marking the quadrants) Next, I placed the Real Red panel with the marked circle on my grid paper again and put the marked thinlit on top, getting all the marks perfect, then used Post It tape to hold everything in place and ran it through the big shot.

This red mat was adhered behind my Old Olive wreath panel with Liquid Glue. Oh, I am liking this! Now we are ready for the artwork.

On a 4″ square of Whisper White I marked the center, then traced a pencil line around the wreath framelit to help me with placing the stamping. A Sponge Dauber and some Balmy Blue ink (mostly sponged off on my scratch paper before touching my Whisper White) give just the barest hint of sky. With Old Olive and Mossy Meadow I inked up the single conifer and the twin conifers from Rooted in Nature and began stamping. Some of the trees are full strength and some I just kept stamping without re-inking, staggering the placement. This gives the illusion of a forest with some trees further away.

1

I moved this square around until the stamped design pleased me within the cut out circle, then very lightly marked in pencil where it would be. This was my guide for using the large plain framelit in the Beautiful Baubles Bundle to trim my design to fit. Liquid Glue again does the adhering. This is my ‘go to’ adhesive.

One bit of advice: DON’T FORGET TO ERASE ALL PENCIL MARKS each step of the way! Do this before assembling. If you made very light marks, they are easy to erase with no telltale signs.

This 3-layered card front was then adhered to my Mossy Meadow card base, again with Liquid Glue.

For the sentiment, I used the words from Merry Christmas to All Bundle and stamped them in Mossy Meadow on Whisper White. Using the small banner die from Lakeside Thinlits I cut half of the sentiment, then turned the die around the cut the second half. I edged this with my Real Red Stampin’ Write Marker, stuck a few Mini Stampin’ Dimensionals on the back and adhered it to my card front.

1

For the inside, I stamped the sentiment from Merry Christmas to All in full strength Real Red and some more trees in Mossy Meadow, again both full strength and stamped off once or twice. Actually, I stamped the trees first so I would know where to put the sentiment.

It looked a bit plain, so I added three of the smaller red dots from the Santa’s Workshop Enamel Shapes. Done! This liner was adhered to a Real Red mat and into the card base with Liquid Glue.5

Hmm. Now the front looks plain. A bow! Of course, a bow.  I used the Real Red 3’8″ Mixed Satin Ribbon (Holiday Catalog page 6) and made a nice, small bow which was adhered with a Glue Dot.

Card finished! On with the envelope, as we can’t have naked envelopes.

A few more Mossy Meadow trees on the front and a pretty stamped Real Red bow on the flap is all this envelope needs to tie it to the card that will go inside. The bow is from the Wishing You Well stamp set.

I rather like this card, and might try another with a different scene, maybe different colors too. The die from Beautiful Baubles will lend itself to many styles.

Card cuts and products used are below, as is a place for you to leave a comment.

It’s Time to Sign Up For the November Holiday Paper Pumpkin!

The Paper Pumpkin team designed November’s kit to give you a solution for your holiday crafting needs!  So, now’s the time to get cozy this Christmas season with Paper Pumpkin, your One-Stop Box™ for holiday paper crafting fun.  When you subscribe by 10 November, we’ll send you our specially-designed box filled with everything you’ll need for a holly-jolly, handmade holiday.

  • The holidays are the best time to share our appreciation for others, and nothing does that like a handmade holiday card. November’s kit gives you everything you need to make plenty of those! (10 cards; 5 of 2 unique holiday designs.)
  • Coordinating colors for this kit: Cherry Cobbler, Crumb Cake, Garden Green, Gold, Soft Suede, Very Vanilla, Whisper White
  • HINT:  the box is a great sneak of what’s inside!

Remember, when you subscribe (or renew your subscription!) before 10 Nov, you’ll  get all of this PLUS an exclusive stamp set AND an ink spot for just $19.95.  And, that includes shipping!  If you’re currently a subscriber – just hang in there and you’ll see notice that your kit shipped after the 10th of November!

If you’re interested in subscribing to Paper Pumpkin, you can either sign up for a subscription where you’re billed monthly for your kit or you can purchase a prepaid subscription in my online store.

COMING SOON! Actually, on November 1

Let it snow! Or at least… create a snowy wonderland using this incredible assortment of products. With two stamp sets, paper, accessories, the only limit is your creativity!

This suite of snowy goodness is currently available only to Demonstrators (or…in a Starter Kit!) – but YOU can order it on or after November 1. However, be aware that this is only available until November 30, or while supplies last. That means that if the supply is sold out before November 30, that’s it. Done. Gone.

Host Code: EV7ETS99 good through the end of October.

Go here to learn the details on using the host code and my customer loyalty rewards program.

If you don’t have a demonstrator and need products or have questions, please contact me. Or if you would like a catalog, let me know.

CARD CUTS: Mossy Meadow: card base 5-1/2″ x  8-1/2″ scored at 4-1/4″; Real Red: front mat land inside mat 4″ x 5-1/4″; Old Olive: 3-7/8″ x 5-1/8″; Whisper White: tree scene 4″ x 4″, sentiment banner 1″ x 5″, inside liner 3-3/4″ x 5″.

Product List

Uncategorized

Stampin’ Up! Happy Thanksgiving

Good Thursday morning Everyone! It is time once again for our monthly Blog Hop with our friends in Canada. We have a color challenge and a sketch challenge. It is up to the individual whether to use one or both challenges. I am using both. Our Colors for this hop are:

And here is the sketch:

With these in mind, I opted to make a Thanksgiving card. Here goes! I hope you enjoy this hop as we have several very creative women participating today.

My card base is Tranquil Tide with a mat on the front of the Joyous Noel Specialty Designer Series Paper. This paper has the 3 required colors.

4

I love the Copper Foil Sheets embossed, whether dry embossed or heat embossed. For today I dry embossed it with the Layered Leaves 3-D Dynamic Textured Embossing Folder, and mounted it on a mat of Tranquil Tide with Liquid Glue.

For the sentiment, I cut the word Happy with the Happy Birthday Thinlit from Tranquil Tide three times and stacked them. I used Liquid Glue to adhere this to the copper. I stamped the Thanksgiving portion of the sentiment from Pleasant Pheasants in Versamark ink and heat embossed it in Copper. This was cut with a Lakeside Framelit and adhered to the copper with Stampin’ Dimensionals.

After it was adhered, I wished I had edged the die-cut with Versamark and dipped it in the Copper Emboss Powder. Hindsight, you know. I might remove it and do that, but time doesn’t allow it right now. I do think it will improve the card.

1

The small leaves are Tranquil Tide, embossed and cut with the dies from Nature’s Roots. One is also stamped and heat embossed with Copper Emboss Powder. The copper leaves are also from Nature’s Roots, dry embossed and cut. The berry branches are cut from Merry Merlot. The dies for these are from the First Frost Bundle

I dry fit everything then Liquid Glued them in place. This finishes the front.

On the inside a mat of the same Joyous Noel DSP as on the front frames a Whisper White sentiment panel. I flipped the mat over and die cut a berry branch (First Frost Bundle) from the center of it. This was attached to the sentiment panel with Liquid Glue. A leafy branch was cut from Merry Merlot card stock with another die from the First Frost Bundle, trimmed and adhered with Liquid Glue.

5

The sentiment is from Pleasant Pheasants and is stamped in Merry Merlot. This sentiment panel is adhered to the mat with Liquid Glue.

The envelope has the trio of leaves on the front embossed with Copper Emboss Powder and more of the Joyous Noel DSP on the flap .

Now, to move on through the hop, just click on the ‘next’ button, or on any of the names to skip around.

Don’t forget to leave a comment, as I do appreciate that. Thanks for hopping with us!

Amy Koenders

Shelagh Freemantle

Mary Deatherage

Kristi Gray

Jaimie Babarczy

Karen Finkle

Julie Johnston-you are here

Sandi MacIver

Eva Dobilas

Host Code: EV7ETS99 good through the end of October.

Go here to learn the details on using the host code and my customer loyalty rewards program.

If you don’t have a demonstrator and need products or have questions, please contact me. Or if you would like a catalog, let me know.

clearance rack

Check out the Clearance Rack. There just might be something there youhave been needing, like Fast Fuse refills? When they are gone, they will be gone for good.

Fingers crossed that my order with the Snowflake Showcase arrives tomorrow. You will be able to order on November 1. These products will be available through November 30 or as long as supplies last.

CARD CUTS: Tranquil Tide: card base 5-1/2″ x 8-1/2″ scored at 4-1/4, mat for copper 3-1/8″ x 4-3/8″, Happy (cut 3) sentiment 3″ x 6″, leaves and sentiment banner 1-1/2″ x 3-1/2″; Joyous Noel Specialty Designer Series Paper: front mat 4-1/8″ x 5-3/8″, inside mat 4″ x 5-1/4″; Copper Foil Sheets: embossed panel 3″ x 4-1/4″, triple leaf, 2-1/2″ x 3″; Merry Merlot: berry branches and inside leaf 3″ x 4″

Product List

Uncategorized

Stampin’ Up! Winter Woods for Christmas

Good Wednesday everyone! Or should I say, “Happy Hump Day??” Whatever, yesterday was the sunniest, warmest day we have had in over a week. It certainly was nice to see the sun, and I saw a few farmers on the road, presumably trying to harvest their crops, moving from field to field.

My card for today is for Christmas, but not a traditional Christmas card. The 52 Christmas Card Throwdown has a challenge this week to make a Christmas card using silver. Easy Peasy, so here goes.

Grab our button for your blog

October colours

My card is VERY simple, just 2 colors of card stock plus Silver Foil and one ink, Versamark.

I began with a plain panel of Balmy Blue. I swiped over it with my Embossing Buddy and stamped the large conifer in the Winter Woods stamp set on the lower portion of the panel with Versamark ink. After covering the stamped image with Silver Stampin’ Emboss Powder I heat set it with my Heat Tool. This was the procedure for every stamping step of this card.

2

The sentiment is also from Winter Woods and received the same treatment. This panel was then Liquid Glued to a Silver Foil Sheets. I wrapped several strands of the Silver Metallic Thread around this and taped it on the back. Then I made a sloppy bow by wrapping the thread around 4 fingers several times and tying it in the middle. This was adhered to the panel with a Glue Dot. The panel was then  adhered onto the Blueberry Bushel card base with Liquid Glue.

Several options came to mind, such as dry embossing the panel, adding rhinestones, using Stampin’ Dimensionals to lift the panel off the card base, etc. However, I just wanted this card to be very simple so I did none of those.

1

For the inside, the same Balmy Blue was heat embosssed with silver using the sentiment from Merry Christmas to All.

3

The pine boughs and pine cones are from Winter Woods also.

As I don’t like to waste the more expensive papers, I did cut a rectangle from the center of the Silver Foil Sheets panels, which I will use for other die cuts or on another project in some way. I usually leave a 3/4″ border of the foil. Only you and I know you cut some out of the center. And, I won’t tell!

Card cuts and products used for this card are listed below.

I have not made an envelope as I can’t decide what to do with it. Perhaps you can give me some suggestions? Just leave them in the comments below.

Host Code: EV7ETS99 good through the end of October.

Go here to learn the details on using the host code and my customer loyalty rewards program.

If you don’t have a demonstrator and need products or have questions, please contact me. Or if you would like a catalog, let me know.

clearance rack

Check out the Clearance Rack. There just might be something there youhave been needing, like Fast Fuse refills? When they are gone, they will be gone for good.

My order with the Snowflake Showcase arrived yesterday. Maybe by the weekend you will see some projects using this suite. I am told that the VelvetPaper in this suite is wonderful. Can’t wait to try it myself.

You will be able to order on November 1. These products will be available through November 30 or as long as supplies last.

CARD CUTS: Blueberry Bushel: card base 5-1/2″ x 8-1/2″; Balmy Blue: front panel 4″ x 5-1/4″, inside panel 3-3/4″ x 5″; Silver Foil Sheets: front mat 4-1/8″ x 5-3/8″, inside mat 4″ x 5-1/4″

Product List

Uncategorized

Stampin’ Up! Owl in the Woods

Good Tuesday to you All! Yesterday we had sun, but it didn’t get very warm. Fall is definitely here and the trees are really changing fast. I hope we get a prolonged autumn instead of going directly to winter.

My card for today is for another someone who is going through a rough patch. It also fits the Alphabet Challenge Blog- O is for Owls, about which you can learn more by clicking on the link. I really like owls, and have photographed many of them.

Stampin’ Up! has this great little bundle called Still Night. It includes the stamp set and a set of dies. By purchasing them together you save 10%. I couldn’t have one without the other.

My card base is Mossy Meadow. The card front is one I began several weeks ago and didn’t like it for the project for which it was started. So, I just tucked it away for future use.  It turned out to be perfect for today’s card.

4

The sky was sponged in Pool Party, Bermuda Bay, Highland Heather and Calypso Coral on Very Vanilla, using Sponge Daubers.

Terra firma is Mossy Meadow and Old Olive also done with Sponge Daubers. The conifers, from Winter Woods, are stamped in full strength Mossy Meadow and staggered to look like a forest. The bare trees in the background are stamped off twice Soft Suede.

That is the beginning of my card, the leftover panel.

To make it today’s card I took my 1-3/4″ punch and punched a Mango Melody moon, then stamped some bare trees with stamped off twice Soft Suede on the moon, to give it the appearance of being behind the trees as it comes up. Liquid Glue adheres it to the card front, lining it up with the trees in the background.

The bare trees in the foreground are from the Winter Woods Bundle. There are two bare tree dies in this set, and they are slightly different. I cut 3 of one of them and just one of the other. The three alike were Liquid glued to each other to add some depth. This one and the single tree were adhered to the card front with Liquid Glue.

1

The branch on which the owl is perched is from Seasonal Layers and is a stack of 2. It also is attached with Liquid Glue. The owl from the Still Night Bundle is stamped in Early Espresso on Soft Suede card stock then die cut with the coordinating dies. Stampin’ Dimensionals make this stand out from the background while adhering it to the card front. Of course, I had to put him in front of a full moon!

The sun is setting, the moon has risen and it is time for the owls to begin their hunt.

The sentiment is from the same bundle and is stamped in Early Espresso. I used my Stamparatus to stamp this 3 times to get it dark enough to show up against the green. I wanted a sentiment on the front, but didn’t want it to detract from the owl.

For the inside, I stamped a row of the bare trees from Winter Woods in Soft Suede on a Very Vanilla panel. The sentiment is from the Beautiful Promenade Bundle, and is stamped in Early Espresso. This was adhered into the card base with Liquid Glue.

5

This finished the card.

The envelope was simply stamped with a forest of conifers using the two trees stamp in the Rooted in Nature Bundle. They are in Mossy Meadow, some full strength, some stamped off once and some stamped off twice. I just wanted it to look more like a forest, hence the varying strength of color. The front and the flap received same trees.

Thanks for stopping by today. Don’t forget to leave a comment. I appreciate your feedback.

Card cuts are below, as well as the products used in this card.

Host Code: EV7ETS99 good through the end of October.

Go here to learn the details on using the host code and my customer loyalty rewards program.

If you don’t have a demonstrator and need products or have questions, please contact me. Or if you would like a catalog, let me know.

clearance rack

Check out the Clearance Rack. There just might be something there youhave been needing, like Fast Fuse refills? When they are gone, they will be gone for good.

Fingers crossed that my order with the Snowflake Showcase arrives tomorrow. You will be able to order on November 1. These products will be available through November 30 or as long as supplies last.

CARD CUTS: Mossy Meadow: card base 5-1/2″ x 8-1/2″; Very Vanilla: card front 4-1/4″ x 5-1/2″, inside liner 4″ x 5-1/4″; Early Espresso: trees, bare branch 4-1/2″ x 6″; Soft Suede: owl 2″ x 2-1/2″; Mango Melody: moon 2″ x 2″.

Product List

Uncategorized

Stampin’ Up! Glimmer and Glitz for Feminine Birthday

Good Morning All. I am late, late, late today. Some days are just that way. Today is breezy and quite chilly, though we did not get the freeze they predicted last night. It was too cloudy and windy to drop that much, though we did approach it. Maybe tonight.

On with the card. I have a sweet (well, mostly) little girl who is VERY enamored with Elsa of Frozen fame. (I don’t know how to add the Trademark symbol to my posts, but Elsa and Frozen are Disney property.)

4

Now, I have not seen the movie, but said little girl did ‘read’ a book to me about this story. She really can’t read yet, but has memorized it word for word. When I commented that it was terrible that Elsa had frozen her sister, Anna, she gave me a look that spoke more eloquently than her words, and said, as though speaking to a dimwit, “It isn’t real, GiGi, it is only a movie.” She also asked me to make her an Elsa Halloween costume.

With that background in mind, I knew I had to make a shimmery, glimmery, icy Elsa card.

I was going to use Whisper White Shimmer paper for my card base, but, alas, I had run out! So, I began with a card base of Whisper White Thick card stock and painted the front with my Frost White Shimmer Paint. I let that dry while I took a panel of Balmy Blue and a hot foil stamp of a princess. I added some dark blue foil and put the works in my Go Press and Foil machine. I then ran this through my Big Shot and die cut it.

Next, using Silver Glimmer Paper, I cut several snowflakes using the snowflake dies from the Seasonal Layers Thinlits and the Swirly Snowflakes Thinlits, as my order with the Snowflake Showcase had not yet arrived.

1

The sentiment is from Picture Perfect Birthday. After swiping the card front with my Embossin Buddy, I stamped the sentiment in Versamark, covered it in Silver Stampin’ Emboss Powder and heat set it with my Heat Tool.

I used Stampin’ Dimenionals, and Mini Stampin’ Dimensionals for the smaller places, to adhere the princess to the card front, and Liquid Glue to attach the snowflakes.

For the inside, another Picture Perfect Birthday sentiment following the same procedure as the front sentiment fills the center of the panel, while more Silver Glimmer paper snowflakes add still more bling. Remember, this is for a girly girl who likes all things feminine, including bling!

5

After using Liquid Glue to adhere the sentiment panel to a Balmy Blue mat and into the card base, I looked again at the front. The princess seemed rather plain, so I took my Wink of Stella and went over the whole dress. Much better. But, a princess has a crown does she not? OK. Some Basic Jewels Clear Rhinestones were attached to her head for a tiara. She now looks like a princess from a cold, snowy place. I hope said little girl can make the connection.

4

The envelope is simply stamped with Versamark and Silver Emboss Powder makes the Colorful Seasons Snowflakes really stand out on both the front and the flap.

I don’t usually go for glitz and glamour, but we make cards so we can match the card to the recipient, do we not? Sometimes anyway. A glitzy, glamoury, girly girl needs a card of the same ilk.

CARD CUTS: Whisper White Thick: card base 5-1/2″ x 8-1/2″scored at 4-1/4″; Whisper White: inside panel 3-3/4″ x 5″; Balmy Blue: princess 4″ x 5″, inside mat 4″ x 5-1/4″; Silver Glimmer Paper: snowflakes 3″ x 3″

Product List