sympathy, Uncategorized

Stampin’ Up! Toile Christmas for Happy Inkin’ Thursday Blog Hop

Welcome back to our Happy Inkin’ Thursday Blog Hop, which I just know you will enjoy. The participants are all creative, talented and fun, and have wonderful things to show you. So, come on along.

Today we are working with a theme challenge, which is Birds or Animals. It should come as no surprise to anyone that I chose one of my favorite birds, the Northern Cardinal, which is found in the Toile Christmas stamp set. Here is our theme

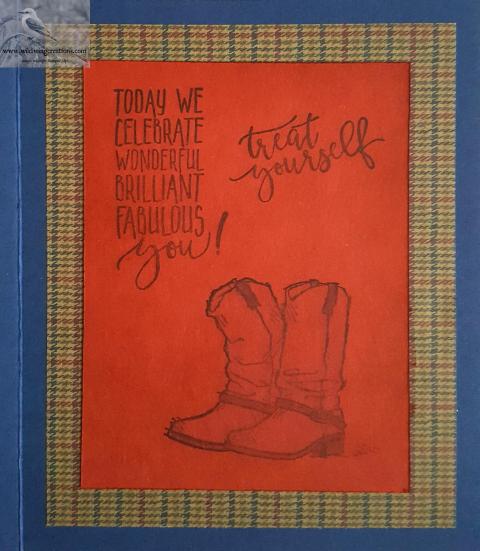
And here is my card.

The stamp set is designed as a Christmas set, but I chose to make it a “Thinking of You” card. It seems in these difficult times that our friends and family, and maybe even those we don’t know very well, could use a boost to their day. What better way to give them that boost, and to let them know you care how they are doing, than by making and sending a card?

Since Cardinals are red, the main color is Cherry Cobbler, which ties in nicely with the plaid I chose to use. Today, the plaid, from Plaid Tidings Designer Series Paper, is on the strips. The card base is Basic Black with mats in Mango Melody. The background on the front and the inside liner are from In Good Taste Designer Series Paper. All these colors are in the plaid. I also chose to add some greenery in Mossy Meadow and Gold Foil sheets. I loosely used the Freshly Made Sketches sketch, but didn’t enter this card in the challenge.

After cutting all the pieces (card cuts are below) I embossed the In Good Taste background panel with one of the Wrapped in Texture embossing folders. Liquid Glue adheres this panel to the Mango Melody mat. The plaid strips are also Liquid Glued to their respective mats, and Liquid Glue is the adhesive used to attach them to the front panel.

The cardinal, from Toile Christmas, is stamped in Memento Tuxedo Black ink on Cherry Cobbler and cut with the coordinating die from the Christmas Cardinal die set. Using the branch in the stamp set, I stamped two of them on Mossy Meadow in Memento Tuxedo Black. I cut these and one plain one with the coordinating die. I cut another branch from Gold Foil Sheets. It seemed too heavy for the card, so I cut a finer branch with leaves from the Birds and More die set. This I cut apart to place it going in opposite directions.

After dry arranging the bits and pieces to the front, I used Liquid Glue and Stampin’ Dimensionals to adhere allĀ  of it to the card front. The sentiment, from Love of Leaves, is stamped in Memento Tuxedo Black on Gray Granite card stock, and cut with a die from Stitched So Sweetly die set. I cut a duplicate in Basic Black, cut it in half horizontally and, with Liquid Glue, glued it to the back of the sentiment making a mat out of it. A couple of Stampin’ Dimensionals adhered it to the card front.

Using Liquid Glue, I adhered this card front to the card base, then added a few Red Rhinestones to finish the front. The Cardinal’s eye is a Red Rhinestone with a black dot in the middle, made with my Basic Black Stampin’ Write Marker.

By the time I got the front done and started on the inside, I got word that a friend had lost a family member, so it became a Sympathy card. For the inside liner, a panel of the In Good Taste was stamped in Memento Tuxedo Black with the sentiment from Woven Heirlooms. In the corners, I stamped the tiny scroll. The Liner is adhered to the Mango Melody mat and then into the card base with Liquid glue. A couple of Red Rhinestones complete the inside.

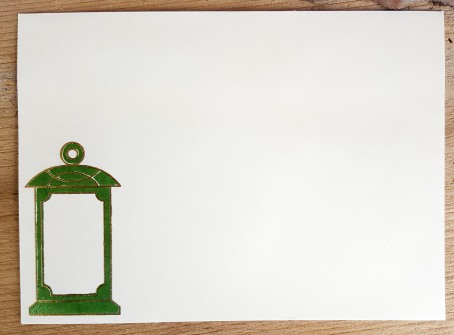
This completed the card. The envelope got another Cardinal on the front, stamped in Memento Tuxedo Black and colored with my Real Red and Mango Melody Stampin’ Write Markers. I used Real Red as the Cherry Cobbler was WAY too dark. The flap was covered with a strip of the Plaid Tidings Designer Series Paper.

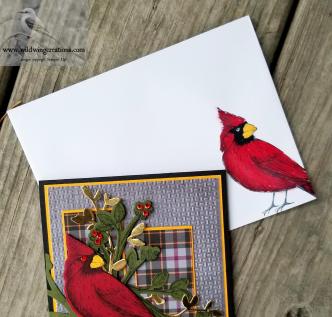
At this point, I kept looking at the front and something just wasn’t right. I finally decided it was the Cardinal. The one on the envelope had the correct color bill and the one on the front did not. They have a bright yellow-orange bill, so I stamped the Cardinal head in Memento Tuxedo Black on a scrap of Mango Melody, fussy cut the bill, and used Liquid Glue to adhere it to the Cardinal on the front of the card. MUCH BETTER! NOW the card is finished!

To continue on the hop, just click the button below to get to Amy’s blog and see what she has to show you. Otherwise, just click on any name to go to a particular blog, but you won’t want to miss anyone!

Amy Koenders

Mary Deatherage

Kristi Gray

Jaimie Babarczy

Sue Prather

Karen Finkle

Akiko Sudano

Karen Ksenzakovic

Julie Johnston-You are here

CARD CUTS

Basic Black: card base 4 1/4″ x 11″, scored at 5 1/2″, mat for front sentiment 2″ x 2″

Mango Melody: front mat and inside mat 4″ x 5 1/4″, mats for large plaid strip 1 3/8″ x 4″, mat for smaller plaid strip 1 3/8″ x 3″, scrap for Cardinal bill

Cherry Cobbler: Cardinal 2 1/2″ x 5″

Mossy Meadow: 3 branches 4″ x 4″

Gold Foil Sheets: branch 2″ x 4″

Gray Granite: front sentiment 2″ x 2″

In Good Taste Designer Series Paper: card front and inside liner 3 7/8″ x 5 1/8″

Plaid Tidings Designer Series Paper: (One 6″x6″ sheet will be enough) Large strip 1 1/4″ x 3 7/8″, small strip 1 1/4″ x 2 7/8″, envelope flap 2 1/4″ x 6″

If you need my help for anything, or have questions, just let me know. If you don’t have a demonstrator, I would be happy to help you with whatever you need to make this project or any other. To order from my online store, just click the bird button at right that says Shop with me Online.


Product List

Uncategorized

Stampin’ up Buffalo Check Nature Sings revisited

Good morning, All. Today my card is the second of the two that I began for the hop yesterday. After deciding to follow both the sketch and the color inspirations, the decision was made to save this card for another blog post.

Ta-Da! 4

This was my original idea, but, to be able to use both the color and sketch I changed it for the blog hop. For this one, I did the plaid the same way, then tore the long sides, leaving it long enough to fit the card base. I then stamped the Gray Granite panel with images and sentiment from Nature Sings. The elk are Gray Granite, the trees Mossy Meadow and the sentiment is Cherry Cobbler.

This was then dry embossed with the Subtle 3D Dynamic Textured Impressions Embossing Folder and adhered to the plaid with Liquid Glue. My Linen Thread was dragged through the Mossy Meadow ink pad and left to dry while I did the inside of the card.

For the inside, I took one of the torn off pieces of plaid and Liquid Glued it to the top of the Gray Granite liner. The elk were again stamped in Gray Granite and a couple of pine boughs in Mossy Meadow. The sentiment is in Cherry Cobbler. Again, all images and the sentiment are from Nature Sings. Beautiful stamp set!

5

This liner was adhered to a Mossy Meadow mat with Liquid Glue and into the card base, also with Liquid Glue. I should have stock in Tombow!

After the Linen Thread had dried I wrapped a length around the plaid sentiment panel and taped it on the back. I made an identical bow to the one for yesterday’s card and would have used a Glue Dot to stick it to the front, but it wouldn’t stick. Perhaps it wasn’t totally dry? Anyway, I wound up using a dab of Liquid Glue to adhere it to the card front.

1

Something was missing though. I kept looking at it and decided that the sentiment panel should have been affixed to a mat. Too late. It was firmly stuck! Nothing to do but leave it alone, or…..cut a couple of strips to edge the sentiment panel. In the end, that was my solution and I don’t think it looks too bad. This (finally!) finished panel was adhered to the card base with Stampin’ Dimensionals.

Actually, I like this card better than the one I did yesterday. Even so, I might try it with Very Vanilla instead of the gray, or maybe even Whisper White? What do you think??

The envelope is the same as yesterday’s also. I considered adding the elk, but was too lazy to clean another stamp, so just did the trees.

Feel free to leave comments below.

If you do not have a demonstrator and would like to place an order in my online store, just click on the bird photo at right that says Order Online. If you place an order up to $50 please use the Host Code WV7QS9PE. Click here for details on when to use the host code. Or, if you have questions, donā€™t hesitate to contact me.


We had another update from Stampin’ Up! yesterday afternoon. Well, at any rate it was afternoon when I got the email as I was away all morning and too busy to check my email. Seems there was an issue with their inventory management system and now they are discovering that many items in the Holiday catalog are running low. Below is the gist of the email:


HOLIDAY CATALOG INVENTORY PROBLEM

There is always a risk of products selling out without enough time to reorder and restock inventory before a catalog life cycle is over. When this does happen, it is usually caused by a higher-than-forecast demand. However, as we upgraded our inventory management system, there were system communication issues with the current holiday catalog and we have just determined that several products are at high risk of early depletion.

These products are running low and additional shipments will not be received before the end of the catalog:

  • SNOWFLAKES & STARS WIRE ELEMENTS (item 147819)
  • SANTA’S SIGNPOST FRAMELITS DIES (item 147911)
  • CHICKEN WIRE ELEMENTS (item 147807)
  • ALPINE SPORTS THINLITS DIES (item 147916)
  • SINCERELY SANTA PROJECT KIT (item 148029)
  • FESTIVE FARMHOUSE COTTON TWINE (item 147888)
  • 5/8″ STRIPED BURLAP TRIM (item 147889)
  • DETAILED LEAVES THINLITS DIES (item 147921)
  • IN THE WOODS FRAMELITS DIES (item 147919)*
  • DETAILED DEER THINLITS DIES (item 147915)*
  • GALVANIZED BUTTONS (item 147891)
  • GALVANIZED CLIPS (item 147806)
  • TAKEOUT THINLITS DIES (item 147927)
  • SWIRLS & CURLS TEXTURED IMPRESSIONS EMBOSSING FOLDER (item 147923)*
  • TRANQUIL TIDE 1/4″ VELVET RIBBON (item 147802)
  • REAL RED 3/8″ MIXED SATIN RIBBON (item 147894)
  • MERRY CHRISTMAS THINLITS DIES (item 147912)*
  • FARMHOUSE FRAMELITS DIES (item 147922)

We donā€™t know when these products will go out of stock, but itā€™s possible some may run out as early as next week.

We have also indicated with an asterisk (*) which of these products will carry over into a future catalog.Ā  So those items can be ordered at a later date.

We are working to fix the system communication errors to avoid similar problems in the future. Thank you for your patience.


SO! Be advised that if you want any of these, you will need to order right away unless it is an item that will be carried over and you can wait for it. I am sure Stampin’ Up! was as dismayed by this as many of you, but things do happen-sometimes especially with computers! How we would get along without them though…..

ALSO: Direct from Stampin’ Up!:


Sales for the following products have exceeded our forecast and are continuing strong, resulting in a large number of backorders. Because backorders are so costly, we have made the decision to shut these items off effective immediately. Since these products cannot be sent from the manufacturer in time for the holidays, these item numbers will not be reactivated.

150095: Santaā€™s Workshop Cards You Can Make It Bundle
147905: Santa’s Workshop Memories & More Card Pack
147815: Santa’s Workshop Memories & More Cards & Envelopes

147816: Joyous Noel Specialty Designer Series Paper
147890: Festive Farmhouse Elements
147811: Santaā€™s Workshop Enamel Elements


CARD CUTS: Cherry Cobbler: 5-1/2″ x 8-1/2″ scored at 4-1/4″; Gray Granite: plaid 4-1/2″ x 6″, front sentiment panel 2″ x 5-1/4″, inside sentiment panel 4″ x 5-1/4″; Mossy Meadow: inside mat 4-1/8″ x 5-3/8″, strips to border front sentiment (2) 1/8″ x 5-1/4″

Product List

Uncategorized

Stampin’ Up! Buffalo Check Nature Sings Christmas for Combined Happy Inkin’ Thursday and Happy Stampers Blog Hop

Good Morning, Everyone! Time again for Amy’s Inkin’ Krew Blog Hop combined with our friends from north of the border, the Happy Stampers! I am so glad you could join us today. We have a very talented group hopping, so let’s see what everyone has done with the challenges we have. When we do a combined hop we have a sketch and a color to serve as inspiration, or a challenge. Sometimes both!

Here is our color challenge:

And here is the sketch:

As I had already started my card (in my head) before I saw the sketch, I had to either change my mind about how I wanted this card to look, or not do the sketch. In the end I did both cards, one with just the colors and the other with both colors and sketch, and will post the second one in another blog. So, here is the one with both sketch and colors

4

I knew I wanted to use the Buffalo Check background stamp to make a plaid to use with the Nature Sings stamp set. The Stamparatus saved the day for me as I have trouble getting the Buffalo Check stamp to give me a good enough image when I just stamp it. In the end, I had to re-ink and stamp it 3 times using Cherry Cobbler ink on Gray Granite before I was satisfied.

After the stamping I used my Mossy Meadow Stampin’ Write Marker to make the plaid. The brush end made the wide lines and the bullet tip made the fine lines. I cut this plaid piece in 3 panels to fit the card. These were then matted to Mossy Meadow with Liquid Glue. Each of the panels was then adhered to the Cherry Cobbler card base with Liquid Glue.

1

For the sentiment strip, which I made wider than the sketch to accommodate the Nature Sings images, I first stamped the elk in Gray Granite on Gray Granite, then added the trees in Mossy Meadow. The sentiment is stamped in Cherry Cobbler and is also from the Nature sings stamp set. This panel was then run through my Big Shot with the Subtle 3D Dynamic Textured Impressions Embossing Folder and adhered to a Mossy Meadow mat with Liquid Glue.

I rolled a length of Linen Thread across the Mossy Meadow ink pad to color it, then wrapped it around the sentiment strip and taped it to the back. I then made a double loop bow and used Liquid Glue to adhere it to the sentiment strip. Stampin’ Dimensionals adhere the panel to the front of the card. This completes the front.

For the inside I stamped the sentiment, from Night in Bethlehem, on Gray Granite in Cherry Cobbler. I stamped the elk in Gray Granite and a Mossy Meadow pine branch,Ā  then ran this through the same embossing folder as used for the front. I matted this on Mossy Meadow and into the Cherry Cobbler base using Liquid Glue.

5

The envelope is Very Vanilla and is stamped with the trees from Nature Sings in Mossy Meadow, both on the front and on the flap. I made a whole forest of trees, some full strength, some stamped and stamped and stamped again without re-inking.

I hope you enjoy today’s hop. Just click the ‘Next’ button to continue on to see what the talented Sandi has done.

Blog hop next button

Amy Koenders

Shelagh Freemantle

Mary Deatherage

Kristi Gray

Jaimie Babarczy

Sue Prather

Julie Johnston- You are here!

Sandi MacIver

Eva Dobilas

The host code for November is WV7QS9PE

Please click here for details on when to use the host code. Or, if you have questions, don’t hesitate to contact me. If you do not have a demonstrator, I will be happy to help you.

Don’t forget the Snowflake Showcase as these are great stamps and dies. However, I just had notice yesterday that the Velvet Paper has sold out. The rest of the showcase is available either until the end of November or as long as supplies last. If you really want these products, I would suggest you wait no longer!

snowflake showcasesnowflake showcase 2

Thanks for stopping by. Please leave comments below.

CARD CUTS: Cherry Cobbler: card base 5-1/2″ x 8-1/2″; Mossy Meadow: 3 mats for front panels 1-11/16″ x 4″, sentiment mat 1-1/2″ x 5-1/4″, inside mat 4-1/8″ x 5-3/8″; Gray Granite: front sentiment 1-5/16″ x 4-15/16″, plaid 4-1/2″ x 6″, inside liner 4″ x 5-1/4″

Product List

Uncategorized

Stampin’ Up! Leaves and Plaid Thank You

Are you surprised it is Friday again? Seems like the weeks just spin by, or am I just getting old and it is just my perception? Anyway, time marches on and I have to try to keep up.

Here is my card for today, which is playing along with the Words 2 Craft By Challenge.

4

W2CB #58: Now for October Eves

For this challenge, the words come from Humbert Wolfe.
Listen!
The wind is rising, and the air is wild with leaves,
We have had our summer evenings,
now for October eves.

I like that quote. Fall, or Autumn if you prefer, is my favorite season. I love the cooler temperatures, the colors as the trees change from their summer dress to their party frocks. There are many more reasons for this to be my favorite season, but I won’t go into all of them. ON WITH THE CARD!

My order with the new Snowflake Showcase items came the other day, so I thought I would check out the lovely VELVET paper. It feels SO nice, soft and velvety. I wondered if it would work to make a ‘flannel’ shirt plaid and thought I should try it. It is only paper, right?

The Buffalo Check stamp is large, so I stamped a panel of the Velvet Paper that was as large as the stamp, mainly so I would have room to manipulate it if necessary. I used the Stamparatus, stamping it three times with Crushed Curry. I was extremely careful to have everything straight and still managed to stamped crookedly! Unbelievable. Well, at least I had room to trim it so it was straight.

1

Stamps ‘n’ Lingers has a great video on making plaid, so I won’t re-invent the wheel here. Just click on the link above to go to her video. Suffice it to say that I used my Mossy Meadow, Soft Suede, Pumpkin Pie and Cajun Craze Stampin’ Write Markers for the plaid lines. I used the brush end of the Soft Suede and Cajun Craze for the ‘fat’ lines, and the bullet end of Pumpkin Pie and Mossy Meadow for the fine lines. I do think it looks like flannel, and it certainly feels like it.

This panel was adhered with Tear & Tape to a Mossy Meadow mat, and onto the Cajun Craze card base.

I stamped a few leaves with the Colorful Seasons stamp set with Cajun Craze on Cajun Craze, Mossy Meadow and Mango Melody card stocks. These were die cut with the thinlits from the Seasonal Layers. The large detailed leaf is Mango Melody. All the leaves were sponged lightly with Cajun Craze and Mossy Meadow to give them a ‘changing color’ look, which fits in with October leaves.

4

These were attached to the plaid with Glue Dots, after arranging them so that they mimicked “the air is wild with leaves” portion of the quote.

The sentiment, from Love What You Do, was stamped in Mossy Meadow on Crushed Curry, then punched out with the Tailored Tag punch. I used my Mossy Meadow Stampin’ Write Marker to go around the edge before adhering it to the card front with Stampin’ Dimensionals. Card front-done! I like it.

For the inside, I inked the sentiment stamp from All Things Thanks with Mossy Meadow, Cajun Craze and Crushed Curry Stampin’ Write Markers. To do this, simply apply the markers directly to the stamp. I wasn’t too careful how I did it, just made sure to cover all of the stamp. I then huffed on it to re-moisten and stamped it on a panel of Whisper White card stock.5

Remember I had to trim the plaid to straighten it? I decided to not waste those pieces, so used Liquid Glue to adhere them above and below the sentiment. Yes, they are stamped crookedly, but, so what? I think with the cut angles it looks fine. Tell me what you think.

The envelope flap was stamped directly. To do this I inserted a scrap of copy paper under the envelope on my Stamparatus and another under the flap. This ensured that the stamping only went where I wanted it to be. The Buffalo Check is stamped in Crushed Curry and I did the same with markers as for the front piece.

The front simply has a stamped-off-once Cajun Craze leaf, then the detail is stamped in full strength Cajun Craze.

I hope you will try making plaid, and enjoy it as much as I enjoy it.

The Host Code for the remainder of October: EV7ETS99

Go here to learn the details on using the host code and my customer loyalty rewards program. You can earn bird eggs toward free stuff, and more! Check it out.

You will be able to purchase the Velvet Paper November 1 when the Snowflake Showcase becomes available to everyone. Remember though, this is only good while supplies last, so get yours early!

CARD CUTS: Cajun Craze: card base 5-1/2″ x 8-1/2″ scored at 4-1/4″, leaves 2-1/2″ x 3″; Mossy Meadow: front mat 3-1/2″ x 4-3/4″, inside mat 4″ x 5-1/4″, leaves 2-1/2″ x 3″; Velvet Paper: for plaid finished at 3-1/4″ x 4-1/2″; Whisper White: inside liner 3-3/4″ x 5″; Crushed Curry: sentiment tag 3″ x 4″; Mango Melody: leaves 2-1/2″ x 3″

Product List

Uncategorized

Stampin’ Up! Buffalo Check Plaid for Happy Inkin’ Thursday Blog Hop

Blog hop header
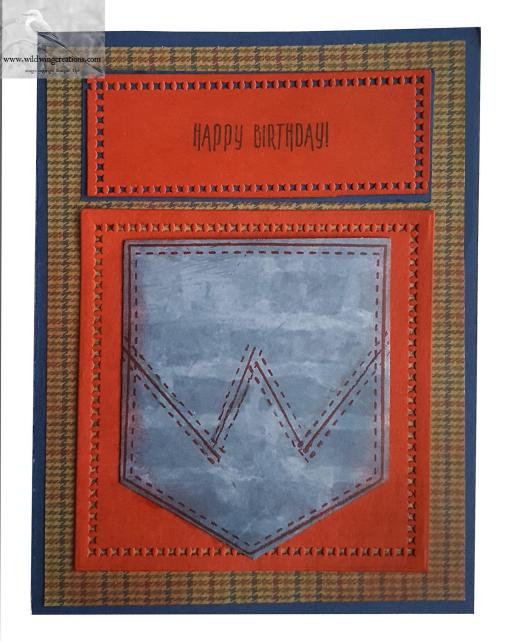
Today for our weekly Thursday Inkin’ Krew Blog Hop, I chose to use the color challenge colors to make a plaid using the Buffalo Check background stamp. Here are our colors.

oct 4 challenge

My friend Mary did a video tutorial on making plaid with the Buffalo Check background stamp. To watch her video, go here. She inspired me to make my own plaid. Here is the plaid I created and the card on which I used it.

4

Now, I love plaid. Always have, always will. I think today’s colors lend themselves well to plaid for a masculine birthday card, so let’s get on with it shall we?

It took a couple of tries to get the look I wanted in the end, but I really like this look. I stamped the Buffalo Check in Cajun Craze on Very Vanilla, then added the stripes in Old Olive and Blackberry Bliss. There are many kinds of plaids out there, so don’t be afraid to experiment a bit. It is only paper! I used my dark Stampin’ Blends marker (brush end) for the wide stripes and the Blackberry Bliss Stampin’ Write Marker bullet end for the finer lines.

My plaid panel was adhered to a Blackberry Bliss mat with Liquid Glue. A strip of Burlap Ribbon was wrapped around these panels and taped to the back.

This became the background for the Pleasant Pheasant stamp, stamped in Cajun Craze on Very Vanilla. I colored this in with the challenge colors plus some crushed curry. And I didn’t like it. AT ALL! It went to file 13! Guess I need practice in coloring. Back to Kindergarten folks!

The one I used is just stamped in Cajun Craze and the grasses colored with my Old Olive Stampin’ Write Marker. I cut the image with the largest Stitched Shapes Circle die. This is Liquid Glued to a Copper Foil scalloped circle, cut with the largest Layering Circles Scalloped die.

Several Stampin’ Dimensionals on the back allowed me to wind some Copper Metallic Thread around before adhering to the card front.

1

The sentiment isĀ  from Sunshine Sayings and is stamped in Blackberry Bliss on Very Vanilla. I used the shaped die from Still Night to cut the sentiment, then used my Old Olive Stampin’ Write Marker to make the stitches. This is adhered to the card front with Liquid Glue. The whole was then applied to the Old Olive card base with Stampin’ Dimensionals.

On the inside, another image from Pleasant Pheasants, stamped in Cajun Craze after stamping off once, provides a background for the Blackberry Bliss sentiment from Special Celebrations on Very Vanilla card stock. A narrow strip trimmed from my plaid panel was adhered to the left side of the sentiment liner with Liquid Glue. The other three sides got more Old Olive Stampin’ Write Marker stitches.

5

This panel was Liquid Glued to a Blackberry Bliss mat and into the card base.

The envelope has another of the Pleasant Pheasant images on the front and more of the pheasants on the flap.

Please, hop on around to see what this talented team has for you today. By clicking on the ‘next’ button you will go to our team leader Amy’s blog. Enjoy!

Blog hop next button

Amy Koenders

Shelagh Freemantle

Mary Deatherage

Kristi Gray

Jaimie Babarczy

Sue Prather

Karen Finkle

Julie Johnston-you are here

The host code for October is EV7ETS99. When placing an order of $50-$149.99 from my online store, use this code to earn a free gift from me. For orders over $150, DO NOT USE THE HOST CODE, as this will nullify any rewards you earn from Stampinā€™ Up! You will still get your free gift from me. And, you will earn bird eggs. For complete details on customer rewards, go here.

You also are eligible for my online class tutorials if you place a (pre-tax and shipping) $50 order through my online store.

October-Online-Class-Collage

CARD CUTS: Old Olive: card base 5-1/2″ x 8-1/2″ scored at 4-1/4″; Blackberry Bliss: cut 2 mats 4″ x 5-1/4″; Very Vanilla: for plaid 4-1/2″ x 6″, inside sentiment 3-3/4″ x 5″, front circle 3-1/2″ x 3-1/2″, front sentiment 1-1/2″ x 3″; Copper Foil Sheets: scalloped circle 4″ x 4″

Product List

Uncategorized

Stampin’ Up! Festive Farmhouse Anniversary

Good Sunday Morning Everyone! This is the day the Lord has made. Let us rejoice and be glad in it. Psalm 118: 24

Rejoice even if it is cold! Or hot! Or raining! Whatever. It is a good thing WE don’t control the weather or things would be in a real mess.

For some reason there are a lot of anniversaries in my family in the autumn of the year. One of my nieces is celebrating theirs soon so I made this card for them using the Festive Farmhouse Designer Series Paper as my inspiration.

If I recall, her bridesmaids wore plaid silk skirts and burgundy silk jackets. The plaid was similar to the Festive Farmhouse plaid. I think. Now, I could be WAY wrong on what I remember, but whatever.Ā  That is why I chose this paper and colors today.

4

My card base is Very Vanilla and the mat on the front is Merry Merlot. A strip of the Festive Farmhouse DSP is cut with my Triple Banner Punch. It has a strip of the new Merry Merlot and Copper 5/8″ reversible ribbon with the Merry Merlot side up on top. I wrapped one end over the DSP and taped it to the back, then cut the other end with my fabric scissors. It was a clean cut, but this ribbon does fray. Badly. The less handling of it the better. To get it to lie flat I used some Tear and Tape to secure it to the DSP. The DSP was Liquid Glued to the mat.

1

A piece of Mossy Meadow run through the Big Shot with the Subtle Dynamic Embossing Folder was then cut with the second largest Layering Ovals scalloped oval. The sentiment from Beautiful Bouquet was stamped in Merry Merlot on Very Vanilla. This was cut with the second largest Stitched Shapes oval. I stamped a bow from Beautiful Bouquet also, but didn’t really like it, so I made a bow from the Merry Merlot/Copper ribbon. It is tough to make a nice bow from 5/8″ ribbon, but it turned out fairly well. A Glue Dot adhered it to the sentiment oval and Liquid Glue adhered that oval to the scalloped oval. This was then adhered to the card front with Stampin’ Dimensionals.

5

The inside Merry Merlot mat was also dry embossed in the Subtle TIEF before adhering it into the card base with Liquid Glue. The sentiment (Better Together) is stamped in Mossy Meadow on Very Vanilla card stock and cut with the same die as the front. The mat is Festive Farmhouse plaid again, cut with the largest Layering Ovals scalloped oval. All are adhered with Liquid Glue.

For the envelope, I used the bow from Beautiful BouquetĀ  to stamp a row of Merry Merlot bows across the bottom of the envelope front. Full disclosure: I stamped the first envelope front UPSIDE DOWN, meaning I stamped them across the top. Oh, my! Wasted envelope!

2 
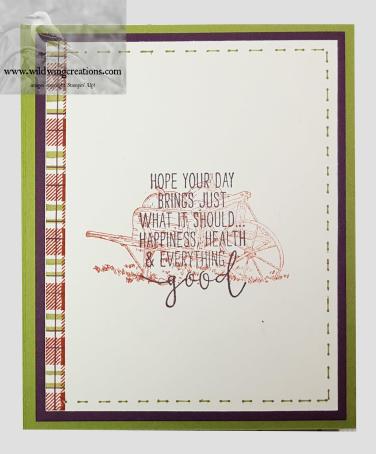
For the flap, I used the Festive Farmhouse plaid Designer Series Paper again. Gotta love the plaid!

3Ā  I think this card is pleasing and hope it brings fond memories to the recipients.

Card Cuts are below, as are the products I used for this card. Also, you can leave comments below. All of the items mentioned below, clearance rack, bonus coupons and Dashing Along end today!


Host Code: RKS93T47 (Good today) Use this code when ordering from my online store to get a free gift from me. There are also other goodies you can earn. Check it out here.


Donā€™t forget to check the Clearance Rack when you order. There are always great deals there. Click on the image below to see what is available.

clearance rack


Host a party with total sales (before taxes and shipping) of $250 and earn free Designer Series Paper in addition to the usual Stampinā€™ Up Rewards. This offer is only good through the end of today!

08.01.18_FLYER_DASHING_DEER_HOST_US


08-01-18_bonus-days_demo-main_en

AND DONā€™T FORGET TO REDEEM YOUR BONUS DAYS COUPONS. STAMPINā€™ UP SENT THESE TO YOU VIA EMAIL AFTER YOUR AUGUST ORDERS OF $50 OR MORE. Today is the last day to be able to redeem them.


CARD CUTS: Very Vanilla: card base 5-1/2″ x 8-1/2″ scored at 4-1/4″, front sentimentĀ  and inside sentiment (cut 2) 3-1/2″ x 5″; Mossy Meadow: scalloped oval 3″ x 4″; Festive Farmhouse Designer Series Paper: front banner 1-7/8″ x 5″, inside oval 3″ x 4″

Product List

Uncategorized

Stampin’ Up! Country Livin’ for a man

Good Friday morning to you all out there in Cyber land. It is cold again in the heartland, but I think this card is cozy for a man with a February birthday. And, it’s red, so if you just change the sentiment it could be a Valentine card. Add an enameled heart shape and there you go!

I began this card with a Real Red card base. Next, I Liquid Glued a panel of the red and black plaid that I had on hand in my scraps from a previous project to a Basic Black mat.

The red and black plaid just said ‘country’ to me, so I followed that theme and stamped the boots from Country Livin’ in Memento Tuxedo Black on a piece of light colored Wood Textures DSP. These were colored in with my Light and Dark Crumb Cake Stampin’ Blends Markers. The sentiment, from Happy Birthday Gorgeous, was also stamped in Tuxedo Black. Somehow that just didn’t look right, and since I had used my Stamp-A-Ma-Jig to place it in the correct spot, I simply cleaned my stamp, re-inked it in Real Red and stamped over the black. The Stamp-A-Ma-Jig allowed me to get a perfect placement over the black.

wild wing creations-3

This was adhered with Liquid Glue to a die-cut black mat. These rectangular dies are from Scrapbooking Made Simple, and I thought made the perfect mat for the sentiment panel. This panel was then attached, off center, to the matted card front panel with Stampin’ Dimensionals.

Using some Linen Thread I wrapped it around the card front three times and taped it on the back. A loopy bow is tied on to the three strands and the completed front is adhered to the card base with Stampin’ Dimensionals.

For the inside, I die-cut another black mat and Liquid Glued a smaller piece of the plaid to it. To this I adhered the sentiment panel, again with Liquid Glue. The sentiment is stamped in Real Red, again on a panel of Wood Textures DSP, and is from an old set that I don’t even remember what it is. There are several sentiments in the set though.

wild wing creations-4

This completes the card. The Whisper White Medium Envelope was finished with another pair of boots, stamped the same as the front of the card, and the flap received another piece of the red and black plaid.

I enjoyed making this card and was pleased with the outcome. I hope you enjoy it as well.

HOST CODE: ZERXEPFWĀ Ā  This code will be good for the month of February.

What is the HOST CODE, you ask? Use it when you place a $50 order through me and you get a free gift valued up to $10. Click HERE for all the details on my customer rewards. It will be worth your while.

AND…with a $50 order you will also get my free tutorials for the Hold on to Hope Bundle, which includes 6 lovely projects.

Hold on to Hope Collage

Card Cuts for today: Real Red: card base 5-1/2″ x 8-1/2″; Basic Black: front base mat 4-1/8″ x 5-3/8″, front sentiment mat 2-7/8″ x 4-3/8″, inside mat 4″ x 5-1/4″; Plaid paper: front 4″ x 5-1/4″, inside 3-1/4″ x 4-1/2″; Wood Textures DSP: front 2-1/2″ x 4″, inside 2-3/4″ x 4″

NON-Stampin’ Up! products used for this card: dies from Scrapbooking Made Simple,Ā  red plaid paper from my stash, and inside sentiment (unknown)

Product List

Uncategorized

Stampin’ Up! Birthday Pocket

Good Morning All,

Yesterday was a GORGEOUS day in the heartland, or at least the part where I live. 52 degrees, light wind, sunshine and beautiful blue sky. Made a great day for birding with friends. Actually, we were scouting eagle nests, and did a little birding in between. So, no card-making yesterday, and I have a large number to get done today.

Today it is VERY windy and still way above normal temperature wise, so a good day to make cards. On with the show!

This birthday card is for a little cowboy who loves his Wrangler jeans and plaid shirts. He is sure to like this, especially with some spendable green tucked into the pocket.

wild wing creations-3

I started with a Night of Navy card base and fast fused some old plaid paper from days gone by that I found in my scrap stash.

Next, also with a scrap that vaguely resembles old jeans, I stamped the pocket from the Pocketful of Sunshine Bundle in Cajun Craze. Using the straight line piece of ‘stitching’, I stamped the W like is found on Wrangler pockets. It is by no means perfect, but I think you, and my little cowboy, will get it.

Using Cajun Craze card stock and some dies I have had for awhile (pre-Stampin’ Up! days), I cut a square large enough to fit under the pocket. This was lightly sponged around the edges with Cajun Craze ink to give it a more leathery look. The pocket was Liquid Glued to this piece, which was Liquid Glued to the plaid mat.

For the sentiment, from the FREE Sale-A-Bration exclusive Party Pandas stamp set, I stamped it in Night of Navy on another die cut piece of Cajun Craze that was Liquid Glued to a Night of Navy mat. This piece was adhered above the pocket with Liquid Glue.

For the inside, another piece of the plaid served as a mat for yet another panel of lightly sponged Cajun Craze, where I stamped the boots from the Country Livin’ stamp set in Early Espresso. The sentiments,Ā  from Picture Perfect Birthday (Occasions catalog), were also stamped in Early Espresso. To give the boots an ‘old and worn’ look, I used my dark and light Crumb Cake Stampin’ Blends to color them.

wild wing creations-4

This panel was liquid glued to the plaid mat and into the card base and the card is finished.

The envelope, never to remain naked, got a pair of boots stamped on the front in Early Espresso and more of the plaid on the flap.

I had fun with this card, and as usual, wish I could see the face of the recipient when it is opened. This could happen if I hand delivered it, but children like to receive mail, so I always mail them. This is the 9th family birthday this month!

HOST CODE: U77FG3VD (good through January 31)

If youĀ  have visited my blog before, you know that using the host code for any order over $50 placed through me earns rewards. To see the details, go here.

And don’t forget that you also can earn FREE stamps and other goodies for every $50 you spend during Sale-A-Bration.

01.03.17_CMAIN_SAB_US

Card Cuts: Night of Navy: card base 5-1/2″ x 8-1/2″ scored at 4-1/4″; front sentiment mat 1-5/8″ x 3-1/2″ Cajun Craze: mat for pocket 3-1/2″ x 3-1/2″, sentiment panel 1-1/2″ x 3-3/8″, inside panel 3″ x 4″; Plaid paper: front 4″ x 5-1/4″, inside 3-3/4″ x 5″; Blue paper: pocket 3″ x 4″

Non Stampin’ Up! products used: Square dies from Scrapbooking Made Simple, plaid and blue paper from my stash.

Product List

Uncategorized

Christmas is Coming!

I know. That is no secret. It also amazes me that every year about this time I start to panic that I won’t get everything done that I WANT to do before then. I times past, either I was better organized, did less, or did fewer things that were time intensive. By Halloween I ALWAYS had my shopping done, cards were mailed by December 1 and by Thanksgiving most of the wrapping was done as well. That left December free for getting together with relatives to bake and decorate dozens of cookies, to make candy, attend events, practice for the church Christmas program and such things. Now……well.

Today’s card is a Christmas card, though I typically don’t send this kind of card. I honestly think that since Jesus is the reason for the season, my cards should reflect that belief. I do like the red and green traditional colors, the Santa Claus figure, deer, Christmas trees, etc. I just don’t usually send those kinds of cards. However, others do, and our Women’s Club has a bake sale and bazaar the first Saturday of December, so I may sell these for their fundraiser. At any rate, I like this card, and I hope you do too.

card and envelope


I began by using the lantern die from the Seasonal Lantern bundle to cut the lantern from Gold Foil Sheets. Using the same die, I cut another out of Very Vanilla card stock so I would have the middle of the lantern to stamp my candle, saving the rest of the lantern for another project. I then used the larger lantern, solid die, to cut one from Real Red Card Stock. I adhered the Gold one to the red lantern with Liquid Glue.

From Old Olive and Garden Green I die cut pine boughs using the Pretty Pines thinlits. Using the Holly Berry Happiness stamp set, I stamped several of the smaller leaves in Garden Green on Garden Green Card stock and the three berries in Real Red on Real Red card stock. These were punched out using the HollyĀ  Berry Builder Punch.card-front.jpg

On the center panel of the lantern, I stamped the Seasonal Lantern candle in Real red and the flame and ‘glow’ in Crushed Curry. I outlined the flame in Real Red with my Stampin’ Write Marker. Using a white gel pen, I added a little highlight on the side of the candle. This piece was then liquid glued into the lantern.

I dry embossed a panel of Real Red using the Holly Textured Impressions Embossing Folder. Using Real Red as my card base, I liquid glued a panel of plaid paper to a panel of Garden Green and onto the card base. On the embossed red panel, I wrapped a piece of gold and white ribbon around, taping it to the back.

I assembled all the pieces of the lantern using liquid glue and Stampin’ Dimensionals and Mini-Stampin’ Dimensionals, then used Stampin’ Dimensionals to adhere the finished lantern to the embossed panel.

Taking my sentiment from the Wonder of Christmas stamp set (retired) I stamped it in Versamark on a panel of Very Vanilla and heat embossed it with Gold Emboss Powder. This was punched out using the Everyday Label Punch. I punched out another in Garden Green to use as a mat for the sentiment label. This one was cut in half vertically and liquid glued to the back of the sentiment. Stampin’ Dimensionals adhered it over the ribbon.front

This finished panel was put on the card front using Stampin’ Dimensionals also.

The inside of the card was made with a plaid panel on a Garden Green mat and adhered to the card base. This sentiment, also from Wonder of Christmas, was heat embossed in gold on a panel of Very Vanilla and adhered to a Real Red mat using Liquid Glue. I lightly drew three holly leaves and filled them in with my Garden Green Stampin’ Write marker. Ditto the red berries, using a Real Red Stampin’ Write marker. I deliberately placed the sentiment toward the left side of the panel to leave room to hand write a message. If I am going to the trouble to make a card for someone, I am going to write a few words of personal greeting as well.

inside

The envelope received a plaid flap and a Garden Green lantern, embossed with Gold on the front.flap

envelope front

I am having a little difficulty in wrapping my mind around the fact that October is nearly 1/3 gone already. YIKES! There are only 24 hours in a day, and I think I need at least 30! Either that, or I don’t need to sleep.

Please use the host code for October 1-15 if you decide to order from me. Also, now is a good time to become a demonstrator if you have any thoughts of doing so.

HOST CODE THROUGH OCTOBER 15: 2HRMVCPM

If you apply that Host Code to your online orders under $150, youā€™ll get a free gift from me. If your order is over $150, please donā€™t apply the hostess code (youā€™ll miss out on your own Stampinā€™ Rewards/Host $$ if you use it), but youā€™ll still get the free gift, too!

For details on my rewards program just click here

Wild Wing Creations Bird Egg Rewards:

Bird Egg Rewards

Qualify to earn FREE Stampinā€™ Up! product from ANY current Stampinā€™ Up! catalog or promotion! Ā The Wild Wing Creations Bird Eggs Rewards Program is my way of personally saying ā€œthank youā€ to my returning customers.

Card Cuts: Real Red: card base 7″ x 10″ scored at 5″, embossed panel 4″ x 5″, inside mat 3-3/4″ x 5-3/4″, solid lantern 3″ x 4″; Garden Green: front mat and inside mat 4-3/4″ x 6-3/4″, mat for sentiment 2″ x 3″, scraps for holly leaves and pine boughs; Very Vanilla: sentiment 2″ x 3″, lantern 3″ x 4″, inside sentiment panel 3-1/2″ x 5-1/2″; Gold Foil sheets: lantern 3″ x 4″; Plaid Designer Paper: front and inside 4-1/2″ x 6-1/2″

NON Stampin’ Up! products used: ribbon, plaid paper. I wanted to use up some older stock, so used these from my stash. You could use instead the DSP Around the world and the gold stripe ribbon, which I will put in my product list.

Product List