Uncategorized

Stampin’ Up! Thanksgiving for Happy Inkin’ Krew Blog Hop

Blog hop headerHappy Thanksgiving, Everyone!! I hope this day you can find many things for which to be thankful. Among the many blessings I have, are the friends with whom I do this hop each Thursday. We have a good time and love to share our creativity with all of you!

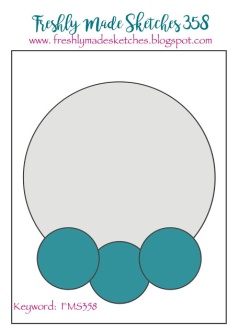
Today we have a sketch for inspiration.

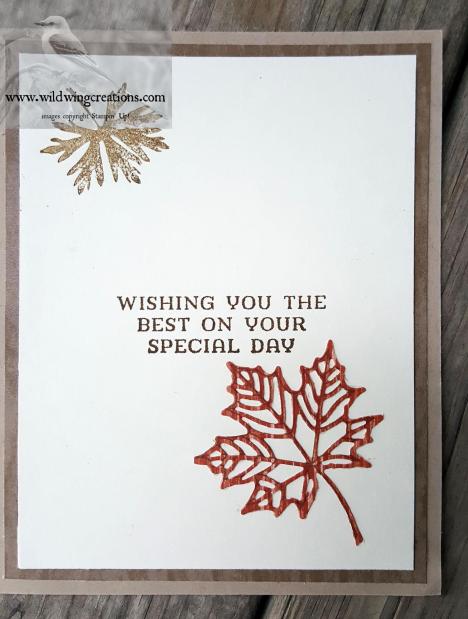
And here is my take on the sketch. I wanted to do another Thanksgiving card, as I love the fall colors and leaves. Also, Thanksgiving is only second to Christmas for favorite holidays, mainly because it is a day to be thankful and, so far, isn’t too commercialized. Also, it is the only time during the holiday season that I am able to be together with my siblings and their families, as well as my own.

4

The first thing I did after cutting my Pumpkin Pie card base was to use the Pinewood Planks Dynamic Textured Embossing Folder to dry emboss the front of the card base. The second task was to dry emboss a Copper Foil Sheets panel with the Layered Leaves DTIEF. This was adhered to an Early Espresso mat, which was then adhered to the card base. Instead of a ribbon, I used some leaves cut from Pumpkin Pie and Mossy Meadow, using dies from the Foliage Frame Framelits.

I also deviated from the rectangle behind the sentiment panel, as shown in the sketch, by cutting two maple leaf shapes from Cajun Craze using the thinlits from Seasonal Layers. The detailed leaf stamp from the coordinating Colorful Seasons stamp set was used to stamp the leaves with Versamark and heat emboss with copper.  Before applying the stamp to the card stock, I rubbed the leaves with the Embossing Buddy to remove any static that might make the embossing powder cling where I didn’t want it.

1

These leaves were then placed behind the sentiment, in place of the rectangle in the sketch, and the small leaves dry arranged behind them. When I was satisfied with the arrangement, I used Liquid Glue to attach them to the embossed copper panel.

The Sentiment is from Pleasant Pheasants, stamped with Versamark and embossed with Copper. The small leaf stamp is from the Feathers and Frost set, also copper embossed. To set the sentiment panel off, I dipped the edges into the Versamark pad and copper embossed the edges as well. This was then Liquid Glued to an Early Espresso mat. Three enamel shapes finish the sentiment panel, which I then adhered to the card front with Stampin’ Dimensionals.

The inside sentiment and leaf design are all from the Pleasant Pheasants stamp set,  stamped with Versamark and heat embossed with Copper Stampin’ Emboss Powder, again using the Embossing Buddy before stamping. I really like this sentiment, and the leaves carry the leafy theme to the inside of the card. This liner is Pumpkin Pie and is adhered to an Early Espresso mat with Liquid Glue.

5

For the envelope, (can you believe it?) MORE copper! A row of the same leaves as on the inside are on the front, and just one imprint on the flap. In case you hadn’t noticed, I LOVE the look of copper!

I hope you like my card, but if you don’t, that’s OK. I do, and I think the recipient will, too. Please leave comments below. Now, please click on the ‘next’ image to move on and see what the super creative Amy has for you. Unless, of course, you prefer to just ‘hop’ around by clicking on an individual name. Don’t get lost! Card cuts and product information below the names.

Amy Koenders

Shelagh Freemantle

Mary Deatherage

Kristi Gray

Jaimie Babarczy

Sue Prather

Julie Johnston – You are here

CARD CUTS: Pumpkin Pie: card base 5-1/2″ x 8-1/2″ scored at 4-1/4″, front sentiment 2″ x 2-1/2″, leaves 1-1/2″ x 2″, inside liner 3-3/4″ x 5″; Early Espresso: mat for copper 3-3/4″ x 4-1/4″, sentiment mat 2-1/8″ x 2-5/8″, inside mat 4″ x 5-1/4″; Copper Foil Sheets: 3-1/2″ x 4″; Mossy Meadow: leaves 2″ x 2″, Cajun Craze: leaves 2″ x 4″

The Host Code for November is WV7QS9PE.

Please click here for details on when to use the host code. Or, if you have questions, don’t hesitate to contact me. If you do not have a demonstrator, and would like to purchase the products used for this card, please just click on the ‘shop online’ button at right on this page. It is near the top of the page. This will take you directly to my online shop.


online xtravaganza

Beginning tomorrow, November 23, through November 28, Stampin’ Up! is having a SALE! This amounts to just about everything in the annual catalog being 10% off, with different items offered over the sale period.

DETAILS:

Online Extravaganza will run for six days. During this time, we’ll be throwing three, 48-hour sales featuring a selection of products from the 2018–2019 annual catalog—all at 10% off! Each 48-hour sale will feature two product categories (e.g., paper, stamps, ink, etc.). When one sale ends, the next sale begins; this cycle will continue until Online Extravaganza is over. By the end, nearly every item from the annual catalog will have been on sale!

November 23–24

PAPER & EMBELLISHMENTS

  • Bags
  • Brads and Buttons
  • Cards and Envelopes
  • Cardstock
  • Designer Series Paper
  • Embossing material
  • Glitter
  • Ribbons
  • Twine
  • Specialty Paper
  • Tags
  • Washi Tape

November 25–26

STAMPS & KITS

  • Stamp sets (clear-mount, wood-mount, and photopolymer)
  • Project kits
  • Card kits
  • Kit refills
  • Memories & More
  • Punch box kits

November 27–28

TOOLS & INK

  • Adhesives
  • Applicators
  • Cleaners
  • Cutting tools
  • Embossing folders
  • Framelits and thinlits
  • Ink Pads
  • Ink refills
  • Markers
  • Punches
  • Scoring Tools
  • Stamp blocks and cases

Ordering Deadlines: 11:50 P.M. at the end of each 2 day period, November 24, 26 and 28

If you  would like to see the full selection of discounted items during each 48-hour sale, please visit my online store. Each sale will be given its own category, which will contain all available discounted items for that particular 48-hour sale. After that, the only thing left to do is shop! Woo-Hoo! We all love a sale. So get your wish lists ready.


snowflake showcase

The Snowflake Showcase will only be around for another week, so if you want any of the products in this suite, add them to your Extravaganza order.The Velvet Paper is sold out.


Product List

Uncategorized

Stampin’ Up! Pleasant Pheasant Repeat

Good Saturday to You All! Yesterday the snow that had been predicted actually happened, so it is a lovely winter wonderland out my window. We had maybe a couple of inches, and the roads were ok, so I could enjoy it without TOO much effort.

Today’s card, though, isn’t about snow as I am still in fall and Thanksgiving mode. I truly love this time of year, when God uses a broad paintbrush to color everything in such spectacular displays. Of course, following that, we all know what comes……at least a gazillion leaves on the ground, with which we have to DO something. Maybe after the snow melts I can get the mower out one final time and mulch them. Or windrow them. Or both. They are a great addition to the compost pile unless there are too many of them.

4

You see how easy it is to get off track? This post is about a card, folks! If you liked my Pheasants for the blog hop on Thursday, please let me know what you think of this one. If you didn’t, well, I am sorry you have to see the same thing again. Same sketch, same stamps, same copper embossing, same inside of card. Sort of.  See it here.

For the front of this one, I took a Copper Foil Sheets and liberally rubbed my Embossing buddy over it. I then stamped the grass/weed/wildflower?, from Healing Hugs, randomly with Versamark, sprinkled it with Copper Stampin’ Emboss Powder and heat set it. I used Tear and Tape to attach it to an Old Olive mat.

The sentiment is from the Happiness Surrounds stamp set in the Snowflake Showcase, stamped in Versamark (Don’t forget to use Embossing Buddy!) on Cajun Craze and embossed with Copper. I treated this sentiment the same as the one on Thursday only this time I added a couple of strands of Copper Metallic Thread to the Linen Thread. To hold the bow in place, I rolled a Glue Dot and stuck it to the sentiment banner.

1

The leaves behind the pheasants are cut from Copper Foil Sheets, Old Olive and Cajun Craze, using dies from Pretty Pines. The copper embossed Pheasants are on Very Vanilla and adhered to an Old Olive mat. I cut this mat with the largest of the scalloped Layering Ovals Framelits, rolled the edges in Versamark, then in the Copper emboss Powder and heat set it. I like this look.

The leaves are dry fit, then I used Liquid Glue to adhere them behind the Pleasant Pheasants, which are adhered with Stampin’ Dimensionals. I used plenty of Liquid Glue to adhere the card front to the card base.

The inside of the card is pretty much the same as Thursday’s, which you can see here, to get the directions. What is different is that I dragged the sentiment panel through the Versamark pad and heat embossed the edge in Copper Stampin’ Emboss Powder, then adhered it to an Old Olive mat.

5

The envelope is similar to Thursday’s, but I made more of the Copper Foil Sheets embossed paper for the flap and stamped the grass on the opposite corner on the front.

Let me know which you like better in the comments below. Thanks for stopping by!

CARD CUTS: Cajun Craze: card base 5-1/2″ x 8-1/2″ scored at 4-1/4″, sentiment banner 1-1/2″ x 1-1/2″, leaf 1″ x 2″; Old Olive: front mat and inside mat 4″ x 5-1/4″, leaf 1″ x 2″, oval 3″ x 4″, Copper Foil Sheets: front focal panel 3-7/8″ x 5-1/8″, leaves 2″ x 3″, envelope flap 2-12″ x 5-3/4″; Very Vanilla: front oval 2-1/2″ x 3-1/2″, inside liner 3-7/8″ x 5-1/8″

Product List

Uncategorized

Stampin’ Up! Pleasant Pheasants Masculine Birthday

Well, here it is Saturday again and I hope your weekend is off to a great start. I have much to do and so little time! Actually, I have the same time as everyone, but it seems there isn’t enough of it.

Today’s card was inspired by the Moving Along with the Times Challenge #82, which has ‘for a man’ as it’s theme. I have some male family members with birthdays coming up, so this challenge fits very well.

I think my card also fits the Freshly Made Sketches Challenge #358.

FMS Final 358-001

Here is my creation.

4

I started with a panel of Very Vanilla on which I centered, pretty much, the image from Pleasant Pheasants. I don’t know if they are pleasant, I can’t tell from their expressions, but it makes a pleasant looking card in my not-so-humble opinion. I stamped it in Soft Suede, then used Stampin’ Blends Markers to color the scene. Grass: Light and Dark Old  Olive; grass heads: Dark Daffodil Delight; hen: Light and Dark Crumb Cake and Bronze; rooster: Dark and Light Cherry Cobbler, Dark and Light Night of Navy, Light Old Olive, Light and Dark Pumpkin Pie, Light and Dark Crumb Cake, Bronze; bills and legs: Light smoky slate. For the white areas I used the White Stampin’ Chalk Marker. A dab of Wink of Stella in the blue/green areas of the rooster adds some iridescence.

4

When finished, this was glued to the back of the card front piece, which is a panel of Nature’s Notes Designer Series Paper. I dry embossed it with the Pinewood Planks 3D Dynamic Textured Impressions Folder. A circle was cut into this panel with the largest of the Layering Circles Framelits. Tear & Tape adheres this to the card base.

I swiped my Embossing Buddy over my papers and stamped 3 leaves with the Colorful Seasons Bundle. One was stamped with Versamark and embossed in Copper on Copper Foil Sheets, and one was stamped with Versamark, also embossed in Copper on a water colored panel of Whisper White, which was leftover from a previous project. All were cut with the coordinating dies from Seasonal Layers Thinlits. One leaf used the detailed leaf on the same water colored paper as before.

1

I arranged these at the bottom of the circle, and was NOT happy with the result. I then cut 2 of the berry branches in Crumb Cake using the die from the Frosted Bouquet Thinlits, and one from a scrap of Nature’s Poem DSP. This helped, but there was still something lacking.

I decided to use a die from Simply Defined to cut a banner from Soft Suede for my sentiment, went over it with my Embossing Buddy then stamped the sentiment in two steps. Two steps were necessary as the stamp, from Beautiful Day, was not curved like the banner. I covered up what I didn’t want, inked the word Happy in Versamark, uncovered the rest and stamped it. I then heat embossed it in Copper, and repeated the steps for the word Birthday.

Sentiment done, I placed Stampin’ Dimensionals on the back but didn’t uncover them yet. This was laid on the front of the card and the leaves and berry branches dry fit. After I was satisfied with the layout, I Liquid Glued them in place on the back of the sentiment banner, then uncovered the Dimensionals and attached the piece to the card front.  It took some time, but the card front is done and I like the result.

1

For the inside, Soft Suede ink was used for the sentiment, which is from the Perennial Birthday stamp set. A leaf from Rooted in Nature  and stamped in stamped-off-once Soft Suede fills the upper left corner. Another detailed die-cut leaf from Nature’s Poem DSP was applied to the lower right corner with Liquid Glue.

5

Three of the same small leaf as on the inside were stamped on the front of the envelope in soft Suede and more of the Nature’s Notes DSP applied to the flap.

Please leave any comments below.

Host Code: EV7ETS99 good through the end of October.

Go here to learn the details on using the host code and my customer loyalty rewards program.

NON Stampin’ Up! products used: Banner die from Simply Defined.

CARD CUTS: Crumb Cake: card base 5-1/2″ x  8-1/2″ scored at 4-1/4″, berry branches 2″ x 6″; Very Vanilla: art panel 4″ x 5-1/4″, inside liner 3-3/4″ x 5″; Nature’s Poem Designer Series Paper: front woodgrain 4-1/4″ x 5-1/2″, inside mat woodgrain 4″ x 5-1/4″, berry branch and inside leaf cajun craze pattern 2-1/2″ x 5-1/2″; Copper Foil Sheets: 2-1/2″ x 2-1/2″; Whisper White  water colored piece: 2-1/2″ x 5″; Soft Suede: sentiment banner 1-1/2″ x 4-1/2″

Product List

Big Shot

Big Shot
[113439]
$110.00

Uncategorized

Stampin’ Up! Buffalo Check Plaid for Happy Inkin’ Thursday Blog Hop

Blog hop headerToday for our weekly Thursday Inkin’ Krew Blog Hop, I chose to use the color challenge colors to make a plaid using the Buffalo Check background stamp. Here are our colors.
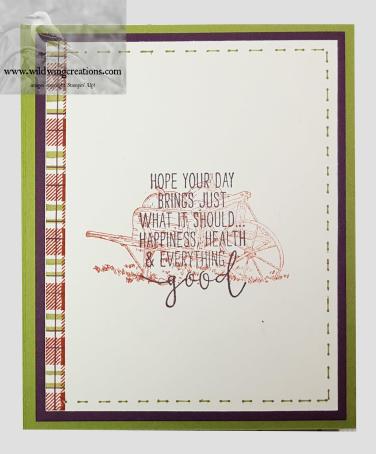
oct 4 challenge

My friend Mary did a video tutorial on making plaid with the Buffalo Check background stamp. To watch her video, go here. She inspired me to make my own plaid. Here is the plaid I created and the card on which I used it.

4

Now, I love plaid. Always have, always will. I think today’s colors lend themselves well to plaid for a masculine birthday card, so let’s get on with it shall we?

It took a couple of tries to get the look I wanted in the end, but I really like this look. I stamped the Buffalo Check in Cajun Craze on Very Vanilla, then added the stripes in Old Olive and Blackberry Bliss. There are many kinds of plaids out there, so don’t be afraid to experiment a bit. It is only paper! I used my dark Stampin’ Blends marker (brush end) for the wide stripes and the Blackberry Bliss Stampin’ Write Marker bullet end for the finer lines.

My plaid panel was adhered to a Blackberry Bliss mat with Liquid Glue. A strip of Burlap Ribbon was wrapped around these panels and taped to the back.

This became the background for the Pleasant Pheasant stamp, stamped in Cajun Craze on Very Vanilla. I colored this in with the challenge colors plus some crushed curry. And I didn’t like it. AT ALL! It went to file 13! Guess I need practice in coloring. Back to Kindergarten folks!

The one I used is just stamped in Cajun Craze and the grasses colored with my Old Olive Stampin’ Write Marker. I cut the image with the largest Stitched Shapes Circle die. This is Liquid Glued to a Copper Foil scalloped circle, cut with the largest Layering Circles Scalloped die.

Several Stampin’ Dimensionals on the back allowed me to wind some Copper Metallic Thread around before adhering to the card front.

1

The sentiment is  from Sunshine Sayings and is stamped in Blackberry Bliss on Very Vanilla. I used the shaped die from Still Night to cut the sentiment, then used my Old Olive Stampin’ Write Marker to make the stitches. This is adhered to the card front with Liquid Glue. The whole was then applied to the Old Olive card base with Stampin’ Dimensionals.

On the inside, another image from Pleasant Pheasants, stamped in Cajun Craze after stamping off once, provides a background for the Blackberry Bliss sentiment from Special Celebrations on Very Vanilla card stock. A narrow strip trimmed from my plaid panel was adhered to the left side of the sentiment liner with Liquid Glue. The other three sides got more Old Olive Stampin’ Write Marker stitches.

5

This panel was Liquid Glued to a Blackberry Bliss mat and into the card base.

The envelope has another of the Pleasant Pheasant images on the front and more of the pheasants on the flap.

Please, hop on around to see what this talented team has for you today. By clicking on the ‘next’ button you will go to our team leader Amy’s blog. Enjoy!

Blog hop next button

Amy Koenders

Shelagh Freemantle

Mary Deatherage

Kristi Gray

Jaimie Babarczy

Sue Prather

Karen Finkle

Julie Johnston-you are here

The host code for October is EV7ETS99. When placing an order of $50-$149.99 from my online store, use this code to earn a free gift from me. For orders over $150, DO NOT USE THE HOST CODE, as this will nullify any rewards you earn from Stampin’ Up! You will still get your free gift from me. And, you will earn bird eggs. For complete details on customer rewards, go here.

You also are eligible for my online class tutorials if you place a (pre-tax and shipping) $50 order through my online store.

October-Online-Class-Collage

CARD CUTS: Old Olive: card base 5-1/2″ x 8-1/2″ scored at 4-1/4″; Blackberry Bliss: cut 2 mats 4″ x 5-1/4″; Very Vanilla: for plaid 4-1/2″ x 6″, inside sentiment 3-3/4″ x 5″, front circle 3-1/2″ x 3-1/2″, front sentiment 1-1/2″ x 3″; Copper Foil Sheets: scalloped circle 4″ x 4″

Product List