Uncategorized

Stampin’ Up! Hoppy Birthday Card

Good Sunday Morning to All of You out there! What a week it was. We had wind, rain, snowflakes (very few though the radar showed snow!) and sunshine. One day it hit 68 degrees. Of course that was the day it was really windy, so no raking leaves for me.

As stated previously the next few posts will be Some cards for men and boys. Today is a birthday card for a special young man who will be 9. I hope he likes frogs! You know, frogs and snails and puppy dog tails, that’s what little boys are made of.

I used the So Hoppy together stamp set I got FREE from Sale-A-Bration. What a fun set it is. All elements are from this set except the word ‘Birthday’ which is from the Well Said stamp set. If you are interested in either of these, today is the last day to order from Sale-A-Bration, but the Well Said set is in the Occasions catalog and will be available until June 3.

On with the card. I began with a Granny Apple Green card base and added a mat of Tropical Escape Designer Series Paper.

I stamped the frog image and sentiments in Granny Apple Green ink on Whisper White. The little bees are stamped in Memento Tuxedo Black. It sort of looks like he is juggling them, don’t you think??

4

The stamp with ‘hoppy’ on it also has ‘for you’ under the ‘hoppy’. I taped this off, inked the stamp and removed the tape so I would only stamp Hoppy. Under that I stamped Birthday from Well Said.

1

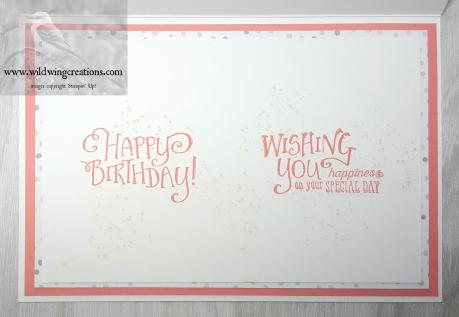
On the inside I adhered a scrap strip of Tropical Escape DSP to one edge of Whisper White card stock, then stamped the frog and sentiment in Granny Apple Green and the bees again in Memento Tuxedo Black. You may notice there is a design around the sentiment.

5

There is a reason for this. You see, I goofed and really messed up the sentiment. But, the paper has 2 sides you say. Not any more, when I had already adhered the DSP. My ‘fix’ for this mistake was to stamp the sentiment on a scrap of Whisper White card stock and punch it out with the Story Label Punch. (this punch is available through today as part of the Sale-A-Bration Coordination) Using a Sponge Dauber and Granny Apple Green I smudged the edges so they would stand out from the background and used Liquid Glue to adhere this over my mistake. You might as well make it look like you planned it that way.

Liquid Glue was used to adhere this liner to the inside of the card.

For the envelope another piece of the Tropical Escape DSP covers the flap while a small froggie sits on the front.

3

2

This is such a cute set for kids of any age. I hope you like it as much as I do. I considered coloring in the unicycle and the frog, but kids don’t care and I was short on time. Thank you for stopping by. Please leave comments below.

CARD CUTS: Granny Apple Green: card base 4-1/4″ x 11″ scored at 5-1/2″; Whisper White: front art panel 3-3/4″ x 5″, inside liner 4″ x 5-1/4″, scrap for label inside 2″ x 3″; Tropical Escape Designer Series Paper: front mat 4″ x 5-1/4″, scrap from front for inside strip 7/8″ x 5-1/4″, envelope flap 2-1/2″ x 6″

Product List

Uncategorized

Stampin’ Up! Golden Afternoon Thoughts

Oh! My! Goodness! Can you believe I need five masculine cards for next week??? Yep, one for a friend who is ill, 3 birthdays and a retirement. So, busy little beaver that I am, I will post a masculine card today, and one every day next week. You never know when that 6th one might come in handy.

I began with an Early Espresso card base for this one, and used my most favorite DSP, the Wood Textures 6″ x 6″ pack. I hope Stampin’ Up! makes some of these in 12″ x 12″, especially the whitewashed one. I used it first from every pack I purchased.

4

I used the Stamparatus for all the stamping to get everything where I wanted it, and because I was stamping Early Espresso on the wood, I wanted it to be DARK. This meant stamping twice, or three times.

I first stamped the Golden Afternoon tree, then the small deer from the Dashing Deer  (from Holiday catalog but still available) stamp set. I stamped the one with antlers in Early Espresso on Early Espresso card stock and die cut it with the matching die.

Using the small grass stamp from High Tide, I stamped grass along the bottom of the panel. One deer is grazing, so she had to have something to eat, right?

4

Using a Sponge Dauber and Early Espresso Ink, I went around the edges of the panel to give it an even more rustic look. THEN I added the die cut deer with Mini Stampin’ Dimensionals. I cut tiny strips from the edge of the Dimensionals for his legs.

The sentiment, also from Golden Afternoon, was stamped in Versamark ink after I went over the whole panel with my Embossing Buddy. I didn’t want copper anyplace but the sentiment. I then heat set the Copper Stampin’ Emboss Powder with my heat tool. A double length of Copper Metallic Thread and one length of Linen Thread were wrapped around the panel together and tied in a small bow. A Glue Dot keeps the bow in place on the front and a couple pieces of tape secured the back.

1

I used Tear & Tape to adhere a Copper Foil Sheets panel to the card base and Stampin’ Dimensionals adhered the Wood Textures DSP panel to the copper mat. Card front done.

Another Early Espresso tree on the inside and a scrap strip of copper at the bottom of the panel add some interest to an otherwise plain panel. Copper Emboss Powder was used with Versamark again for the sentiment, which is from Healing Hugs, then set with my heat tool. The copper strip was adhered with Liquid Glue.

5

The Medium Crumb Cake Envelope (no longer available, but I had them leftover, so why not use them) has a couple of Early Espresso Dashing Deer on the front and a piece of the Wood Textures DSP on the flap.

2

3

I rather like this look of the stamps on the wood.

CARD CUTS: Early Espresso: card base 5-1/2″ x 8-1/2″ scored at 4-1/4″, deer 2″ x 2-1/2″; Copper Foil Sheets: front mat 4″ x 5-1/4″, inside strip 1/4″ x 5-1/4″; Wood Textures Designer Series Paper: front art piece 3-3/4″ x 5″, inside liner 4″ x 5-1/4″, flap 2-1/2″ x 6″

Product List

Uncategorized

Stampin’ Up! Golden Afternoon Sympathy

Good Morning Everyone. Well, here it is Friday already, and another week gone. Just a couple more days and March will be history.

For today I had to make yet another Sympathy card. Golden Afternoon is perfect for this occasion, or for others I can think of as well. To me the stamp set is serene, speaking quietly of peace, calm and even the presence of the Lord.

4

My card base is Early Espresso and the art piece is from the 6″ x 6″ Wood Textures Designer Series Paper. I stamped the tree in Early Espresso using my Stamparatus because I wanted a really dark image.

Stampin’ Blends in Light Mossy Meadow and Dark Granny Apple Green were used to color the leaves on the tree and the plants at the base of the tree. Light Crumb Cake colored the trunk and branches.

Some birds in Pacific Point, stamped off once, fly past the tree.

4

The sentiment is stamped in Versamark on the back side of a scrap from the front, and heat embossed in Copper Stampin’ Emboss Powder. (TIP- Anytime you use embossing powder, use the Embossing Buddy to de-static the paper so the embossing powder does not stick where you don’t want it.) This was cut with the Tailored Tag Punch. I punched another in Mossy Meadow, cut it in half horizontally and Liquid Glued it to the back of the sentiment tag, spreading it to form a mat.

1

Some Stampin’ Dimensionals on the back (8!) gave me plenty of sticky to wind some Copper Metallic Thread around and still have enough adhesion to stick to the 5/8″ Burlap Ribbon underneath. I had put a strip of Tear & Tape on the back of the Burlap Ribbon, wrapped it around the Wood Textures DSP and taped it to the back.

More Stampin’ Dimensionals on the back of the art piece adhere this card front to the Mossy Meadow mat, which is stuck to the card base with Liquid Glue.

5

Inside, another panel of Wood Textures DSP, same as the front, is stamped with more Pacific Point birds in full strength, and sentiments from Lasting Lily in Mossy Meadow.  The scripture verse on the opposite side is from Hold on to Hope and is stamped in Early Espresso, also on the Wood Textures DSP. I also stamped the small tree from Golden Afternoon in Early Espresso, letting it run off the paper. This was adhered with Liquid Glue. The Sentiment liner was adhered to the Mossy Meadow mat and into the card base with Liquid Glue.

The Crumb Cake Envelope (retired) has another small tree on the front in Early Espresso and more of the Wood Textures DSP on the flap with a few birds flying by.

2

3

I hope you like my card, but if you don’t that’s ok. Please leave comments. Below are the card cuts and products used for this card.

CARD CUTS: Early Espresso: card base 5-1/2″ x 8-1/2″ scored at 4-1/4″; Mossy Meadow:front mat 4″ x 5-1/4″, inside mat 4″ x 5-1/4″, front sentiment mat 2″ x 3″; 6″ x 6″ Wood Textures Designer Series Paper: front art panel and inside liner 3-7/8″ x 5-1/8″, second sentiment panel inside 2-3/4″ x 3-1/2″, front sentiment 2″ x 3″

Product List

Uncategorized

Stampin’ Up Country Floral Birthday for Happy Inkin’ Thursday Blog Hop

Good Thursday morning to You All! I think Spring is finally making a comeback, though it it still pretty drab outside. At least the snow and ice are pretty much gone. We are also supposed to get more rain today. That won’t help the flooding situation in the midwest.

But, on with the hop! Today we have another sketch for inspiration for our hop. Please hop along to all the other ladies to see what beauties they have created.

My card is a birthday card for someone special. Our team leader, Amy, has a birthday today, so I made my card especially for her.

We are working from this sketch:

This is the 5′ X 7″ card I created
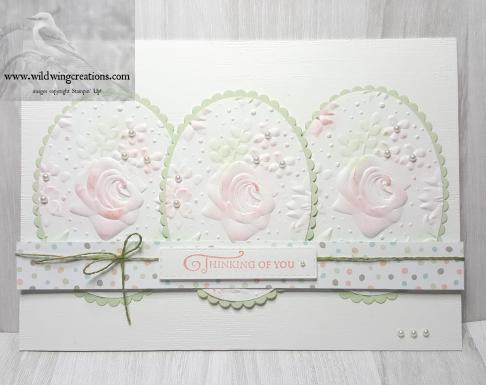
4

I began by cutting Whisper White and Soft Sea Foam ovals using the Layering Ovals framelits. The Whisper White ones I then ran through the Big Shot using the new Country Floral Dynamic Textured Impressions Folder. To get a better depth impression and reduce the cracking, I spritzed the ovals with water and pretty much centered the rose image in the DTIEF on the oval. The depth was great, but there was still some minor cracking. Maybe I didn’t spritz enough.

The next step was to lightly color some of the flowers and leaves with a Sponge Dauber and Flirty Flamingo or Soft Sea Foam ink. These were then adhered to the Soft Sea Foam scalloped ovals with Liquid Glue.

A panel of Whisper White dry embossed with the Subtle Dynamic Textured Impressions Folder, cut the same size as the front of the card base which is also Whisper White, was adhered with Liquid Glue. The ovals were centered top to bottom over this panel and the outer two were adhered to the card front with Liquid Glue. The third was adhered with Stampin’ Dimensionals.

1

A strip of Twinkle, Twinkle Designer Series Paper was cut to fit across the front of the card. Linen Thread, colored in Soft Sea Foam by dragging it across the stamp pad, was taped to the back of the DSP strip on both ends. I then tied a bow around the thread.

I dry fit this strip and determined where I needed to put which adhesive. This was then Liquid Glued to the center oval and Stampin’ Dimensionals adhered it to the other two ovals. The ends sat just a bit higher, so I used a Mini Stampin’ Dimensional stacked on a regular Dimensional to make it level.

The sentiment, from Golden Afternoon, was stamped in Flirty Flamingo on a strip of Whisper White and cut with the smallest of the Stitched Rectangles. I used Stampin’ Dimensionals to adhere it to the DSP strip.This completed the front.

On the inside, I stamped some dots from the Birthday Backgrounds stamp set in Soft Sea Foam on a panel of Whisper White. The sentiments are from Better Together and are stamped in Flirty Flamingo. This panel was Liquid glued to a mat of the Twinkle, Twinkle DSP, on a Flirty Flamingo mat and into the card base. Card done.

5

Whoa, wait a minute. In looking at the front, I decided some pearls would be nice, so a few Pearl Basic Jewels were added to the flowers, one to the sentiment panel and 3 at the bottom of the card front. Now it is finished.

4

HAPPY BIRTHDAY, AMY!! I hope you like your card.

For the envelope, a piece of the Twinkle, Twinkle DSP decorates the flap while some Flirty Flamingo roses from the Climbing Roses stamp set dance across the front.

On with the hop! Click the NEXT button to see what the creative Eva has for you, or click on any name to go to her blog. Enjoy! I am sure you won’t be disappointed. You may even be inspired! 😉

Amy Koenders

Shelagh Freemantle

Mary Deatherage

Kristi Gray

Jaimie Babarczy

Sue Prather

Karen Finkle

Julie Johnston – You are here

Eva Dobilas

PAPER CUTS: Whisper White: card base 7″ x 10″ scored at 5″, embossed panel 5″ x 7″, ovals 4-1/2″ x 8-1/2″, inside liner 4″ x 6-1/4″  sentiment strip 3/4″ x 5″; Flirty Flamingo: inside mat 4-3/4″ x 6-3/4″; Soft Sea foam: scalloped ovals 4-1/2″ x 8-1/2″; Twinkle, Twinkle Designer Series Paper: strip on front 3/4″ x 7″, inside mat 4-3/8″ x 6-3/8″, envelope flap 2-1/2″ x 7-1/4″.

Product List

Uncategorized

Stampin’ Up Beauty Abounds with Butterflies

Good Wednesday, or Hump Day, if you prefer. I have need of several cards this month. A lot of birthdays and a few sympathy cards are in order. Today is another birthday for a 93 year old.

4

I think this is a lovely card, but it is not my own design. Jan Brown, Stampin’ Up! demonstrator in the UK posted this and did a video on it. I used different colors and sentiments, but the basic idea is the same. If you want to see the video, just click here.

I began with a Whisper White card base, a Night of Navy mat and Whisper White for the artwork.

I began by cutting all the panels, then stamped the floral image from Beauty Abounds in Memento Tuxedo Black. I taped of one end, inked the stamp, removed the tape and stamped  the image diagonally across the paper. Repeat this for the other end.

4

Ink the sentiment from Butterfly Gala and stamp the upper right corner. Ink the Happy Birthday sentiment from Beautiful Bouquet and stamp the lower left side. All stamping is done with Memento Tuxedo Black.

Using my Basic Black Stampin’ Write Marker, I made some little dots in the center where the stamps nearly met, so that if someone looks under the butterfly they will see little dots. While this was drying I stamped two of the double butterfly images from Butterfly Gala in Memento Tuxedo Black also.

Stampin’ Blends were great for coloring the image. I used Light Granny Apple Green for the leaves and flourishes and Dark Balmy Blue for the flowers. Since these are small images, I did not do any blending.

1

Now to color the butterflies. I first used Memento Tuxedo Black to stamp their bodies, then used Light and Dark Balmy Blue and Light and Dark Night of Navy, beginning next to the body with the lightest color and moving outward and darker, blending as you go. the last color was the Dark Balmy Blue next to the Dark Night of Navy. The little dots at the outer edge of the wings are then filled in with Light Balmy Blue. I  spritzed all the butterflies with some Imagine Crafts Sheer Shimmer Silver Spray to add a little sheen. Probably some Wink of Stella would do about the same thing.

Fold the wings next to the bodies, add some Liquid Glue and adhere to the card front. Some Pearl Basic Jewels finishes them nicely.

Inside, I stamped the sentiment in Memento Tuxedo Black from Stitched All Around.  The other large butterfly was Liquid Glued at the body. To this one I added the antennae. I didn’t think the front ones needed them as it was already pretty busy and thought the antennae might be confusing or distracting.

5

The envelope was stamped on the front with another large butterfly, taping off the smaller one before inking. It was then colored the same as the ones on the card. Be sure when using Stampin’ Blends on the envelope that you slip a scrap of card stock or something inside the envelope as the Blends do bleed through.

2

The flap was finished with a strip of the Night of Navy dots from the 6″ x 6″ Subtles Designer Series paper.

3

I hope you like this card. I think it is lovely and not difficult at all.

CARD CUTS: Whisper White: card base 5-1/2″ x 8-1/2″ scored at 4-1/4″, art panel 4″ x 5-1/4″, inside liner 4″ x 5-1/4″,  butterflies, scrap at least 3″ x 4-1/2″; Night of Navy: outside and inside mats 3-7/8″ x 5-1/8″; 6″ x 6″ Subtles Designer Series Paper in Navy: envelope flap 2-1/4″ x 5-1/2″.

Product List

Uncategorized

Stampin’ Up! Waterfront for Happy Inkin’ Thursday Blog Hop

Good Thursday, or Day-After-Hump-Day, to You.

Seems like Thursday rolls around more often than every 7 days, but I guess it really doesn’t.

Some friends and I are going birding later today, so it’s a good thing this blog hop is this morning.

I really like this Waterfront stamp set for so many reasons, not the least of which is that it makes a very nice masculine card. Which I need this week.

It was my original intent to use His Grace and make an Easter card, then I remembered that I needed a man’s birthday card. So, here we go. Here is the sketch for today’s inspiration.

I think this is a lovely challenge sketch, so here is what I created, though I think it might have been better using a feminine slant and flowers. The pine cones were a bit too large, and I didn’t have anything smaller.

4

My card base is Basic Black. The mats on both inside and outside are Share What You Love Designer Series Paper. I also used it on the envelope flap.

Using the Waterfront stamp set, I stamped the images on watercolor paper using Smoky Slate for the mountain, Balmy Blue (stamped off once) sky, pacific Point (also stamped off once) water, Crumb Cake land and Mossy Meadow trees. This was cut with the second largest circle in the Layering Circles Framelits. The mat was cut from Basic Black using the largest circle.

I cut a length of  5/8″ Burlap Ribbon and used Tear & Tape to secure it in place on the background. A few rounds of Linen Thread was wound around and stuck to the Stampin’ Dimensionals on the back of the art piece.  A couple more Dimensionals attached this to the Share What You Love DSP mat over the Burlap Ribbon.

1

Using a couple of the small leaf/pine stamps from the Painted Seasons stamp set, I stamped a few of those in Mossy Meadow. The sentiment, using the Southern Serenade stamp set is stamped in Early Espresso near the top of the card.

Some Early Espresso and Crumb Cake pine cones and Mossy Meadow pine boughs from the Pretty Pines Thinlits were adhered with Liquid Glue and Stampin’ Dimensionals. Something was not quite right (and I am still not sure if it is) so I added a couple of black branches or whatever they are, also from the Pretty Pines Thinlits. This card front was then adhered to the card base with Stampin’ Dimensionals.

For the inside, another mat of the Share What You Love DSP is behind the Very Vanilla Liner. This was stamped with Crumb Cake for the ground, and Mossy Meadow for the trees. The sentiment is from Better Together and is stamped in Early Espresso.

5

The Medium Very Vanilla Envelope is stamped with Mossy Meadow trees from Waterfront across the front with a strip of the DSP on the flap.

So, on with the hop. Clicking the Next button will take you to Canada’s own Eva , who is very creative. Or, you can just click on any name to go to that blog. Thanks for stopping by. Card cuts and products used for this card are below.

Amy Koendersc

Shelagh Freemantle

Mary Deatherage

Kristi Gray

Jaimie Babarczy

Sue Prather

Karen Finkle

Julie Johnston – You are Here

Eva Dobilas

CARD CUTS: Basic Black: card base 5-1/2″ x 8-1/2″ scored at 4-1/4″, little branches 1-1/2″ x 3″, circle mat 3-1/2″ x 3-1/2″; Watercolor Paper: art piece 4″ x 4″; Share What You Love Designer Series Paper: front and inside 4″ x 5-1/4″, envelope flap 2-1/4″ x 6″; Mossy Meadow: pine boughs 3-1/2″ x 3-1/2″; Early Espresso: Pine cones 2″ x 6″; Crumb Cake: pine cone detail 1-1/2″ x 2″

Product List

Uncategorized

Amy’s Inkin’ Krew Team Blog Hop Celebrates Spring

inkin-krew-blog-hop-banner2Hello Everyone! Back once again for our monthly team blog hop. How can it be nearly the middle of March already??? Wow! Spring is on its way, and I am sure all will be happy to see it.

Spring is definitely on this Blog Hop, since that is the theme. We can use any products we choose, not just Stampin’ UP!, though most of us will use, at least primarily, Stampin’ Up! products. And why not? SU has many wonderful sets that shout ‘SPRING’.

My card uses the spring-like Gingham Gala and the adorable Fable Friends stamp set. I really love the You Inspire Me with the daffodils, and His Grace, which is what Easter is all about, but decided today to keep it lighthearted and fun.

4

So, Enjoy the hop and please see what the others have created.

I began with stamping the duck family in Smoky Slate ink on Whisper White card stock, and colored them in with my Stampin’ Blends Markers. I used Smoky Slate for the mama duck, Light Daffodil Delight for the ducklings, and Light and Dark Calypso Coral for their bill and feet. Their clothes are Light and Dark Pool Party, Light and Dark Petal Pink, Light Highland Heather and Light Granny Apple Green, which is darker than I thought it would be. I used my Basic Black Stampin’ Write Marker to fill in the eyes, and some feathers on the mama duck.

While I was coloring the ducks I decided the background was too plain, so I used my Aqua Painter to pick up some color from the lid of my Pool Party Classic Stampin’ Pad, and did a very light color wash for a hint of sky. The grass is from Fable Friends and Sheltering Tree, and is stamped in Granny Apple Green.

1

This art piece was adhered  with Liquid Glue to a mat of Gingham Gala 6″x6″ Designer Series Paper in Daffodil Delight. I used the smaller check for this as well as for the scalloped circle behind the sentiment.

I wrapped a length of retired Daffodil Delight 1/4″ cotton ribbon around this panel, taping it on the back. I used a strip of Tear & Tape to hold it in place.

The sentiment is from Fable Friends and stamped in Granny Apple Green on Whisper White and cut with the smallest Stitched Shapes circle. Liquid Glue adhered this to a mat of Daffodil Delight card stock cut with a scalloped circle die from Layering Circle Framelits, then onto the larger Gingham Gala scalloped circle. Stampin’ Dimensionals were used to adhere this to the card front.

My card base is Whisper White with a mat of Daffodil Delight which I ran through my Big Shot with the Subtle Dynamic Textured Impressions Folder. The mat was Liquid Glued to the card base. The art piece was then attached with Stampin’ Dimensionals.

4

A small bow of the same 1/4″ Daffodil Delight Cotton Ribbon finishes the front being adhered with a rolled up Glue Dot.

On the inside, I stamped more Granny Apple Green grass and another sentiment from Fable Friends, also in Granny Apple Green.

5

The row of ducklings was stamped in Smoky Slate on Whisper White using my Stamparatus. The ducklings are colored with Dark Daffodil Delight Stampin’ Blends, and their clothes are in the same Blends colors as used on the front. Light Calypso Coral Blends colors their bills and feet.

This liner was adhered to another panel of the Daffodil Delight Gingham Gala DSP, onto a Subtle dry embossed mat of Daffodil Delight and into the card base, all with Liquid Glue.

For the envelope I chose to use more of the Gingham jGala DSP on the flap and stamped the mama Duck in Smoky Slate over a row of Granny Apple Green Grass from the same stamp set. I colored her bill and feet in Light Calypso Coral Stampin’ Blends and her clothes in Daffodil Delight.

I don’t think you can get more “SPRING” than this. Gotta love it.

Oh, yes, here in Iowa it has finally gotten out of the freezer and into the 40 + degree range, so we are seeing our snow piles and ice finally melt. And, the birds are starting to sing and my friend saw Red-winged Blackbirds yesterday, a harbinger of spring.

BRING ON SPRING! We are ready for it!

I hope you enjoy today’s hop with our many talented team members. Card cuts and products used for this card are below. Please leave comments below as well. Thanks for hopping with us.

inkin-krew-blog-hop-previous2inkin-krew-blog-hop-next2


Karen Ksenzakovic

Connie Troyer

Jaimie Babarczy

Sue Prather

Julie Johnston – you are here

Mary Deatherage

Karen Finkle

Shirley Gentry

Amy Koeders

CARD CUTS: Whisper White: card base 5-1/2″ x 8-1/2″, art piece 3-5/8″ x 4-7/8″, inside liner 3-1/2″ x 4-3/4″, front sentiment circle 1-3/4″ x 1-3/4″; Daffodil Delight: front mat and inside mat 4-1/8″ x 5-3/8″, sentiment mat scalloped circle 1-3/4″ x 1-3/4″; Gingham Gala Designer Series 6″ x 6″ Paper Pack: front art piece mat and inside liner mat 3-7/8″ x 5-1/8″, large front scalloped circle 2-1/2″ x 2-1/2″

Product List

Uncategorized

Stampin’ Up! Quality Products for more than cards

Good Saturday to Everyone! I think ‘good‘ is relative. It is good that we have finally risen above freezing and some of the ice and snow has melted. It is not good that a very chilly, wet, wind is blowing, bringing a considerable amount of rain. This is not good for the potential of flooding. All that melt has to go somewhere, and if it melts too fast……!

Also, good that I am able to get out of bed and fend for myself. That is ALWAYS a blessing.

It is not good that another classmate has become a widow as of this morning, so, another Sympathy card will be forthcoming. It is good that I am able to make these simple expressions of caring.

It is also good that I can share with you the bags that I stamped for our donors. All I did was use our fantastic Stampin’ Up products, and another volunteer stuffed the bags…and took a couple pictures for me to share with you. Thanks Cari and Peggy!

gift bags

The organization is a 501c3 called The Cornerstone Well, and was founded to help families in our county who are in financial crisis. Rather than just give them food, or clothing or whatever, ‘The Well’ vets the applicants, then if there is a definite need, ‘The Well’ pays for whatever is needed. If it is rent, we pay the landlord, if it is car repairs, we pay the car place. If it is utilities, we pay the utility. If their needs are not something with which we can help, we refer them to other sources. Our aim is to give them a hand up, not a handout.

We also teach classes in finance, budgeting, stretching your dollar (how to make your own laundry soap, cleaners, etc.) and hope to add cooking classes as soon as funds allow.

But, I digress. This post is about ways to use your Stampin’ Up! products that you might not have considered. gift bags thanks

Based on the idea behind these bags for our sponsors, I am thinking that I will purchase plain bags next Christmas and stamp my own Gift Bags. This could be a party event…the more, the merrier! Can’t you just see 10 or more ladies having a ball stamping bags with our lovely Christmas stamps?? How festive!

Team member and friend Kristi uses her Stampin’ Up! products for a variety of things. She entertains a lot, so she makes party favors, place cards, table decor, invitations, and I-don’t-know-what-all, but they are lovely. Anyone can do this. Go here to see some of her projects.

The bags for our fundraiser sponsors were stamped with the “All Things Thanks” and “Bright Wishes” stamps, using the lovely Gorgeous Grape Classic Stampin’ Pad. Since “Well” is part of the organization name, I thought the pretty wishing well in “Bright Wishes” was a perfect stamp to use.

well

It was SO easy to get every bag stamped precisely the same using the Stamparatus.

The primary color for our logo is purple, and what better purple than our own Gorgeous Grape!

So, two stamp sets, one stamp pad, the Stamparatus, and 24 gift bags were done in a jiffy.

Additionally, to highlight the great quality of Stampin’ Up!, our director had ordered a custom stamp and purple stamp pad for the pledge envelopes from our local office supply store,  and was very disappointed in the resulting stamped envelopes. I offered to do them for her, and brought home the stamp, pad and envelopes.

The problem was NOT the quality of the stamp, but the stamp pad itself. I stamped a sheet of copy paper using the pad she had purchased, and then with my own Stampin’ Up! Gorgeous Grape Classic Stampin’ Pad. There was absolutely no comparison! She was amazed at the difference in the two products. Unfortunately, you will have to take my word for it, because I didn’t think to snap a picture of the comparison.

Bottom line…..if you want good quality, buy Stampin’ Up!

Thanks for stopping by. My next post will probably be……another sympathy card. I am doing WAY too many of these of late.

Uncategorized

Stampin’ Up! Dear Doily used for volunteer work

1

Good Friday morning to everyone! Whew, what a busy week. Seems I was stuck at home (actually a good thing as I got a lot done and read MANY books) for weeks, and then everything piles in at once.

Have many of you wondered, as have I, just how long our framelits and thinlits will last, or how many items you can cut with them before they are too dull to work anymore?? Well, read on, and I will give you a clue.

I do considerable volunteer work for a few organizations, and each one seems to think I have NOTHING else to do! HA! Well, maybe they are right, in that if I was overly busy I wouldn’t have time to read MANY books, right?

Needless to say, I try to put my crafty ways to good use where I can. One of the organizations for whom I volunteer is having a fundraiser banquet Sunday. We have been very busy preparing for it….lining up other volunteers to help with serving, decorating, clean up, providing food, sponsoring tables, advertising, gift bags, etc. etc.! It is great that we have a good number of folks willing to help.

Each attendee will have by their plate a clear bag with some goodies in it, including (the point of this blog) flower shaped seed paper.

What is seed paper you ask? Well, the Botanical Paperworks web site will explain it better than I can, but basically seeds are IN the paper, so you plant the paper and things grow. COOL!

Our banquet theme is ‘Sowing Seeds’ and we thought seed paper was appropriate to include for each guest. I wanted a rather large die cut, preferably a flower, as the seeds in the paper are of wildflowers. Alas, I had no flower die large enough that really looked like a flower, so I substituted the doily from the new Dear Doily Bundle. I do think it rather looks like a flower, don’t you ?

Guess what? It cut this many and shows no sign of dulling.

1

Well, just how many is that, you ask? This many!

2

We expect 160 guests, and the seed paper comes either 8.5″ x 11″ or 11″ x 17″. I traced around the die on a sheet of both sizes to see which would be the most economical. I could get 12 from an 11″ x 17, so we opted for that size.

We wanted a scripture about the mustard seed parable on the paper, so I cut out one of the shapes, scanned it and copied and pasted 12 on an 11″ x 17″ sheet in Photoshop. I kept the layers so I could delete them later.

Then I typed the text in and copied it to each shape on the sheet. Next, I deleted the shapes and printed. Since our logo color is Purple and the seed paper (which comes in several colors) is lavender, I put the text in purple. I had to cut the paper into 3 strips so it would fit in my Big shot.1

It was then a simple matter to use the die and my Big Shot to cut each shape.

Now, as to how many? You can do the math, but I will save you the trouble. 17 sheets times 12 per sheet equals (drum roll please) 204. I will confess that I wasted about 8, as on the first two sheets printed I had them too close to the edge to cut a nice looking, centered verse. So, 204 minus 8 equals 196 shapes cut with my doily.

2

Wa-Hoo Kachoo! That is a lot of cutting. (took me over an hour cutting them ONE-AT-A-TIME) But, my Big Shot and my doily framelit were up to the task. My shoulder is another story, but we won’t go there. Bear in mind that this paper had SEEDS in it, which your Designer Series Paper and card stock do not. That means that the nearly 200 cuts I have could probably be doubled, or even tripled! In other words, YOUR THINLITS AND FRAMELITS WILL JUST KEEP WORKING FOR YOU.

Now you have it….information you can actually use. I firmly believe that if you don’t bend the heck out of them, your dies will last longer than you!

I hope this post encourages you to think outside the usual uses for our dies and stamps, and apply them to other areas in your life.

I also used the “All Things Thanks” stamp set, and the wishing well from the “Bright Wishes” stamp set, and my Gorgeous Grape Classic Ink Pad to stamp the Thank You gift bags to be given to our donors. They turned out beautifully.

Product List

sympathy

Stampin’ Up! Golden Afternoon for Happy Inkin’ Thursday Blog Hop

Good morning All! We are still in the deep freeze, though the freeze isn’t as deep as it was earlier in the week. It seems that whenever it warms up a bit we get more snow. We shall see if the predicted amount happens today. But, it IS March, which means that spring can’t be too far away. Oh, and by the way, just in case you haven’t heard, this weekend is the time to turn your clocks forward. Already???

My card for today is one of the unfortunate ones we all have to make from time to time….sympathy. Two friends  lost their fathers this past week, so I have been in the sympathetic mode. What better stamp set to use than Golden Afternoon? It has both as quiet scene and great sentiments for the purpose.

Our hop challenge today is color, also perfect for a sympathy card:

And here is the card I created

4

This is without a doubt the easiest card I have ever made. It is truly simple, and quick to make. Only one stamp set, no dies and two inks. Easy Peasy.

I began with a Night of Navy card base, a mat of Balmy Blue and an art piece in Whisper White. I stamped the large tree from Golden Afternoon in night of Navy, the birds in flight in Balmy Blue, and the sentiment also in Balmy Blue.

1

This was adhered to the Balmy Blue mat with Liquid Glue and Stampin’ Dimensionals adhered this card front to the card base.

On the inside, I used the same Balmy Blue mat, and liner in Whisper White. I wanted room to write, so I only stamped some Balmy Blue birds, or would that be Balmy Bluebirds?? Just kidding.

5

Liquid Glue was used for adhesion of both pieces.

The envelope got the small tree from the stamp set in Night of Navy ink, with more of those Balmy Blue birds on the flap.


See, I told you it was easy.  Now on with the hop. Our very creative team will no doubt have some wonderful projects for you. Clicking the ‘next’ button will take you to the uber creative Eve, but you can click on any name to just hop around.

Amy Koenders

Shelagh Freemantle

Mary Deatherage

Kristi Gray

Jaimie Babarczy

Sue Prather

Karen Finkle

Julie Johnston – You are Here

Eva Dobilas

CARD CUTS: Night of Navy: card base 5-1/2″ x 8-1/2″ scored at 4-1/4″; Balmy Blue: front mat and inside mat 4″ x 5-1/4″; Whisper White: front art piece 3-7/8″ x 5-1/8″, inside liner 3-3/4″ x 5″

Product List