sympathy, Uncategorized

Stampin’ Up! Sympathy for Happy Inkin’ Thursday Blog Hop

Blog hop headerGood Thursday all! I hope you had a wonderful Christmas, although I know that holidays are difficult for some folks. Especially when Sympathy cards are in order. Such was the case for a dear friend of mine, so I decided to use today’s challenge colors to create a card for her.

Here are our colors: Which, when I first saw them, I thought looked pretty dull. However,  when I began to work with the colors I decided they weren’t bad at all. I think the card turned out quite well, actually.

I began by choosing my papers. When in doubt about putting colors together, Stampin’ Up! has helped those who may be color challenged with the Designer Series Papers. Each package tells you what colors have been used, so it is relatively easy to combine your colors. The DSP I chose for today’s card is Frosted Floral. I also used a bit of DSP from the Share What You Love package.

4

My card base is Gray Granite with a mat of Blackberry Bliss. Over this I Liquid glued a panel of the Frosted Floral Designer Series Paper. This paper has a lovely sheen. Next is a mat of the Share What You Love DSP, cut much smaller than the floral background piece. I didn’t want much of this to show, so the Blackberry Bliss panel is only 1/8″ smaller. This combo was Liquid Glued to the background piece.

I wrapped a length of 1/2″ Textured Weave Gray Granite Ribbon around these and taped it to the back.

My sentiment piece is stamped in Blackberry Bliss on Gray Granite with an outline stamp from the Floral Frames stamp set. The sentiment is from the Lasting Lily stamp set, which will be available, free, in the Saleabration catalog on January 3 with the appropriate order. It is also stamped in Blackberry Bliss.

Using the frame die in the Foliage Frame Framelits, I cut this out, then cut another from the same paper as the mat under the Blackberry Bliss panel. I cut this one in half lengthwise and used Liquid Glue to adhere my sentiment label over it, off setting the mat so a bit of the Pear Pzazz shows.

On the back I placed several Stampin’ Dimensionals, both to lift this away from the ribbon and to give my embellishments a place to stick.

1

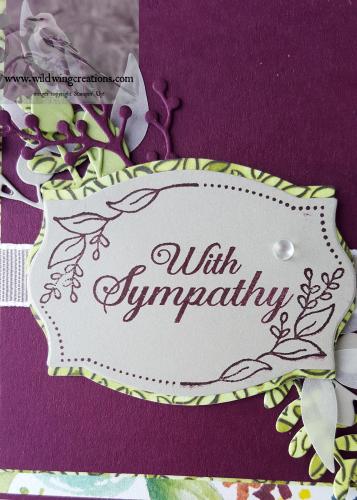
Using the leaves in the Foliage Frames dies, I cut them from the Designer Series Paper, Vellum, Gray Granite and Pear Pzazz card stock. I also cut one berry branch from the Frosted Bouquet bundle in Blackberry Bliss. These were arranged behind the sentiment panel and adhered with Glue Dots and the Dimensionals on the back of the sentiment. A single Frosted Epoxy Drop finishes the sentiment label.

The final step for the front of the card was to attach the sentiment and leaf sprays to the card front, then, with more Stampin’ Dimensionals, adhere the card front to the card base.

For the inside, I kept it simple. A mat of Blackberry Bliss supports a Whisper White liner with the Blackberry Bliss sentiment from Lasting Lily. The little leaves in the corners are from Floral Frames and are stamped in Blackberry Bliss. This leaves plenty of room for a personal note.

5

Don’t overlook these little stamps that are included in many stamp sets. They are great little additions to a page where you need something, but not TOO much.  They make wonderful accents.

For the envelope, another panel of the Frosted Floral DSP adds a little pzazz to the flap, while a single Blackberry Bliss image from the First Frost bundle completes the front.


I hope you enjoy today’s hop. We have many talented ladies hopping today. Clicking the ‘Next’ button will take you to team leader Amy’s blog, or you can click on any name to go directly to her blog.

Blog hop next button

Amy Koenders

Shelagh Freemantle

Mary Deatherage

Kristi Gray

Jaimie Babarczy

Sue Prather

Karen Finkle

Julie Johnston – You are Here

Product List

Uncategorized

Stampin’ Up! First Frost Get Well for Happy Inkin’ Thursday combined Hop

{HOLD EVERYTHING!!! Today’s blog is NOT part of the combined Inkin’ Krew/Happy Stampers hop! I don’t know what happened. I had a deadline by which to post my link for the rest of the hoppers, and I posted well ahead of the deadline. However, for some never-to-be-known reason, my link disappeared. It is probably floating around somewhere out there in cyberspace, which does my hopping friends and me no good at all! At any rate, by the time this was discovered, it was too late to join the hop. My apologies to everyone. I will put a link at the bottom for the person who follows me on the hop, so if you care to hop along, you can do so without me.}

Good Morning, Everyone. I hope this finds you all done with your Christmas cards and they are all in the mail. What? You still have a few to do? Join the club..I do, too!

Today’s card is not a Christmas card though. I have a couple of friends who are ill and hospitalized, though they are improving and should be dismissed sooner rather than later. I took time out from my Christmas activities to make cards for them.

Today we are joined with our friends from Canada, and have both a color and and a sketch we can use. I chose only the sketch this time, as I just wasn’t ready to make a bright, springlike card. Here is our sketch

sketch

And here are the colors colors

I created my card from colors my friends like, rather than using the challenge colors.

I began today’s card with a Smoky Slate base and added Blackberry Bliss, Whisper White, Soft Sea Foam and Petal Pink. This is a top-folding card. Here is my creation.

4

To make the two toned front, I cut one piece of Blackberry Bliss and a smaller one of Petal Pink, then taped them together on the back. I then used my Tufted Dynamic Textured Impressions Embossing Folder to dry emboss the front. Before I embossed this panel, I VERY lightly spritzed it with water. This seems to make a clearer, deeper impression. I then set this aside to dry.

After it had dried, I wrapped a length of Gray Granite 1/2″ Textured Weave Ribbon around the joint, taping it on the back also. This panel was then adhered to the card base with Tear & Tape.

The sentiment is from Healing Hugs and is stamped in Blackberry Bliss on Whisper White, then cut with the third largest Stitched Shapes Framelits oval. I backed this with a scalloped Smoky Slate oval from Layering Ovals Framelits. To this, I placed several Stampin’ Dimensionals and wound some Silver Metallic Thread around. Set aside for the moment.

1

Behind the sentiment I arranged pieces of die cuts from the First Frost Bundle, cut from Soft Sea Foam, Gray Granite, Petal Pink and Whisper White. The only piece NOT from First Frost is the detailed embossed leaf, which is from the Wonderful Romance Bundle (available Jan. 3). It is such a pretty leaf, I will use it a lot. Oh, yes, and one of the die cut pieces was stamped (First Frost) first in Blackberry Bliss on Whisper white. I cut several of each piece, not knowing exactly what I would want in the final production and will save the leftovers for another project.

I dry arranged these over the ribbon, then used Glue Dots to secure them before attaching the sentiment oval. Add the sentiment oval and the card front is finished.

For the inside, I stamped a single image, a duplicate of the die cut one on the front, from First Frost Bundle, in Blackberry Bliss on whisper White and matted it on a panel of Petal Pink. This was then adhered into the card base. Liquid Glue did both panels. As this card would be signed by several people, I did not add a sentiment, thus leaving room for multiple messages.

5

The envelope received the same stamped image on the front and a piece of the First Frosted Floral Specialty Designer Series Paper on the flap. 2

3

{To join the hop, click here}

Host Code for December: KUCX27E2

Just click here for information on my customer loyalty program and when to use the host code.

Don’t forget the Year End Closeout. There are some great things to be had here, some at reduced prices.


closeout


CARD CUTS: Smoky Slate: card base 4-1/4″ x 11″ scored at 5-1/2″, sentiment oval mat 2-1/2″ x 4-1/2″, die cuts 1-1/2″ x 4″; Petal Pink: top of front 1-1/4″ x 4-1/8″, die cuts 1-1/2″ x 4″, inside mat 4-1/8″ x 5-3/8″; Blackberry Bliss: bottom of front 4″ x 4-1/8″; Whisper White: sentiment oval, die cuts 3″ x 5″, inside liner 4″ x 5-1/4″; Soft Sea Foam: die cuts 3″ x 4″; Frosted Floral Specialty Designer Series Paper: envelope flap 2-1/2″ x 6″

Product List

Uncategorized

Stampin’ Up! Wonderful Romance for a Wedding

What better use of a stamp set with Romance in its name than for a wedding? Huh? It is a perfect match. And the coordinating dies….how can one go wrong? Then, there is also the perfectly romantic, wonderful Lace Dynamic Textured Embossing Folder. These will be available to you on January 3. Only demonstrators can order in December.

I had a request from someone who wanted me to make a wedding card. Of course, this bundle came to mind.

Yesterday on their respective blogs, my friends/teammates Amy and Mary made cards using this bundle. Stampin’ Up! makes it easy for you to purchase the stamps and dies together and save 10%. I decided after my own bundle and the TIEF came yesterday that I would CASE their cards, using a bit from Amy’s and a bit from Mary’s. This is the result.

4

I like tone on tone cards, especially for wedding cards, so this one is white on white on pale green on white. I used Thick Whisper White card stock for the card base, Soft Sea Foam for the mats and the rest is all Thick Whisper White card stock. It seemed that there needed to be a LITTLE bit of color, but nothing too obvious.

Normally I would just use the thick stock for the card base, but I really wanted the detail of the embossing folder to show, as well as the detail in the die cuts. I thought perhaps the thicker card stock would make them more visible and I think it does.

1

I began by die  cutting 6 of the large leaf spray, then 6 each of the four different size leaves. I did this because I didn’t want to stamp color on the leaf spray and the only other way to get leaf detail was to die cut the leaves and use Liquid Glue to attach them to the base spray. I also cut 3 smaller leaf sprays that have detail, and 6 of the little berry sprays. There are 4 little flower dies in this set, which speeds things up, and I cut 5 little flowers (4 at once and 1 extra), which are centered with Basic Jewels Pearls.

I used the largest Stitched Shapes circle to cut the sentiment circle on which I stamped the sentiment from Special Celebrations in Soft Sea Foam. On this circle I adhered all the die cuts with Liquid Glue to form the wreath.That is, all except the little flowers which are attached with rolled up Glue Dots.

This is a 5″ x 7″ card. The mat is cut from Soft Sea Foam card stock. The background is Thick Whisper White, dry embossed using the Lace Dynamic Textured Embossing Folder. This is then adhered to the mat using Liquid Glue. 5

To this, I used Stampin’ Dimensionals to attach the wreath. A few Basic Jewels Pearls and a couple of bows finish the front. I made the larger bow from 5/8″ Polka Dot Tulle Ribbon and the smaller one from some 1/8″ satin ribbon from my stash. Both are adhered to the wreath using  Glue Dots.

On the inside another Soft Sea Foam mat shows nicely behind the Whisper White liner, which was punched using an old Stampin’ Up! eyelet edge punch. The sentiment here is also from Special Celebrations and stamped in Soft Sea Foam.

6

The envelope flap was dry embossed with the Lace TIEF, and a large flower spray was stamped on the front in Soft Sea Foam.

3

2

That’s it folks. I sort of copied my friends, yet made this card my own. I hope the recipients like it.

The host code for December is KUCX27E2

Just click here for information on my customer loyalty program and when to use the host code.


closeout

Some items from the Holiday catalog will be retiring at the end of the month. This is a good time to get some bargains. Just click here to see the list of retiring and discounted items.


CARD CUTS: Thick Whisper White card stock: card base 7″ x 10″ scored at 5″, die cuts 5″ x 8-1/2″, embossed panel 4-3/4″ x 6-3/4″, inside liner 4-1/2″ x 6-1/2″; Soft Sea Foam card stock: front mat and inside mat 4-7/8″ x 6-7/8″

Product List

Christmas

Stampin’ Up! Twinkle Meets Night in Bethlehem for Happy Inkin’ Thursday Blog Hop

Blog hop header

Good Thursday to you All! Time again for hour Happy Inkin’ Krew Thursday Hop, and we have a great group of talent awaiting you. Our challenge inspiration this week is color, specifically Gold and White and a color of our choice.

Here is the Challenge:Dec 13 challenge

I chose Navy Blue as the third color, and here is the card I created.

3

I had seen a video on making this card and thought it was pretty neat. I will not re-write the plan as you can go to Jan Brown’s video to see for yourself how to do it. Just click here to go to her You Tube video. The most important part of the video is the scoring. It is so much easier to see it than to just tell it.

In a nutshell, you will need 12″ x 12″ card stock for starters. You can get 3 cards from one sheet of this as they are cut at 4″. I do find myself in need of 12″ x 12″ card stock once in a while, so I purchased the assortment for each color collection, as well as Whisper White and Very Vanilla. Very handy to have these. I don’t know about you, but it is very frustrating when I go to make something and don’t have the proper items needed to do it.

Make the score lines (watch the video) then fold and burnish with bone folder. I like the Simply Scored board for this.

6

After that, you need some patterned paper, stamps and die cuts. The beauty of this card is that it can be for any occasion. Tomorrow I will show you a masculine birthday card using this same technique/pattern/idea.

5

HOWEVER! For today I used Whisper White card stock for the base and some Night of Navy star patterned paper from the Twinkle, Twinkle Designer Series Paper pack. I also used it for the envelope. Since this is a square card, I had to make a matching envelope as I had none in which the card would fit.  The Envelope Punch Board makes this process easy peasy!

1

The stamp set is Night in Bethlehem and I used Versamark ink and Gold Stampin’ Emboss Powder for the images and the front sentiment. Before you stamp, be sure to use the Embossing Buddy so you don’t get embossing powder where you don’t want it. It really shows on the blue.

The sentiments, back and front, are from Star of Light. The sentiment on the back is stamped with Night of Navy ink. The front sentiment strip is cut using a die from Night Owl Thinlits, and the Gold Foil Sheets stars are cut with a die from the Starlight Thinlits. They are adhered with mini Stampin’ Dimensionals, and the sentiment with regular stampin’ dimensionals. All other attachments are done with Liquid Glue.

One thing I did not do on this card that Jan did, was to make an extra, larger panel on the front. I just liked the way this looked without it, but do plan to make another using the larger panel, and the birthday card for tomorrow’s post uses the larger panel.

Above the back sentiment I stamped a single star in Crushed Curry using a stamp from Star of Light.

4

That’s it! Not difficult at all, even though it looks it. We will let everyone think we spent HOURS making this card for them! I have made at least 6 of these, and may show some others in a future blog post. I will put card cuts and products used at the bottom of this post.

I have not decorated the envelope as I still haven’t decided whether or not it needs it. Since I have made a second card, and will probably do a third using these same products, I will decorate one envelope and then decide if they all need it. Probably I would stamp and emboss stars on the flap and the Holy Family on the front. Let me know what YOU think about that.

2

Now, on with the hop!

Blog hop next button

Amy Koenders

Shelagh Freemantle

Mary Deatherage

Kristi Gray

Jaimie Babarczy

Sue Prather

Karen Finkle

Julie Johnston

CARD CUTS: Whisper White: card base 4″ x 12. Make light pencil mark at top and bottom (long side) at 6″ mark. score at 2″, 4″ (rotate 180 degrees and repeat) then score diagonally from 2″ score line to 6″ pencil mark and from opposite pencil mark to other 2″ score line (rotate 180 degrees and repeat) (THIS IS WHERE THE VIDEO HELPS), front sentiment 1-1/4″ x 3″; Twinkle, Twinkle Designer Series Paper: end panels (2) 1-7/8″ x 3-78″, center square 2-3/4″ x 2-3/4″, triangles (3) 2-5/8″ x 2-5/8″ (cut one in half diagonally, cut the other two in half diagonally and cut these in half also. You will end up with 2 large triangles [half square] and 8 smaller ones [quarter square].), extra will be needed if you make an envelope (a square 6-3/4″ x 6-3/4″); Gold Foil Sheets: 1-1/4″ x 5″

Product List

Uncategorized

Celebrate is the theme for Amy’s Inkin Krew Team Blog Hop

inkin-krew-blog-hop-banner2

Gracious! Here it is almost the middle of December and time once again for our monthly team blog hop. I know I sound like a broken record, but, really! Time FLIES!

Our team hop this month is working around the theme “celebrate” which can be about celebrating almost anything. I used the opportunity to make a belated birthday card for a teen.

I had seen a You Tube Video by Jennifer McGuire where she inked up a background then heat embossed a design over it and stacked her sentiment over that. That video was my inspiration, though I didn’t do any embossing.

Here is my card.

4

Though I am an independent Stampin’ Up! demonstrator, sometimes SU doesn’t have what I need for a card. As a result I use a few other products from other companies. In this case, I wanted a frame I could layer and I don’t have such a critter in my Stampin’ Up! stash.

I began by sponging a sheet of Whisper White card stock pretty heavily with Tranquil Tide, Blueberry Bushel and Bermuda Bay inks, using Stampin’ Sponges cut into quarters. I set this aside to dry while I did my die cutting.

The sentiment uses the Celebrate You Thinlits. I cut four of the word Celebrate from Pool Party card stock and stacked them together with Liquid Glue.

1

While these dried I cut three of the frames from Whisper White Thick card stock and stacked them together, also with Liquid Glue.

After my sponged background was dry, I made small pencil marks using the inner side of the frame die to know how large to cut my background. With this die, there was only about 1/16″ leeway between too small and too large. Too small and the edges would show; too large and it would interfere with the cutouts on the frame. Tricky business, but it worked okay. I used Liquid Glue to adhere this to the frame, then turned it upside down and put a heavy weight on it for a few minutes.

Small dots of Liquid Glue around the inside and outside edges of the frame as well as on the background, adhere this to the Whisper White Thick card stock base.

Stampin’ Dimensionals were used to attach the sentiment to the background. I cut small strips from the edge of the Dimensionals to put on the long strokes of each letter.

1

I thought about some embellishments, but everything I had was too….well, fussy, for this card. So, it is rather plain.

On the inside, The balloon and sentiments are from Happy Birthday Gorgeous. I first stamped the Happy in Tranquil Tide, on a panel of Whisper White card stock. To do this I masked off the word birthday, inked the stamp, then removed the mask and stamped Happy on my panel.

Belated was stamped in Pool Party, then I reversed the mask to stamp just the word Birthday, again in Tranquil Tide.

5

The balloon was stamped in Bermuda Bay and I used my Bermuda Bay Stampin’ Write Marker to make the string.

This panel was adhered to a mat of Pool Party and into the card base. Card done!

For the envelope, I had to make it! Because it is a square card, I had no envelopes to fit. Making envelopes is so easy with the Stampin’ Up! Envelope Board.

I measured the size of the card (5″ x 5″), looked it up on the handy chart on the board, then cut my Designer Series Paper the size it told me I would need. The DSP for the envelope is from the Tranquil Textures package. Using the Envelope Board I scored and rounded the corners. Then it was a simple matter to fold and Liquid Glue it all together.

To finish it, I stamped a couple of balloons on the flap and one on the front. My Bermuda Bay Stampin’ Write Marker again made the strings.

I hope you like this card. I think I will try another of this type, and do some heat embossing on it as well, perhaps making a more feminine one. This one fills the bill today, however, for the card I needed to send.

Now, click on the previous or next buttons to take you to another blog, or just click on any name. I am sure you will find plenty to inspire you! Enjoy the hop!

inkin-krew-blog-hop-previous2

inkin-krew-blog-hop-next2

  1. Julie Johnston – you are here
  2. Jaimie Babarczy
  3. Karen Ksenzakovic
  4. Shirley Gentry
  5. Sue Prather
  6. Mary Deatherage
  7. Karen Finkle
  8. Amy Koenders

CARD CUTS: Whisper White Thick Card Stock: card base 5″ x 10″, scored at 5″, frame 2 pieces each 4-3/4″ x 4-3/4″;  Whisper White card stock: inside panel 4-1/2″ x 4-1/2″; panel for sponging background 5″ x 5″; Pool Party: sentiment 4 scraps 1-1/2″ x 4″ or one piece 4″ x 7″, inside mat 4-3/4″ x 4-3/4″, Tranquil Tide Designer Series Paper; envelope 8-1/2″ x 8-1/2″

December Host Code: KUCX27E2

Click here to learn about my customer loyalty program and the free stuff you can earn, as well as an explanation of the Host Code.

Product List

Uncategorized

Stampin’ Up Wishing You Well for Happy Inkin’ Thursday Blog Hop

And a great morning to you all! I have missed blogging for the last week or so, due to 1) stuff that had to be done, 2) procrastination (mine), 3) no creativity.

That said, I am back at it this week, so welcome to another

Blog hop header

Today we have a sketch challenge

december 6 sketh

To answer that challenge, I made this Sympathy card.

3

Between the need for sympathy cards and either Get Well, or Thinking of You, I keep pretty busy. I really admire those who make cards for charities but I just don’t seem to find the time to do that. Maybe one day.

For this card, I kept things simple. The card base is Night of Navy. I turned the sketch on it’s side so I could use the floral from Wishing You Well. This is stamped in Gray Granite on Whisper White card stock and mounted to a Gray Granite mat. I first ran the Gray Granite through my Big Shot with the Subtle Dynamic Textured Embossing Folder. This layered panel was adhered to the card front with Stampin’ Dimensionals.

Using the Flourish Thinlits, I cut some of the large flourish from Whisper White card stock and arranged them behind the floral piece. Instead of the bow and button, I stamped the bow from the Wishing You Well set in Night of Navy.

I’m not certain I like the flourishes, but they are part of the challenge, and once glued on, they are there. Whether I like it or not. Perhaps they should have been done in Gray Granite?

For the inside, I simply adhered a Whisper White panel to my card base with Liquid Glue after stamping the sentiment from Hold on to Hope in Night of Navy. The With Sympathy sentiment is from Better Together.

4

The envelope has more of the floral design from Wishing you well, both on the back and on the front. See? I said it was simple.

Now, Hop on around to see what the rest of our talented team has done.

Blog hop next button

Amy Koenders

Mary Deatherage

Kristi Gray

Jaimie Babarczy

Sue Prather

Karen Finkle

Julie Johnston

CARD CUTS: Night of Navy: card base 5-1/2″ x 8-1/2″ scored at 4-1/4″; Gray Granite: mat   ; Whisper White: focal piece , inside liner 4″ x 5-1/4″, flourishes 4″ x 6″

Product List