Uncategorized

Stampin’ Up! Serene Garden Anniversary for the Happy Inkin’ Thursday Blog Hop

Blog hop headerI hope you are all having a tremendous Thursday as you join us for the Thursday Blog Hop. Our challenge for today was color, and I think these are GREAT colors, especially when used together. Here are the colors for today’s challenge.

June 28 hop color challenge

Here is the card I created for it. It is a 5″ x 7″ card, so if you want a smaller one, adjust the card cuts accordingly.

wild wing creations-4

I began with a Mossy Meadow card base. Next up was to emboss the Very Vanilla with the Basketweave 3D Dynamic Textured Embossing Folder. I love this folder! It is so versatile and can be used with so many stamp sets.

I stamped the large design in the Serene Garden stamp set in Mossy Meadow on Very Vanilla, colored the flowers with my Petal Pink Stampin’ Write Marker, and used my Blender Pen to add a bit of color to the leaves. I thought the flowers looked ‘flat’ so I went over the outer petals again with the Petal Pink marker. Then I fussy cut this image. Yes, you heard me, I fussy cut it, because I have not yet purchased the coordinating dies. Even if I had the dies, I would have still done some fussy cutting so more of my basketweave would show. YOU can save 10% by ordering both the stamps and the dies in a bundle.

I stamped the smaller corner leaves in Mossy Meadow (my new favorite green) and again used the blender pen to distribute some color. I also fussy cut these.

wild wing creations-1

The sentiment is from Special Celebrations and stamped in Versamark on Very Vanilla and heat embossed in Gold. Before stamping, I used my Embossing Buddy to go over the Very Vanilla so I wouldn’t get little bits of gold where I didn’t want them. I cut this with the third largest Layering Ovals die and adhered it to a Petal Pink Layering Ovals die. Before adhering I edged the VV oval with Versamark and dipped it in the Gold Emboss Powder, then heat set it. This layered oval was then Tear and Taped to a Gold Foil Sheets oval, just slightly larger than the scalloped pink one.

I did a dry fit and decided to do the inside before making the final adhesion. Good thing I did, too, as I dry fit the front to be a horizontal card, then made the inside vertical! I am sure none of you have ever done that! Since I hadn’t glued anything to the front, it was all ok, though I think I would have liked the horizontal layout better.

The inside sentiment is from the retired Number of Years and stamped in Mossy Meadow on Very Vanilla. I also edged this panel with my Mossy Meadow Stampin’ Write Marker. I used the retired stamp set because this is an anniversary card, and I have no other anniversary sentiment, at least that I could find.


The lovely dove in Serene Garden graces the inside in Petal Pink. The single stemmed flower is stamped in Mossy Meadow and the flower colored in Petal Pink. This panel was adhered to a Petal Pink mat and into the card base with Liquid Glue.

Back to the front and I was ready to put everything together when I noticed the horizonal/vertical mis-match. No problem, just make the whole thing vertical!

I Liquid Glued the fussy cut pieces to the basketweave. This panel was Tear and Taped to the Petal Pink mat. The Petal pink was also adhered to the Gold Foil Sheets (out of which I cut the center leaving a 3/4″ border) with Tear and Tape and the whole was glued to the card base with Liquid Glue.

wild wing creations-4

To finish the front I stuck MANY Stampin’ Dimensionals to the back of the layered ovals and wound some Gold Metallic Thread around then adhered it to the card front. The final touch was a single gold dot, but the label is missing, so I don’t know which embellishment it is. I think any bit of gold, or Petal Pink or Mossy Meadow would do.

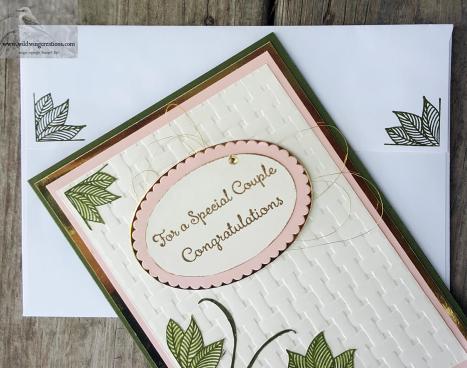
The envelope was stamped on the front and flap with the same stamps as for the card, also in Mossy Meadow. The flowers on the front were colored with my Petal Pink Stampin’ Write Marker. I only used the corner stamp for the flap after waffling about whether to add flowers.

wild wing creations-2

wild wing creations-3

I really like this Serene Garden stamp set and will no doubt use it frequently.

Now, ON with the HOP! Click the image to go to the next blog, or click on any name to go there. There are some talented ladies on this hop so don’t miss any of them!

Blog hop next button

Amy Koenders

Mary Deatherage

Kristi Gray

Jaimie Babarczy

Sue Prather

Karen Finkle

Julie Johnston: YOU ARE HERE

Don’t forget, if you don’t have a demonstrator, there are free goodies to be had if you place an order with me. Click here for details on freebies.

Hostess code: 3YHGPBAT

Card Cuts: Mossy Meadow: card base 7″ x 10″ scored at 5″: Very Vanilla: basketweave 4-1/4″ x 6-1/4″, for leaves, floral piece and sentiment oval 4″ x 6″, inside panel 4-1/4″ x 6-1/4″; Petal Pink: front mat and inside mat (cut 2) 4-1/2″ x 6-1/2″; Gold Foil Sheets: Front mat 4-3/4″ x 6-3/4″, cutting the oval from the center

Product List

Uncategorized

Stampin’ Up Joint Thursday Blog Hop

joint blog hop header

Happy Thursday to Everyone! Today we are hopping with some of our friends north of the Border.

We’re joining forces with Sandi MacIver’s Happy Stampers for our Happy Inkin’ Thursday Blog Hop this week! This will be a once-monthly event. We’re also doing something a little fun with the challenges. On our combined weeks, we will have a sketch challenge and a color challenge that we can choose to use individually or together!

I have chosen to do both this month. At first I wasn’t sure I could make the color combination work, as it is outside my comfort zone. However, nothing ventured, nothing gained, so I decided to try it. Actually, I am very pleased with the resulting card.

Here are the colors for the challenge,

June 21 joint hop colors

And this is the sketch.

June 21 joint hop sketch

Now on with the show! This is the card I chose to make.

front

Bermuda Bay is my card base and the first mat is Fresh Fig. This panel was put through the Big Shot with the Woodland Textured Embossing Folder, one of my favorites.

Did I say this card is for a man? A friend is having major health issues right now so this card is to let him know I am thinking of him.

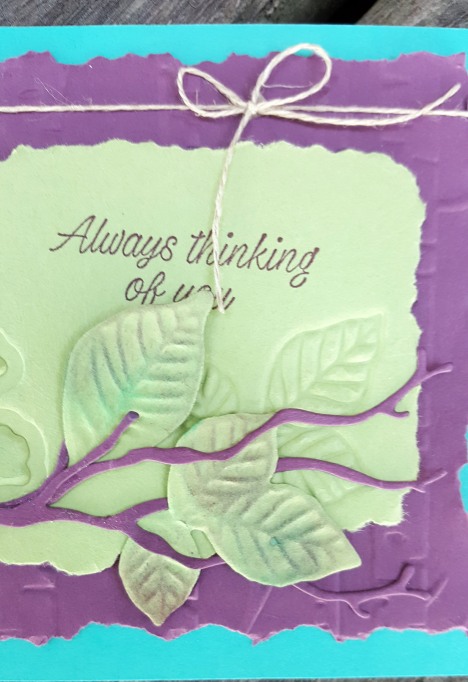
Next up I used Thinlits in the Rooted in Nature bundle along with the Big Shot Embossing Mats to emboss the tree and leaves. This is a fun way to stretch the use of your dies-use them for embossing. I embossed the tree and the leaves on the  Pear Pzazz panel, then embossed just the detailed leaves on some scrap paper. I then used the open leaf die to cut them out. Things still looked a little plain, so I used a sponge dauber and some Bermuda Bay ink to give the large embossed tree some color, then added Bermuda Bay and Fresh Fig ink to the cut out leaves.

The Fresh Fig branch is from the Seasonal Layers die set and is cut twice. One of the branches was trimmed and glued to the other to make extra branches.

The sentiment is stamped in Fresh Fig and is from the Accented Blooms stamp set. Since I was going for a rustic look, I didn’t want the sentiment straight up and true, so I angled it a bit, just above the embossed leaves.

detail

I did a quick dry fit of all the pieces and it just wasn’t, well, right. I didn’t have the rustic look I was going for. So, I began tearing. First I tore the Fresh Fig mat, then decided both panels needed to be torn. I think this look is much better. Liquid Glue adhered the embossed Pear Pzazz panel to the embossed Fresh Fig panel. A length of Linen Thread was wrapped around the Fresh Fig panel and taped on the back. A small Linen Thread bow was then adhered with a glue dot.

I did use Tear and Tape to secure the Fresh Fig panel to the card base as I wanted to be double certain it would stay there.

Then came the fun part of adding the branch and leaves over the front. I dry fit them several ways before I adhered them with Liquid Glue and Stampin’ Dimensionals.

On the inside, I embossed leaves in the corners of  the Pear Pzazz panel, using the same technique as for the front of the card. Then I again tore the edges. I did not sponge the edges, either here or on the front. I guess I thought that would be overkill, but it would be fine to do it if you wish. This was then Liquid Glued to the Fresh Fig panel and into the card base. I chose to leave the inside blank so that I could write a longer, personal message.

inside

For the envelope, you know we cannot have a plain, bare naked envelope, I again used the Sponge Daubers and Pear Pzazz and Fresh Fig Inks to ink the three-leaf stamp from Rooted in Nature to give them a multi-colored look. Then I stamped each inking twice for even more variety of color. On the front a simple three-leaf multi-color stamped once was good enough for me.

flapenvelope front


I think this card turned out well and fairly closely follows the challenges of both color and sketch. Please leave a comment and let me know what YOU think.

If you desire to purchase products and do not have a demonstrator, I will be happy to help you.

HOSTESS CODE: 3YHGPBAT Good through the end of June. There are goodies available if you order through my website. To get the details on loyal customer rewards, click here. Use the hostess code for orders under $150. The link above explains it all.

Now, ON WITH THE HOP! To go to the next, just click the image below, or, if you prefer to skip around, just click on a name to go to that blog. Enjoy!

Blog hop next button

Julie Johnston: You Are Here
Card Cuts: Bermuda Bay: 5-1/2″ x 8-1/2″ scored at 4-1/4″; Fresh Fig: (2) inside and front panels 4″ x 5-1/4″ then torn, branches 3″ x 4″ (cut 2); Pear Pzazz: (2) front 3-3/4″ x 5″ then torn, inside panel 4″ x 5-1/4″ torn slightly smaller than the Fresh Fig panel, scrap approx 3″ x 4″ to cut 1 large leaf and 1 three-leaf set.

Product List
Uncategorized

Stampin’ Up! Love What You Do Happy Inkin’ Thursday Blog Hop

Blog hop header

Good Thursday Everyone! My the week is going fast. But then, don’t they all?

My card for today’s hop is following the color challenge and uses the Love What You Do stamp set. Here is the challenge,

June 14 color challenge

and here is the card I made for it. I had not ordered the Granny Apple Green yet, in either ink or card stock, so I am substituting Pear Pzazz. It is the closest in color to the Granny Apple Green, so I hope it doesn’t throw things off too much.  I didn’t use much of it anyway, just because it was the wrong green, just the ink for the sentiment.

wild wing creations-3

Once again I am grateful to the crafters out there who post their creations on You Tube to inspire the rest of us. I so enjoyed the video Linda Bedinger did on this fun fold, that I decided to try it. You can watch her video with great instructions (which I won’t repeat).

Just go to Linda Bedinger to see what she did.

After doing all the card cuts, I began by stamping the watercolor background in Shaded Spruce on a panel of Whisper White. Over this I stamped the flower image in Memento Tuxedo Black. This piece was cut with the Stitched Shapes Framelits and mounted on a mat of Blushing Bride that I had cut with a Layered Squares Framelit. This was adhered with Liquid Glue to the Shaded Spruce card base that I had already cut and folded.

A panel of Share What You Love Specialty Designer Series Paper is affixed to the lower portion with Liquid Glue. wild wing creations-1

The sentiment, from Beautiful Bouquet, was stamped in Pear Pzazz since I didn’t have the Granny Apple Green, on Whisper White. I then cut it with a Layering Ovals Framelit and adhered it to a Blushing Bride Scalloped Layering Ovals mat with Liquid Glue. Stampin’ Dimensionals adhered it to the front of the card.

On the inside, a layered panel identical to the front, with the stamped off once watercolor background and the Tuxedo Black flowers finished the back of the folded card base.

wild wing creations-1

For the sentiment, I used a two part message from Beautiful Bouquet, stamping it in Blushing Bride. I also used Blushing Bride to stamp the flower clusters in the upper corners. Another panel of Share What You Love DSP finished the inside.

The envelope is stamped on the front with the same flowers as the art piece in Shaded Spruce and colored in with my Blushing Bride Stampin’ Marker. The flap is covered in more of the Share What You Love DSP.

Now on with the hop. Just click the ‘NEXT’ image to go on to Amy’s Blog, or click any name to go to their blog.

Blog hop next button

Amy Koenders

Shelagh Freemantle

Mary Deatherage

Kristi Gray

Jaimie Babarczy

Sue Prather

Karen Finkle

Julie Johnston: You are HERE


Uncategorized

Stampin’ Up! Nature Anniversary Fun Fold

Good Morning all! It is the weekend again, Woo-Hoo! Doesn’t everyone love the weekend? Weddings, graduations, class reunions, etc. all seem to fall on the weekends.

This month our family has several birthdays and four anniversaries. It is hard to stay ahead! One of the anniversary couples will receive this fun-to-make card, and it isn’t hard. Giving instructions without showing you how to do it might be hard.

Never fear, Linda Bedinger has a great video which you can see here.

wild wing creations-3

I like this color combination of Blueberry Bushel and Soft Seafoam. Assembly is quick and easy once you have the card stock cut.

I used the oak tree from the new Rooted in Nature stamp set to stamp the front in Blueberry Bushel ink on Whisper White card stock. This was cut with a square from the Stitched Shapes Framelits and mounted on a Blueberry bushel scalloped square. This was cut with a die from the Layering Squares Framelits.

I used Versamark ink to watermark the leaves on the front of the card base before I did any cutting and folding. Next step is to cut and fold the card front back. Linda’s video shows very clearly how to do this.

wild wing creations-5

To assemble, do the cutting and folding, then adhere the Soft Seafoam  square to the folded front. I used Tear and Tape as this will hold up to the rigors of opening and closing. Stamp the image, do the die cuts, adhere the image square to the scalloped square with Liquid Glue.

For the sentiment, I used the Beautiful Bouquet stamp set and stamped it in Blueberry Bushel. I used my Paper Snips to cut the flag end and Liquid Glued it to the back of the scalloped square. This is then adhered with Stampin’ Dimensionals, though you wouldn’t have to do this. You could just use Liquid Glue to adhere this to the card.

On the inside, I again stamped the tree, then used the sentiments from Beautiful Bouquet to stamp them in Blueberry Bushel and Soft Seafoam. This liner is adhered with Liquid Glue. I think this tree will be used a lot in my future card making!!wild wing creations-4

To finish, I used some Whisper White Organza ribbon, now retired, to tie around the front and make a small bow. Card is finished.

I really like this design and will be making more of these. Thank you Linda Bedinger.

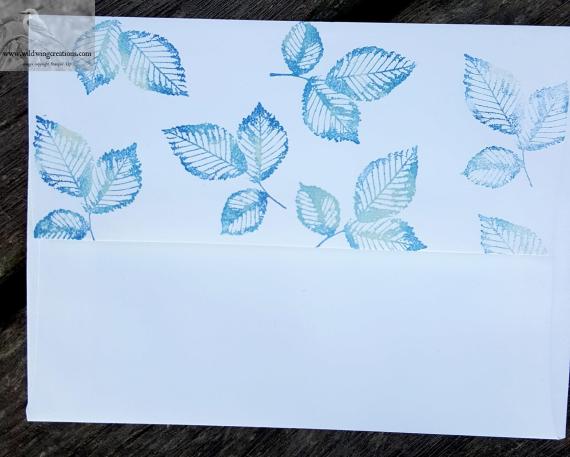
The envelope is finished by stamping leaves from the Rooted in Nature stamp set on the flap and the tree on the front.

To do the leaves, I used sponge daubers to ink the stamp with Blueberry Bushel and Soft Seafoam, giving them a more natural look. Although, who ever heard of BLUE leaves? Oh, well. I then stamped each one twice before re-inking the stamp to add even more shading.

I hope you enjoy this card and make one for yourself.

Card Cuts: Blueberry Bushel: card base 4-1/4″ x 11″ scored at 5-1/2″, 3-1/4″ x 3-1/4″ scrap for scalloped square; Whisper White: inside liner 4″ x 5-1/4″, front for stamping and sentiment banner 3-1/2″ x 4″, Soft Seafoam: 3-1/2″ x 3-1/2″

Product List

Uncategorized

Stampin’ Up! Happy Inkin’ Thursday Blog Hop Share What You Love

Blog hop headerHappy Thursday to all you who hop! I took a brief leave of absence from this blog hop, but here we are back again. Come on along and join the fun! We are working from a sketch today.

June 7 sketch

And, my card features the Share What You Love Specialty Designer Series Paper and the Lovely Floral Dynamic Textured Impressions Embossing Folder. Both are part of the Share What You Love Suite.

wild wing creations-4

I started with a card base of So saffron, to which I adhered a panel of the Share What You Love DSP with Liquid Glue. A square of Champagne Foil Sheets is the mat for the Lovely Floral embossed panel in So Saffron. Tear and Tape assures a good adhesion to the foil.

The sentiment, from the host set Very Vintage, is stamped in Versamark and Memento Tuxedo Black, then heat embossed with clear embossing powder, on a scalloped oval of Champagne foil. I don’t yet have the black embossing powder, but this would be the perfect place for it. The bee, or is it a fly?, is also from Very Vintage and heat embossed. This oval is adhered to one cut from the Share What You Love DSP and adhered to the card front with Stampin’ Dimensionals.

The ovals are die cut with the Layering Ovals Framelits. wild wing creations-1

For the inside I simply layered a liner of So Saffron over a mat of ChampagneFoil Sheets using Tear and Tape. This was then layered over a panel of the Share What You Love DSP. I chose to not put a sentiment inside as I wanted to have room for a longer personal note. There is a bit of glitz in the DSP, which is perfectly set off by the Champagne Foil. I like this combination.

wild wing creations-5

For the flap, what else, but more of the DSP? What? No DSP? Ha! For a change I decided that more bees and some little flowers from the Very Vintage stamp set would be appropriate. I stamped the bees in Memento Tuxedo Black and colored them in with my So Saffron Stampin’ Write Marker. The flowers are stamped in So Saffron.

wild wing creations-3

The front of the envelope got more of the same. I think this made for a very pretty ensemble.

wild wing creations-2

I hope you enjoy this simple card.

If you don’t have a demonstrator, I would be happy to help you with questions or products.

Now, on with the hop. You can move through by clicking NEXT, or just click on the name of the person whose blog you wish to visit.

Blog hop next button

Amy Koenders

Shelagh Freemantle

Mary Deatherage

Kristi Gray

Jaimie Babarczy

Sue Prather

Karen Finkle

Julie Johnston (You are here)

Card Cuts: So Saffron: card base 5-1/2″ x 8-1/2″ scored at 4-1/4″, embossed panel 2-1/2″ x 4-3/4″, inside liner 3-1/4″ x 4-3/4″; Share What You Love Specialty Designer Series Paper: Front mat 4″ x 5-1/4″, large scalloped oval 2-1/2″ x 3-1/2″, inside mat 4″ x 5-1/4″; Champagne Foil Sheets: front square mat 3-1/2″ x 3-1/2″, smaller scalloped oval 2″ x 3″, inside mat 3-1/2″ x 5″;

Product List

Uncategorized

Stampin’ Up! Tranquil Petals Anniversary

Good Saturday All! I hope you have a great weekend planned and all goes as planned. Where I am, plans may get rained upon, but that is fine with me as we are quite dry here, and any rain we get will be welcome.

My card for today is for an anniversary that happens to be today, so, of course, it has been sent off already.

I started with a piece of the Tranquil Textures Designer Series Paper and built the card from that. I took the colors from the DSP and used Fresh Fig, Tranquil Tide, Mint Macaron and Night of Navy as well as Whisper White.

A detailed tutorial on how to make this fun fold can be found at Linda Bedinger’s You Tube Video, so I won’t go into the details. It is much easier to show than to tell, and I don’t do videos. wild wing creations-4

I began with a Mint Macaron card base. Then, by cutting a 4″ x 4″ square of the Tranquil Textures DSP and drawing a faint pencil mark diagonally from corner to corner, then in the opposite corners, I found the exact center. Finding the exact center is crucial to getting tight corners when you begin folding.

Fold the point up to the center, going around and doing all four corners. Measure up about 1/2″ from the fold and make a tic mark, then fold the point down toward the fold. Linda’s video shows how easy this is.

Using the bird and little flower from Best Birds stamp set, I stamped them in Night of Navy on a 2-3/4″ x 2-3/4″ square of Whisper White card stock. Having put some ink in the lid of my Fresh fig ink pad, I used a Blender Pen to color in the flowers and some fainter coloring on the bird. I also used my Mint Macaron Stampin’ Write Marker to color the stems of the flowers (which are hidden under the fold). The Daffodil Delight Stampin’ Write Marker colored his bill.

This piece is placed inside the folded piece and secured with a bit of Liquid Glue. Or, you could use Snail or any other adhesive as it doesn’t take much. Your Stampin’ Dimensionals that hold the folds also keep this piece in place.

Stampin’ Dimensionals hold down the folds in both directions.

wild wing creations-1

I did a dry fit of this piece on the Fresh Fig mat to get the placement for the 1/2″ Tranquil Tide Finely Woven Ribbon (retired), laying a strip of Tear and Tape on the ribbon and sticking it down to the Fresh Fig panel. Over this I wrapped some Linen Thread around 3 times, taping it on the back. I made a small bow with the Linen Thread and used a folded over Mini Glue Dot to secure it in place.

The folded art piece is Liquid Glued to the upper portion of the card front.

The sentiment is also from Best Birds and stamped in Night of Navy on Whisper White. This is edged with my Night of Navy Stampin’ Write Marker and Liquid Glued to a panel of Tranquil Textures DSP. This piece is then adhered to the card front with Stampin’ Dimensionals. A metal embellishment from the Petal Passion Embellishments attached with a Mini Glue Dot finished the front.

On the inside I repeated the small flower in each corner in Night of Navy and colored them in as I did for the art panel on the front. Then, using a ruler and my Night of Navy Stampin’ Write Marker, I drew a line  between these flowers to finish it off. The sentiment is from Petal Palette and stamped in Tranquil Tide. wild wing creations-5

This panel is Liquid Glued to a panel of Tranquil Textures DSP and onto a Fresh Fig mat. This completed inner liner is Liquid Glued into the card base.

The envelope flap got a piece of the DSP, and a little bird in Night of Navy shows off the front.

I hope you like this card. Please check out the video for more details on how this is done. It is much easier than it appears at first glance.

Host Code: BWJN37KC

If you do not have a demonstrator, I would be happy to answer your questions, send a catalog, or help in any way I can. If you want to order, just click on the “Order Online button at right. The host code is for any order between $50 and $150, which gets you a gift of your choice (valued up to $10), but if your order is over $150, please don’t use the host code. Using it would negate the customer rewards you earn for an order over $150. You will still get the free gift from me. Also, check out my customer rewards page to see what other goodies await you.

Yesterday was the first day to order from the new 2018-2019 Annual Catalog, and there are lots of great products to be had. These will all be available until May 31, 2019. New colors, new stamps, new dies, new embellishments, new Blends, WOW! Of course, many of the old stamps and dies carry over as well. CHECK THEM OUT!

CARD CUTS: Mint Macaron: card base 5-1/2″ x 8-1/2″ scored at 4-1/4″; Fresh Fig: front mat and inside mat 4″ x 5-1/4″; Tranquil Textures Designer Series Paper: folded piece 4″ x 4″, sentiment mat 1″ x 3-1/4″, inside mat 3-1/2″ x 5″; Whisper White: for stamped front liner 2-3/4″ x 2-3/4″, sentiment 3/4″ x 3″, inside liner 3″ x 4-1/2″

Product List