Uncategorized

Stampin’ Up! Golden Afternoon Thoughts

Oh! My! Goodness! Can you believe I need five masculine cards for next week??? Yep, one for a friend who is ill, 3 birthdays and a retirement. So, busy little beaver that I am, I will post a masculine card today, and one every day next week. You never know when that 6th one might come in handy.

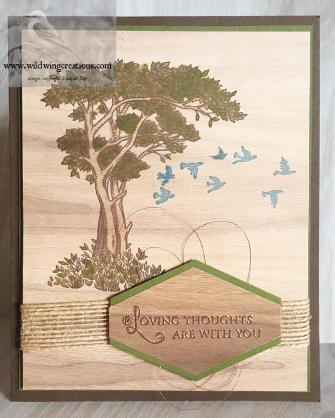
I began with an Early Espresso card base for this one, and used my most favorite DSP, the Wood Textures 6″ x 6″ pack. I hope Stampin’ Up! makes some of these in 12″ x 12″, especially the whitewashed one. I used it first from every pack I purchased.

4

I used the Stamparatus for all the stamping to get everything where I wanted it, and because I was stamping Early Espresso on the wood, I wanted it to be DARK. This meant stamping twice, or three times.

I first stamped the Golden Afternoon tree, then the small deer from the Dashing DeerĀ  (from Holiday catalog but still available) stamp set. I stamped the one with antlers in Early Espresso on Early Espresso card stock and die cut it with the matching die.

Using the small grass stamp from High Tide, I stamped grass along the bottom of the panel. One deer is grazing, so she had to have something to eat, right?

4

Using a Sponge Dauber and Early Espresso Ink, I went around the edges of the panel to give it an even more rustic look. THEN I added the die cut deer with Mini Stampin’ Dimensionals. I cut tiny strips from the edge of the Dimensionals for his legs.

The sentiment, also from Golden Afternoon, was stamped in Versamark ink after I went over the whole panel with my Embossing Buddy. I didn’t want copper anyplace but the sentiment. I then heat set the Copper Stampin’ Emboss Powder with my heat tool. A double length of Copper Metallic Thread and one length of Linen Thread were wrapped around the panel together and tied in a small bow. A Glue Dot keeps the bow in place on the front and a couple pieces of tape secured the back.

1

I used Tear & Tape to adhere a Copper Foil Sheets panel to the card base and Stampin’ Dimensionals adhered the Wood Textures DSP panel to the copper mat. Card front done.

Another Early Espresso tree on the inside and a scrap strip of copper at the bottom of the panel add some interest to an otherwise plain panel. Copper Emboss Powder was used with Versamark again for the sentiment, which is from Healing Hugs, then set with my heat tool. The copper strip was adhered with Liquid Glue.

5

The Medium Crumb Cake Envelope (no longer available, but I had them leftover, so why not use them) has a couple of Early Espresso Dashing Deer on the front and a piece of the Wood Textures DSP on the flap.

2

3

I rather like this look of the stamps on the wood.

CARD CUTS: Early Espresso: card base 5-1/2″ x 8-1/2″ scored at 4-1/4″, deer 2″ x 2-1/2″; Copper Foil Sheets: front mat 4″ x 5-1/4″, inside strip 1/4″ x 5-1/4″; Wood Textures Designer Series Paper: front art piece 3-3/4″ x 5″, inside liner 4″ x 5-1/4″, flap 2-1/2″ x 6″

Product List

Uncategorized

Stampin’ Up! Golden Afternoon Sympathy

Good Morning Everyone. Well, here it is Friday already, and another week gone. Just a couple more days and March will be history.

For today I had to make yet another Sympathy card. Golden Afternoon is perfect for this occasion, or for others I can think of as well. To me the stamp set is serene, speaking quietly of peace, calm and even the presence of the Lord.

4

My card base is Early Espresso and the art piece is from the 6″ x 6″ Wood Textures Designer Series Paper. I stamped the tree in Early Espresso using my Stamparatus because I wanted a really dark image.

Stampin’ Blends in Light Mossy Meadow and Dark Granny Apple Green were used to color the leaves on the tree and the plants at the base of the tree. Light Crumb Cake colored the trunk and branches.

Some birds in Pacific Point, stamped off once, fly past the tree.

4

The sentiment is stamped in Versamark on the back side of a scrap from the front, and heat embossed in Copper Stampin’ Emboss Powder. (TIP- Anytime you use embossing powder, use the Embossing Buddy to de-static the paper so the embossing powder does not stick where you don’t want it.) This was cut with the Tailored Tag Punch. I punched another in Mossy Meadow, cut it in half horizontally and Liquid Glued it to the back of the sentiment tag, spreading it to form a mat.

1

Some Stampin’ Dimensionals on the back (8!) gave me plenty of sticky to wind some Copper Metallic Thread around and still have enough adhesion to stick to the 5/8″ Burlap Ribbon underneath. I had put a strip of Tear & Tape on the back of the Burlap Ribbon, wrapped it around the Wood Textures DSP and taped it to the back.

More Stampin’ Dimensionals on the back of the art piece adhere this card front to the Mossy Meadow mat, which is stuck to the card base with Liquid Glue.

5

Inside, another panel of Wood Textures DSP, same as the front, is stamped with more Pacific Point birds in full strength, and sentiments from Lasting Lily in Mossy Meadow.Ā  The scripture verse on the opposite side is from Hold on to Hope and is stamped in Early Espresso, also on the Wood Textures DSP. I also stamped the small tree from Golden Afternoon in Early Espresso, letting it run off the paper. This was adhered with Liquid Glue. The Sentiment liner was adhered to the Mossy Meadow mat and into the card base with Liquid Glue.

The Crumb Cake Envelope (retired) has another small tree on the front in Early Espresso and more of the Wood Textures DSP on the flap with a few birds flying by.

2

3

I hope you like my card, but if you don’t that’s ok. Please leave comments. Below are the card cuts and products used for this card.

CARD CUTS: Early Espresso: card base 5-1/2″ x 8-1/2″ scored at 4-1/4″; Mossy Meadow:front mat 4″ x 5-1/4″, inside mat 4″ x 5-1/4″, front sentiment mat 2″ x 3″; 6″ x 6″ Wood Textures Designer Series Paper: front art panel and inside liner 3-7/8″ x 5-1/8″, second sentiment panel inside 2-3/4″ x 3-1/2″, front sentiment 2″ x 3″

Product List

Uncategorized

Stampin’ Up Country Floral Birthday for Happy Inkin’ Thursday Blog Hop

Good Thursday morning to You All! I think Spring is finally making a comeback, though it it still pretty drab outside. At least the snow and ice are pretty much gone. We are also supposed to get more rain today. That won’t help the flooding situation in the midwest.

But, on with the hop! Today we have another sketch for inspiration for our hop. Please hop along to all the other ladies to see what beauties they have created.

My card is a birthday card for someone special. Our team leader, Amy, has a birthday today, so I made my card especially for her.

We are working from this sketch:

This is the 5′ X 7″ card I created

4

I began by cutting Whisper White and Soft Sea Foam ovals using the Layering Ovals framelits. The Whisper White ones I then ran through the Big Shot using the new Country Floral Dynamic Textured Impressions Folder. To get a better depth impression and reduce the cracking, I spritzed the ovals with water and pretty much centered the rose image in the DTIEF on the oval. The depth was great, but there was still some minor cracking. Maybe I didn’t spritz enough.

The next step was to lightly color some of the flowers and leaves with a Sponge Dauber and Flirty Flamingo or Soft Sea Foam ink. These were then adhered to the Soft Sea Foam scalloped ovals with Liquid Glue.

A panel of Whisper White dry embossed with the Subtle Dynamic Textured Impressions Folder, cut the same size as the front of the card base which is also Whisper White, was adhered with Liquid Glue. The ovals were centered top to bottom over this panel and the outer two were adhered to the card front with Liquid Glue. The third was adhered with Stampin’ Dimensionals.

1

A strip of Twinkle, Twinkle Designer Series Paper was cut to fit across the front of the card. Linen Thread, colored in Soft Sea Foam by dragging it across the stamp pad, was taped to the back of the DSP strip on both ends. I then tied a bow around the thread.

I dry fit this strip and determined where I needed to put which adhesive. This was then Liquid Glued to the center oval and Stampin’ Dimensionals adhered it to the other two ovals. The ends sat just a bit higher, so I used a Mini Stampin’ Dimensional stacked on a regular Dimensional to make it level.

The sentiment, from Golden Afternoon, was stamped in Flirty Flamingo on a strip of Whisper White and cut with the smallest of the Stitched Rectangles. I used Stampin’ Dimensionals to adhere it to the DSP strip.This completed the front.

On the inside, I stamped some dots from the Birthday Backgrounds stamp set in Soft Sea Foam on a panel of Whisper White. The sentiments are from Better Together and are stamped in Flirty Flamingo. This panel was Liquid glued to a mat of the Twinkle, Twinkle DSP, on a Flirty Flamingo mat and into the card base. Card done.

5

Whoa, wait a minute. In looking at the front, I decided some pearls would be nice, so a few Pearl Basic Jewels were added to the flowers, one to the sentiment panel and 3 at the bottom of the card front. Now it is finished.

4

HAPPY BIRTHDAY, AMY!! I hope you like your card.

For the envelope, a piece of the Twinkle, Twinkle DSP decorates the flap while some Flirty Flamingo roses from the Climbing Roses stamp set dance across the front.

On with the hop! Click the NEXT button to see what the creative Eva has for you, or click on any name to go to her blog. Enjoy! I am sure you won’t be disappointed. You may even be inspired! šŸ˜‰

Amy Koenders

Shelagh Freemantle

Mary Deatherage

Kristi Gray

Jaimie Babarczy

Sue Prather

Karen Finkle

Julie Johnston – You are here

Eva Dobilas

PAPER CUTS: Whisper White: card base 7″ x 10″ scored at 5″, embossed panel 5″ x 7″, ovals 4-1/2″ x 8-1/2″, inside liner 4″ x 6-1/4″Ā  sentiment strip 3/4″ x 5″; Flirty Flamingo: inside mat 4-3/4″ x 6-3/4″; Soft Sea foam: scalloped ovals 4-1/2″ x 8-1/2″; Twinkle, Twinkle Designer Series Paper: strip on front 3/4″ x 7″, inside mat 4-3/8″ x 6-3/8″, envelope flap 2-1/2″ x 7-1/4″.

Product List

sympathy

Stampin’ Up! Golden Afternoon for Happy Inkin’ Thursday Blog Hop

Good morning All! We are still in the deep freeze, though the freeze isn’t as deep as it was earlier in the week. It seems that whenever it warms up a bit we get more snow. We shall see if the predicted amount happens today. But, it IS March, which means that spring can’t be too far away. Oh, and by the way, just in case you haven’t heard, this weekend is the time to turn your clocks forward. Already???

My card for today is one of the unfortunate ones we all have to make from time to time….sympathy. Two friendsĀ  lost their fathers this past week, so I have been in the sympathetic mode. What better stamp set to use than Golden Afternoon? It has both as quiet scene and great sentiments for the purpose.

Our hop challenge today is color, also perfect for a sympathy card:

And here is the card I created

4

This is without a doubt the easiest card I have ever made. It is truly simple, and quick to make. Only one stamp set, no dies and two inks. Easy Peasy.

I began with a Night of Navy card base, a mat of Balmy Blue and an art piece in Whisper White. I stamped the large tree from Golden Afternoon in night of Navy, the birds in flight in Balmy Blue, and the sentiment also in Balmy Blue.

1

This was adhered to the Balmy Blue mat with Liquid Glue and Stampin’ Dimensionals adhered this card front to the card base.

On the inside, I used the same Balmy Blue mat, and liner in Whisper White. I wanted room to write, so I only stamped some Balmy Blue birds, or would that be Balmy Bluebirds?? Just kidding.

5

Liquid Glue was used for adhesion of both pieces.

The envelope got the small tree from the stamp set in Night of Navy ink, with more of those Balmy Blue birds on the flap.


See, I told you it was easy.Ā  Now on with the hop. Our very creative team will no doubt have some wonderful projects for you. Clicking the ‘next’ button will take you to the uber creative Eve, but you can click on any name to just hop around.

Amy Koenders

Shelagh Freemantle

Mary Deatherage

Kristi Gray

Jaimie Babarczy

Sue Prather

Karen Finkle

Julie Johnston – You are Here

Eva Dobilas

CARD CUTS: Night of Navy: card base 5-1/2″ x 8-1/2″ scored at 4-1/4″; Balmy Blue: front mat and inside mat 4″ x 5-1/4″; Whisper White: front art piece 3-7/8″ x 5-1/8″, inside liner 3-3/4″ x 5″

Product List

Uncategorized

Stampin’ Up! Botanical Butterflies Birthday

Good Morning My Peeps,

I haven’t been posting very much because I haven’t had anything much to say. Well, I always have something to say, but sometimes it is not worth the bits and bytes to post it.

Today, however, I think I have a beautiful card for you. I can take NO credit for it, however, as it came from the UK. Jan B to be specific. You can see her video here on how to make this card. I plan to do another with a totally different look, but using the same techniques.

6

Jan called this an ‘inside block’ card, but I just think it is a wonderful fancy fold. And, it is really easy! I will give you the basics, but you really should watch Jan go through the steps.

    1. Cut Granny Apple Green card stock to 6″ x 10″.
    2. Using Scoreboard, and with long side at the top, score at 3″, 4-1/2″, 6″and 7-1/2″.
    3. Ā Fold 6ā€ x 10ā€ card stock on 6ā€ score line. With fold at top of scoreboard, and the short side facing (i.e. so the 7 Ā½ā€ score line is facing you), make a small pencil mark at Ā¾ā€, 2ā€, 2Ā½ā€, 3Ā¾ā€, 4Ā¼ā€, 5Ā½ā€.
    4. FoldĀ  on 7Ā½ā€ score line. With fold at top of scoreboard, and the long side facing (i.e. so you can see the first row of pencil marks) make pencil mark at Ā½ā€, 1Ā¾ā€, 2Ā¼ā€, 3Ā½ā€, 4ā€, 5Ā¼ā€.
    5. Use a ruler to connect these lines.
    6. Re-fold on the 6″ scoreline. Cut on lines.
    7. Erase pencil marks. They will be on the back and won’t show, but I like to erase them anyway.
    8. Use bone folder to crease the large sections forward, and smaller sections backward. Standing up, it will look like this:8
    9. Use Liquid Glue to adhere Designer Series Paper to Whisper White card stock pieces, then adhere these to the card base.
    10. Use Light Highland Heather and Light Granny Apple Green Stampin’ Blends to color 3 large black and white butterflies (Botanical Butterfly Designer Series Paper).
    11. Do a rough cut out from the larger paper sheet, then punch them out using the Duet Butterfly Punch.
    12. I used some removable tape to hold the butterfly to a ‘handle’ of card stock to more easily insert it into the punch and line it up.
    13. Close the card and line up the butterflies where you want them. I put mine so that 1/2 would show when the card is closed. Jan B did this also.2
    14. Stamp the floral image from Beauty Abounds and sentiment from Golden Afternoon stamp sets in Memento Tuxedo Black ink.
    15. Color the floral image with Granny Hpple Green and Highland Heather Stampin’ Write Markers.
    16. Die cut using largest skinny rectangle for floral image and smallest squarish rectangle from the Stitched Rectangles Framelits.5
    17. Adhere with Liquid Glue to Granny Apple green card stock pieces.
    18. Use Stampin’ Dimensionals to adhere to left card front.
    19. Rough cut small butterflies from Botanical ButterflyĀ  DSP, then punch out with Duet Butterfly Punch.
    20. Use Liquid Glue to adhere 6 small rectangles of DSP to Whisper White.
    21. Adhere to cut squares on card base.
    22. Put a dab of Liquid Glue on body only of little butterflies and adhere to each of the 6 large squares on the card..1
    23. Finally, adhere strip of Multipurpose Adhesive Sheets to back of Whisper White card stock.
    24. To prevent gumming up your Big Shot acrylic cutting pads, lay the backing strip you removed from the adhesive over the die and paper. If you cut your adhesive to EXACTLY the size of the card stock you won’t need to do this. Mine was bigger and sticky around the edges.
    25. Use window die from Stained Glass Thinlits to cut 2 windows.
    26. These are now stickers. Peel off backing and adhere to panel.
    27. One more thing….use the Butterfly Gala stamp set to stamp the antennae in Memento Tuxedo Black.

Your card is done! How easy was that? Yes, there are some time consuming steps, but once you have done one, it doesn’t take long to do the next one. It will probably take longer to decide which papers to use!

Since there is no ‘inside’ on which to write or place a sentiment, I simply wrote on the back of the panel with the 3 butterflies. You can do as you like. When closed the card measures 4″ x 6″. Instead of making an envelope, I used a 5″ x 7″ white one.

The envelope has another of the floral images on the front, colored the same as the one on the card. The flap has more of the Botanical Butterfly Designer Series Paper on the flap.

34

I think this is a stunning card and can’t wait to try some different stamps and colors.

CARD CUTS: Granny Apple Green: card base 6″ x 10″ scored as above, floral panel 1-3/4″ x 3-3/4″, sentiment panel 1-5/16″ x 1-3/4″ ,Whisper White: panels to fit between score/fold lines 2-3/8″ x 5-7/8, 1-3/8″ x 5-7/8″, 2-7/8″ x 5-7/8″, 6 pieces 1-1/8″ x 1-3/8″ Floral panel 2″ x 4″, sentiment 1-1/2″ x 2″, windows 1-1/2″ x 5-1/2″; Botanical Butterfly Designer Series Paper: panels to adhere to Whisper White panels 2-1/4ā€ x 5-3/4ā€, 1-1/4″ x 5-3/4″, 2-3/4″ x 5-3/4″, 6 pieces 1″ x 1-1/4″, enough to punch out 3 large and 6 small butterflies.

Product List

Uncategorized

Stampin’ Up! Climbing Roses Birthday for Happy Inkin’ Thursday Blog Hop

Another week has gone by and I spent nearly all of it at home. What a shocker! ‘Tis true, everything on my schedule was cancelled due to snow/ice/wind/extreme cold..any and/or all of the above. So, from last Wednesday until, maybe tomorrow, I have been home except for a very quick trip Monday to get some groceries and bird seed and suet between storms. It was actually freezing rain before I got home.

You might think I would have done something really important, like – uh, taxes? I am the world’s best at procrastinating when that is looming, so, no, I watched the birds at my feeders, read 4 books, played some solitaire, made a few cards, watched birds, made some jewelry, watched some You Tube tutorials, watched the birds at my feeders. (do you see a trend here?) And, yes, I did actually do some work…vacuumed, did laundry, cooked more than usual, did dishes (cooking makes a lot of dishes), did some paperwork, paid bills, and got a small start on spring cleaning by cleaning out 3 or 4 kitchen cabinets and washing down the fronts. Also, of course, is the clearing of sidewalks of ice/snow/sleet. I am not a TOTAL shirker!

But, my week’s work, or lack thereof, is not why we are here. It is time for our talented Krew to share some lovely cards with you. We have a sketch for today, and I have chosen to implement it with the climbing Roses stamp set. On with the hop!

I like soft colors when I am making something for a woman, and I have several birthdays upcoming, most of which are of the feminine type. One of my favorite Stampin’ Up colors is Soft Sea Foam, so that is my card base. I also like layers, so layers you get.

4

I stamped the roses in Basic Gray on Whisper White and used my Stampin’ Blends and Stampin’ Write Markers to color them. Colors used for this were Rich Razzleberry Light Stampin’ Blends, and Soft Sea Foam, Mint Macaron and Powder Pink Stampin’ Write Markers.

The Climbing Roses Bundle has everything I needed except the birthday sentiment and the inside sentiment, and the embossing folder.

The mat behind the roses is Powder Pink and I ran it through the Big Shot with the TuftedĀ  3D Dynamic Textured Impressions Embossing folder. This was attached to a Blackberry Bliss mat with Liquid Glue. Liquid Glue is the only adhesive used on this card except for the Stampin’ Dimensionals under the sentiment.

The extra leaves and the rose on the sentiment are also from the Climbing Roses Bundle. The Powder Pink flower and the Blackberry Bliss berries were some die cuts I had cut for another project and didn’t use. They may have been from the holiday catalog, but I am not sure. Anyway, I like to save things like that as you never know when they will come in handy.

1

The sentiment from All That You Are was stamped in Rich Razzleberry on Whisper White, then die cut with the die in the Climbing Roses Bundle. It looked too small and too plain, so I adhered it to a scrap of Soft Sea Foam and fussy cut around it, leaving a narrow margin. Hmmm…still too plain, and still too small. OK, let’s mount it on a scrap of Blackberry Bliss and fussy cut it, leaving a larger margin. Oh, yes. Much better. The little rose adds a finishing touch. This was afixed to the front, then the whole was Liquid Glued to the card base.

On the inside, my Powder Pink liner was stamped with a sentiment from Golden Afternoon in Rich Razzleberry. The corner adornments are also from Climbing Roses and stamped in Basic Gray using the second generation stamping method. I left these un-colored.

5

This was adhered to a mat of Blackberry Bliss and into the card base. I don’t know if you can tell from the photo, but the mat is embossed with the Tufted Dynamic Embossing Folder. I don’t usually emboss the mat, but I originally thought I would put it on the front of the card, then decided it was too dark. Rather than add it to my stash of paper-to-be-used-later, I just used it as a mat.

Card finished.

The envelope also got the small rose spray on the front, stamped in Basic Gray and colored with Powder Pink and soft Sea Foam Stampin’ Write Markers. Since I had not used any Designer Series Paper to also use on the flap, I simply stamped the large rose spray on the flap, letting it extend down onto the envelope.Ā  I then colored it with Powder Pink, Rich Razzleberry, Soft Sea Foam and Mint Macaron Stampin Write Markers.

2

3

My apologies for the appearance of some of the photos. All were taken at the same time with the same lighting, so I don’t know why some of them look striped. It is a mystery. Let me assure you….they are NOT striped!

Now, to see what the rest of this talented Krew has for you, just click the next button to see what Eva has done for you. Or, just click on any name hop to her blog. Enjoy!

Card cuts and products used are below.

Blog hop next button

Amy Koenders

Shelagh Freemantle

Mary Deatherage

Kristi Gray

Jaimie Babarczy

Sue Prather

Karen Finkle

Julie Johnston

Eva Dobilas

CARD CUTS: Soft Sea Foam: 5-1/2″ x 8-1/2″ scored at 4-1/4″, extra leaves 1-1/4″ x 3″, sentiment mat 2-1/2″ x 3-1/2″; Blackberry Bliss: front mat 4″ x 5-1/2″, sentiment mat 3″ x 4″, inside mat 4″ x 5-1/4″, scrap for berries; Powder Pink: embossed mat 3-3/4″ x 5-1/2″, inside liner 3-3/4″ x 5″; Whisper White: rose spray 3-1/2″ x 5″, sentiment 2″ x 3″

Product List