Uncategorized

Stampin’ Up! Poppy Moments Thank You

Here we are again for a Happy Inkin’ Thursday Blog Hop! The weeks just keep rolling around in spite of hurricanes, wildfires and Covid19! I hope all of you are out of harms way and well. If not, my prayers are for things to quickly improve. The farmers in my neighborhood have started their harvest, but it isn’t in full swing yet. OK, enough chatting, on with the hop.

Today we have a color challenge, where we are given 5 colors and have to use a minimum of three of them. I have to say, this one was really a challenge for me. I struggled with what to do and changed my mind at least 3 times. As I write this, I still have a little time, so might change it again! Here are the colors.

They didn’t really ‘speak’ to me like some colors do, so it was a struggle as to which 3 to use. In the end, I used all five.

I have the Painted Poppies stamp and the Poppy Moments dies, but I wasn’t sure what to do with them. I guess the poppies came to mind because most poppies are orange, and Cajun Craze is sort of orange. And, Pretty Peacock is sort of green, so that became the leaves.

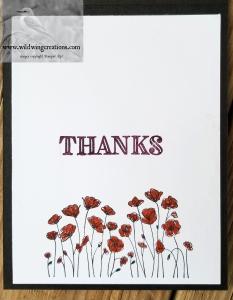
Here is my card and how I made it.

The card base is Basic Black. I double matted, meaning there are 2 layers under the card front piece, Whisper White on Basic Black and Blackberry Bliss on the Whisper White.

My card front is Whisper White, embossed with the Pinewood Planks 3D embossing folder.

Using the dies from Poppy Moments, from Pretty Peacock I cut 2 branched leaves, 2 detailed branch leaves, 2 large leaves, and 2 large leaf details. These are adhered with Liquid  Glue.

The large poppy was cut from Cajun Craze twice, and the detail twice. I only cut one of the smaller poppy and its detail once as well. Liquid Glue adhered the detail to the poppy base. I also cut the appropriate poppy centers from Basic Black.

Now to assemble the front. I did a dry fit, then, when all was as I wanted it, I used Liquid Glue to attach the leaves to the embossed Whisper White. To add a little more dimension, I very carefully curled the poppies with my bone folder. Not too much, as I was afraid of tearing the details. The top most poppy was adhered just with a little Liquid Glue in the center, leaving the edges of the petals free.

The other large poppy was adhered below it with a couple of Stampin’ Dimensionals. The smaller one was also adhered with Stampin’ Dimensionals.

The sentiment is from Ornate Thanks and is stamped in Blackberry Bliss on Whisper White. The Paper Trimmer cut it to the perfect size, then I mounted it on a mat of Pretty Peacock. In hindisght, perhaps I should have stamped it in Pretty Peacock and matted it in Blackberry Bliss since the main mat is Blackberry Bliss. You can do as you like.

For the inside liner, I stamped the sentiment, also from Ornate Thanks, in Blackberry Bliss on Whisper White card stock. The field of poppies from Painted Poppies was stamped in Memento Tuxedo Black and colored with my Cajun Craze Stampin’ Write Marker. I deliberately did not color them perfectly, leaving some white area to make it look a bit more rustic. I like this little field of poppies. The liner was directly adhered to the card base with Liquid Glue. I decided not to mat the liner.

The envelopes had to have some decoration too, as I do not like naked envelopes. Again, the poppy field was perfect for the envelope, both front and flap.

Now that you have seen what I did with the challenge, click on the ‘NEXT’ button to see what Amy has for you, or click on any name to go directly to her blog. Thanks for stopping by. Comment below. Also, the products used and card cuts are below the names.

If you don’t have a demonstrator, I would be happy to fill that role for you.

Amy Koenders

Mary Deatherage

Kristi Gray

Jaimie Babarczy/

Sue Prather

Karen Finkle

Akiko Sudano

Karen Ksenzakovic

Julie Johnston – You are here

CARD CUTS

Basic Black: card base 4 1/4″ x 11″ scored at 5 1/2″, scrap for flower centers, approx 2″ x 2″;

Whisper White: front mat 4 1/8″ x 5 3/8″, embossed front 3 7/8″ x 5 1/8″, inside liner 4″ x 5 1/4″, front sentiment scrap cut to size, in this instance 1/2″ x 2 7/8″

Blackberry Bliss: front mat 4″ x 5 1/4″

Cajun Craze: poppies one piece about 4″x 5″ will do all the flowers and details, or you can use up scraps.

Pretty Peacock: leaves 2″ x 6″ , sentiment mat 9/16″ x 2 15/16″


Product List

autumn, Uncategorized

Stampin’ Up! Gathered Leaves and Gratitude

Good Saturday morning, Folks! I hope your weekend is off to a good start. So much to do, so little time! And, it seems to move more quickly with each passing day. Make the most of YOUR time!

Today’s card uses several stamp sets to accomplish a different autumn look. My card base is Cajun Craze, which has to be my go-to color for fall. To this I adhered a Grapefruit Grove mat with a panel of Come to Gather Designer Series Paper.

4

I knew I wanted to use copper on this card, so proceeded to stamp the small leaves from To Every Season  in Versamark ink, after rubbing my Embossing Buddy over the whole panel. I do this so there won’t be little bits of copper where I don’t want them. I then added the Copper Stampin’ Emboss Powder and set it with my heat gun.

Next, I stamped the large leaf from Gather Together in Cajun Craze, and cut it out using the matching die from Gathered Leaves. I also cut one from a Post-It note to use as a mask, anticipating that I might need a mask.

I thought the wheat from Gather Together would be a nice autumn touch, so I stamped it in Soft Suede ink on Soft Suede card stock. I am not sure this was the best choice, but I didn’t make that decision until I had already glued it onto my card front, so there the wheat stays. By the way, these were fussy cut.

1

I inked one of the cut-and-emboss dies from Gathered Leaves in Versamark ink, then cut and embossed it on a scrap of Cajun Craze. I then heat embossed it for a different look. I also cut two leaves using the cut-and-emboss dies from Gathered Leaves from Copper foil.

The sentiment, from Day of Thanks is stamped in Cajun Craze on Grapefruit Grove, then die cut using one of the Stitched Nested Labels dies. This was adhered to my card front with Liquid Glue.

Next up is the dry arrangement of the wheat and leaves. The large leaf and wheat are fixed on the card front with Liquid Glue. Stampin’ Dimensionals were used to adhere the coppery leaves. A final touch was the Linen Thread bow, which is attached with a Glue Dot.

On the inside, I simply stamped more of the small leaves from To Every Season, and heat embossed them in Copper Stampin’ Emboss Powder. I left the rest blank so I could write a personal note.

5

The envelope got a strip of the Come To Gather Designer Series Paper on the flap and more of the leaves stamped on the front.

3

I started the front design by stamping the large leaf in Cajun Craze, letting it run off the edges. Here is where my fore-thought in making a mask came in handy. I used it to cover my stamped image, then stamped the wheat and some of those small leaves. The Wheat was stamped in Soft Suede and the little leaves in Versamark. They were then also heat embossed in Copper.

2

I hope you enjoy my card. The Grapefruit Grove is a departure from my usual autumn color scheme, but I think it is good.

Please leave comments below.

Back by popular demand: Designer Series Paper sale. BUT YOU NEED TO HURRY as this sale ends Monday. To order, just click on the bird image that says ‘Shop with me’.

buy 3 get 1 DSP

Here are the details:

  • All order types qualify for this promotion.
  • Only Designer Series Papers listed in the table below qualify for this promotion. You may mix and match papers from any of the listed papers.
  • There is no limit to how many times participants can buy three packages of Designer Series Paper, and get one free during this sale.
  • As you order online, when three qualifying Designer Series Paper packs are entered, a prompt to add a free Designer Series Paper will appear.
  • In the online store, if you order four packages of the same qualifying Designer Series Paper, you’ll need to enter three together and then order the fourth free item separately.
  • Designer Series Paper ordered as part of a Starter Kit does not qualify for this sale.
  • Designer Series Paper ordered with Stampin’ Rewards does not qualify for this sale.

Buy-3-Get-1-DSP-Chart

Product List

Uncategorized

Stampin’ Up! Buffalo Check Plaid for Happy Inkin’ Thursday Blog Hop

Blog hop headerToday for our weekly Thursday Inkin’ Krew Blog Hop, I chose to use the color challenge colors to make a plaid using the Buffalo Check background stamp. Here are our colors.

oct 4 challenge

My friend Mary did a video tutorial on making plaid with the Buffalo Check background stamp. To watch her video, go here. She inspired me to make my own plaid. Here is the plaid I created and the card on which I used it.

4

Now, I love plaid. Always have, always will. I think today’s colors lend themselves well to plaid for a masculine birthday card, so let’s get on with it shall we?

It took a couple of tries to get the look I wanted in the end, but I really like this look. I stamped the Buffalo Check in Cajun Craze on Very Vanilla, then added the stripes in Old Olive and Blackberry Bliss. There are many kinds of plaids out there, so don’t be afraid to experiment a bit. It is only paper! I used my dark Stampin’ Blends marker (brush end) for the wide stripes and the Blackberry Bliss Stampin’ Write Marker bullet end for the finer lines.

My plaid panel was adhered to a Blackberry Bliss mat with Liquid Glue. A strip of Burlap Ribbon was wrapped around these panels and taped to the back.

This became the background for the Pleasant Pheasant stamp, stamped in Cajun Craze on Very Vanilla. I colored this in with the challenge colors plus some crushed curry. And I didn’t like it. AT ALL! It went to file 13! Guess I need practice in coloring. Back to Kindergarten folks!

The one I used is just stamped in Cajun Craze and the grasses colored with my Old Olive Stampin’ Write Marker. I cut the image with the largest Stitched Shapes Circle die. This is Liquid Glued to a Copper Foil scalloped circle, cut with the largest Layering Circles Scalloped die.

Several Stampin’ Dimensionals on the back allowed me to wind some Copper Metallic Thread around before adhering to the card front.

1

The sentiment is  from Sunshine Sayings and is stamped in Blackberry Bliss on Very Vanilla. I used the shaped die from Still Night to cut the sentiment, then used my Old Olive Stampin’ Write Marker to make the stitches. This is adhered to the card front with Liquid Glue. The whole was then applied to the Old Olive card base with Stampin’ Dimensionals.

On the inside, another image from Pleasant Pheasants, stamped in Cajun Craze after stamping off once, provides a background for the Blackberry Bliss sentiment from Special Celebrations on Very Vanilla card stock. A narrow strip trimmed from my plaid panel was adhered to the left side of the sentiment liner with Liquid Glue. The other three sides got more Old Olive Stampin’ Write Marker stitches.

5

This panel was Liquid Glued to a Blackberry Bliss mat and into the card base.

The envelope has another of the Pleasant Pheasant images on the front and more of the pheasants on the flap.

Please, hop on around to see what this talented team has for you today. By clicking on the ‘next’ button you will go to our team leader Amy’s blog. Enjoy!

Blog hop next button

Amy Koenders

Shelagh Freemantle

Mary Deatherage

Kristi Gray

Jaimie Babarczy

Sue Prather

Karen Finkle

Julie Johnston-you are here

The host code for October is EV7ETS99. When placing an order of $50-$149.99 from my online store, use this code to earn a free gift from me. For orders over $150, DO NOT USE THE HOST CODE, as this will nullify any rewards you earn from Stampin’ Up! You will still get your free gift from me. And, you will earn bird eggs. For complete details on customer rewards, go here.

You also are eligible for my online class tutorials if you place a (pre-tax and shipping) $50 order through my online store.

October-Online-Class-Collage

CARD CUTS: Old Olive: card base 5-1/2″ x 8-1/2″ scored at 4-1/4″; Blackberry Bliss: cut 2 mats 4″ x 5-1/4″; Very Vanilla: for plaid 4-1/2″ x 6″, inside sentiment 3-3/4″ x 5″, front circle 3-1/2″ x 3-1/2″, front sentiment 1-1/2″ x 3″; Copper Foil Sheets: scalloped circle 4″ x 4″

Product List

Uncategorized

Stampin’ Up! Pleasant Pheasants for Combined Thursday Blog Hop

joint blog hop header

Once again we are joining some Stampin’ Up! friends from north of the border (Canada, not Minnesota) for a combined Blog Hop. Lots of talent here folks, so come on along.

We usually have a choice (or you can use both) of a a sketch or a color challenge. For today we only have a sketch.

Aug 16 sketch

For my contribution, I chose the new (available September 5 in the Holiday catalog) Pleasant Pheasants stamp set. I used everything in the set EXCEPT for the pheasants! Next card, I promise. They are gorgeous.

wild wing creations-4

I began with a Cajun Craze card base. Next up, I added a Sahara Sand mat, which I ran through the Big Shot using the brand spankin’ new Tin Tile Dynamic Textured Embossing Folder. Gotta love this TIEF! Reminds me of the old tin ceilings, with which I am enamored. To distress it, I used a TINY bit of Soft Suede ink on my Stampin’ Sponge (cut into sixths) and sponged over the highlights.

This embossing folder will be available to you on September 5 in the Holiday catalog. It is part of the Country Lane Suite of products. I am told that if you mist your card stock with water before embossing, that it makes a deeper impression. I did not do that for this card.

I wrapped a length of Copper Metallic Thread around this panel three times, taping it on the back. This panel was then adhered to my card base with some Liquid Glue.

A scrap from Sahara Sand was stamped with the leaf border in Cajun Craze. I then fussy cut with my Paper Snips Scissors along one side, not too precisely, but enough to make a nice edge. Using what ink was left in the sponge, I sponged this edge too, to take off the ‘newness’ of it. This was Liquid Glued to the back side of a Mossy Meadow square.

wild wing creations-1

A smaller square of Sahara Sand was sponged around the edges, again without re-inking my sponge. The ole wooden bucket of pumpkins was stamped in the corner with Soft Suede. I used my Blender Pen to sort of blend in the brown on the bucket, then used Pumpkin Pie, Crushed Curry and Mossy Meadow Stampin’ Write Markers to color it.

The Embossing Buddy was wiped over this square before I stamped the sentiment in Versamark ink, to keep the Copper Embossing Powder from sticking where I didn’t want it. I heat set it with my heat tool, then Liquid Glued this square to the Mossy Meadow square. Stampin’ Dimensionals adhere it to the card base and tin tile mat.

The copper thread is HARD to maneuver into a bow, so I wrapped it around 3 fingers a few times, pinched and twisted it in the middle, then used a glue dot to hold it together. This stuff has a mind of its own and wants to spring away if you don’t control it. The glue dot does a fine job of this. I then could wrap another piece around the bow and tie it to secure it firmly. The glue dot holds it in place on the card.

Card front: Done

wild wing creations-5

On the inside I again sponged the Sahara Sand panel very lightly with Soft Suede, then stamped the image and sentiment in Soft Suede also. The Blender Pen softens the wooden wheelbarrow and some Pumpkin Pie Stampin’ Write Marker colored the pumpkins. A bit of Mossy Meadow for the grass and this panel is ready to Liquid Glue to the Mossy Meadow mat and into the card base.

For the envelope, I dry embossed the flap of a Medium Very Vanilla Envelope with the Tin Tile TIEF and stamped the wheelbarrow on the front in Soft Suede.

I hope you like this card. I have several Thanksgiving cards to make, and this Pleasant Pheasant stamp set will get used a lot.

Now, on with the hop! You know the drill. Click the button or each name to continue. And, don’t forget to leave your comments. Thank you for hopping with us.

Blog hop next button

Julie Johnston: You are here

Don’t forget Bonus Days. For every $50 (before taxes and shipping) you spend by the end of August, you earn a  $5 coupon to spend in September.

08-01-18_bonus-days_demo-main_en

08.01.18_BONUS-DAYS_CUSTOMER-FAQ_NAEN

CARD CUTS: Cajun Craze: 5-1/2″ x 8-1/2″, scored at 4-1/4″; Sahara Sand: panel to emboss 4″ x 5-1/4″, front sentiment 3-1/4″ x 3-1/4″, inside liner 3-1/2″ x 4-3/4″, leaf border 1″ x 4″; Mossy Meadow: front 3-1/2″ x 3-1/2″, inside mat 3-3/4″ x 5″

Product List

Uncategorized

Fall Sympathy card

Well, folks, here it is Sunday and I actually had time to finish helping yesterday with the pancake feed and get home to work on this post. We served over 1,800 pancake and sausage  breakfasts. Though the tent was still up, things were pretty much torn down when I left. With what remained to be done, I figured I would be more in the way than I would be help. I think all us Kiwanians were tired to the bone, but the day was a success.

This is the second iteration of this card. The first one had REAL twigs framing the oak tree. I really liked it and thought I was being pretty smart in thinking of that. Then, I thought, “that isn’t so smart. How will that fit in an envelope, never mind get through the mail without being ruined. ” So, I opted for the twigs from the Seasonal Layers thinlits, cut from Early Espresso card stock. However, the first one will be saved to use on a gift package for someone, or whatever use I can find for it.

wild wing creations4

I started with a piece of Sahara Sand and ran it through the Big Shot with the Pinewood Planks dynamic embossing folder. From this I cut a rectangle, using the Layering Squares framelits. To cut a rectangle with a square die, all you need to do is cut one square at one end of your panel, slide it toward the other end, keeping the die lined up, and cut the other end of your rectangle.

Then, cutting a piece of Sahara Sand slightly smaller than the embossed piece, I stamped this with the oak tree from Lovely As A Tree in Early Espresso. These two panels were liquid glued together.

The card base is Early Espresso, and the next two layers are Sahara Sand and a panel from the Painted Autumn Designer Paper Series. The mat and DSP panel are liquid glued together.

Four branches from the Seasonal Layers thinlits in Early Espresso form the frame around the rectangle. Seasonal Layers and Colorful Seasons form a bundle that saves you 10% over purchasing them separately.

Since I was not using real twigs, I decided to cut four more out of fun foam to lift them off the page and give some dimension. After gluing them together with their card stock counterpart, I dry arranged them on the card front. I didn’t want four look-alike branches, so each was trimmed in a different way and liquid glued to the art panel. This, in turn, was added to the DSP panel with Stampin’ Dimensionals.

wild wing creations6

At this point in the construction, I decided a little fall color would be good, so I stamped the oak leaf cluster from Lovely As A Tree, and the one with the acorns from Count My Blessings, both in Early Espresso. I already had my heat gun and tub of Clear Emboss Powder ready. As soon as I stamped, I dipped it in the emboss powder, shook it off and heat embossed those leaves. I only did one cluster at a time, as the Early Espresso dries much more quickly than the Versamark.

Since the embossing acts as a resist, it was a simple matter to use a small piece of sponge and sponge the leaves with Cajun Craze, Crushed Curry and Pumpkin Pie, first masking off the acorns. I then masked off the leaves with a piece of Post-it-Note and sponged the acorns in Soft Suede.

Both leaf clusters were fussy cut, then adhered to the corners of the branch frame with Stampin’ Dimensionals. This art panel was then adhered with Stampin’ Dimensionals to the DSP panel.

wild wing creations1

Sometimes I don’t know when to quit. I wrapped a piece of fine, lightweight jute twine I had in my craft room (you could use Linen Thread) around the panel 3 times, securing it on the back with tape. Glue Dots hold the 3 strands together as though they are tied, and a bow is Glue Dotted over this. The bow is made by wrapping the twine around 3 fingers 5 times (or as many times as you want) and tied in the middle.

Now all that remains is the sentiment. I wanted it to look like an old board. The sentiment, in Early Espresso, was stamped from the Teeny Tiny Wishes stamp set on a scrap of the embossed Sahara Sand (made when I cut the rectangle). This was fussy cut to, perhaps, look like an old board. The mat for this was another scrap, this time from the Wood Textures DSP, with notches cut unevenly in both ends with my Paper Snips. Mini-Stampin’ Dimensionals attach the sign to the mat, and Stampin’ Dimensionals were used for the mat to the front panel. After it was too late to do so, I wondered if this card would have been improved had I very lightly distressed the embossed wood, perhaps by sponging some ink over it. However, I didn’t, so maybe that technique will get a chance on another card.

More Stampin’ Dimensionals (Wow! Wish I had stock in the company that makes these!) adhered the finished panel to the card base and the card front is done.

The inside boasts a mat of Sahara Sand with a panel of the same Autumn Harvest DSP liquid glued to it.

wild wing creations5

I cut a much smaller mat of Sahara Sand, and stamped the branches from Colorful Seasons around it as a frame in Early Espresso. The Oak Cluster from Count My Blessings was stamped in the corner in Soft Suede, and colored in using the stamp pad lid and Blender Pen. In the closed position, squeeze the stamp pad to get some of the ink on the lid, then use that as your palette with your Blender Pen to paint the leaves and acorns. I again used Cajun Craze, Crushed Curry and Pumpkin Pie for the leaves, and Soft Suede for the acorns.

The sentiment, in Early Espresso, is from the Thoughts and Prayers stamp set. This panel was liquid glued on the DSP and into the card base.

To coordinate the envelope with the card, I stamped several of the oak/acorn cluster along the bottom of the front, and adhered a final piece of the DSP to the flap.

I hope you enjoy this card. I think it is lovely and sure to lift anyone’s spirits. To me, the oak is symbolic of longevity. We all know that longevity on this earth is not forever, but the spirit lives on, making the oak appropriate for a sympathy card.

HOST CODE for September 16-30 is NB7HX2ST

If you apply that Host Code to your online orders under $150, you’ll get a free gift from me. If your order is over $150, please don’t apply the hostess code (you’ll miss out on your own Stampin’ Rewards/Hostess $$ if you use it), but you’ll still get the free gift, too!

Wild Wing Creations Bird Egg Rewards:

Bird Egg Rewards

Qualify to earn FREE Stampin’ Up! product from ANY current Stampin’ Up! catalog or promotion!  The Wild Wing Creations Bird Eggs Rewards Program is my way of personally saying “thank you” to my returning customers.

For details on both rewards, and the free tutorials, click here.

September Card Class Tutorials

septembercollage

With a $50 order placed through my online store in September, you get my Painted Harvest Class Tutorials. You also earn Bird Egg Reward Points (see the information below) and if you apply the Host Code or have an order of over $150, you get the free thank you gift too!!

Card Cuts: Early Espresso: card base 7″ x 10″ scored at 5″, branches 2 pieces 1-1/2″ x 8-1/2″; Sahara Sand: inside mat and outside mat (2) 4-3/4″ x 6-3/4″, embossed panel 3-3/4″ x 5-3/4″, oak tree panel 3-1/2″ c 5-1/4″, inside panel 3-1/2″ x 5″, sentiment ‘sign’ scrap from inside rectangle of embossed piece, for oak leaves 4″ x 4″; Autumn Harvest Designer Series Paper: front panel and inside mat (2) 4-1/2″ x 6-1/2″; Wood Textures Designer Series Paper: mat for sentiment 1″ x 2-1/2″

Non Stampin’ Up! products used in this project: Fun Foam, thin jute twine, Kraft 5-1/4″ x 7-1/4″ envelope

Product List


Product List

Uncategorized

Sneak Peek Painted Harvest Card Revealed!

Hey All! I hope you are having a good day. To all of you who may get to read this who are facing the clean-up from Irma, Harvey or wildfires, God Bless You All. I cannot imagine the heart-rending pain and the physical labor you face.

Yesterday I posted some gift tags attached to jars of canned goods. These are for the friend who gave me the excess produce from their garden. I canned vegetables for soup and my own version of vegetable juice cocktail. They will get a jar of each with a pretty tag.

Not only did they give the the produce, they picked it! I am blessed.

The card for today goes along with the jars and tags.wild wing creations3

I began with a Very Vanilla card base. The mat is Cajun Craze and the art panel background is from the Painted Autumn Designer Series Paper. This paper is beautiful.

I liquid glued this panel to the Cajun Craze, then wrapped a length of Burlap Ribbon around and taped it on the back. A little liquid glue adhered the ribbon to the front.

Using the Everyday Label punch, I punched, surprise! A label! in Very Vanilla. Using a Sponge Dabber I inked the edges with a little Chocolate Chip, leaving it pretty pale in the center. The sentiment is from Painted Harvest and is in stamped-off-once Chocolate Chip. This was attached over the ribbon with Stampin’ Dimensionals.

A leaf from Painted Harvest was stamped in Lemon Lime Twist and the second stamp (this is a two step leaf) in Always Artichoke. This was punched out using the matching leaf punch and adhered with Glue Dots, as was the Linen Thread double bow.

wild wing creations5

The sunflower, also a two-step stamp in Painted Harvest, was stamped first in Crushed Curry, then the second stamp in Cajun Craze on Very Vanilla card stock. Remember, this matches what I did yesterday with the gift tags. I made a mask of the flower by stamping it on a post-it-note, then fussy cut it. This was placed over the stamped image. Then I stamped two leaves over this in Lemon Lime Twist and Always Artichoke.

Now for the fun part….fussy cutting. Some people like it, some don’t. When there is no die or punch, there is no other alternative if you want it cut out. After the flower and leaves were cut, all in one piece, I adhered it to the DSP panel with Stampin’ Dimensionals and the whole panel was attached to the card base, also with Stampin’ Dimensionals.

For the inside,  I stamped the sunflower and two leaves in the lower left corner, using the same colors and technique as for the one I fussy cut on the front. The upper right corner was stamped with two more of the leaves.wild wing creations4

The sentiment is from Painted Harvest also, and stamped in Chocolate Chip, stamped off once. You just have to love this set! I have seen this flower stamped in greens, pinks, even purple and pink! All are lovely. However, for this card, I was going for an autumn look and wanted to match my previously made gift tags.

To finish this set, I stamped another flower and leaves on the front of a medium Very Vanilla Envelope, wild wing creations1

and used more of the Painted Autumn DSP on the flap.

wild wing creations2

This finishes a fun set to give to a dear friend.

I would be happy to be your demonstrator if you do not already have one. To order from me, just click on the ‘shop online’ button at right.

HOST CODE good through tomorrow EAJGJ9ND

If you apply that Hostess Code to your online orders under $150, you’ll get a free gift from me. If your order is over $150, please don’t apply the hostess code (you’ll miss out on your own Stampin’ Rewards/Hostess $$ if you use it), but you’ll still get the free gift, too!

Wild Wing Creations Bird Egg Rewards:

Bird Egg Rewards

Qualify to earn FREE Stampin’ Up! product from ANY current Stampin’ Up! catalog or promotion!  The Wild Wing Creations Bird Eggs Rewards Program is my way of personally saying “thank you” to my returning customers.

For details on rewards, click here.

September Card Class Tutorials

septembercollage

With a $50 order placed through my online store in September, you get my Painted Harvest Class Tutorials. You also earn Bird Egg Reward Points (see the information below) and if you apply the Host Code or have an order of over $150, you get the free thank you gift too!!

Card Cuts: Very Vanilla: card base 4-1/4″ x 11″, sentiment label 2″ x3″, fussy cut flower and punched leaf 3″ x 4-1/2″; Cajun Craze: 4″ x 5-1/4″; Autumn Harvest DSP: 3-7/8″ x 5-1/8″.

Product List

Save

Save