Uncategorized

Stampin’ Up Wood Textures Birthday

Good Sunday Morning All

Today is supposed to be another beautiful day, so after church I am going out with camera to see what goodies I can find. In the meantime, I want to share a card with you that I first found on Pinterest. I went to Su Mohr’s blog, https://aromasandart.com/lovely-as-a-tree/, and since it uses a couple of my favorites, I thought I would CASE for my nephew’s birthday.

wild wing creations-1

I am definitely going to play around with this idea some more, so who knows what may be in the future!

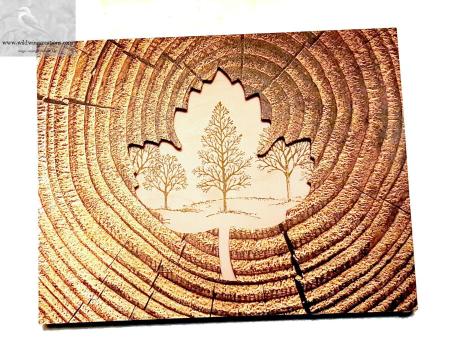
For starters, I made the card base from Early Espresso, then, with sheets from the Wood Textures Designer Series Paper Stack, I proceeded to make the card front.

I cut the top piece to 4-1/4″ x 5-1/4″, then centered the leaf from Leaflets Framelits and ran it through the Big Shot. On a sheet of the plainer wood grain sheets from Wood Textures, I stamped the image from Lovely as a Tree in Soft Suede. These two pieces were adhered together with Foam Adhesive Strips, then to the card base with Liquid Glue. I placed the Foam Strips very close to the edges of the back of the tree rings, and around the leaf. Since I didn’t like the look of the white edges of the foam, I used my Early Espresso Stampin’ Write Marker to color them.

This completes the card front. Easy Peasy.

wild wing creations-1

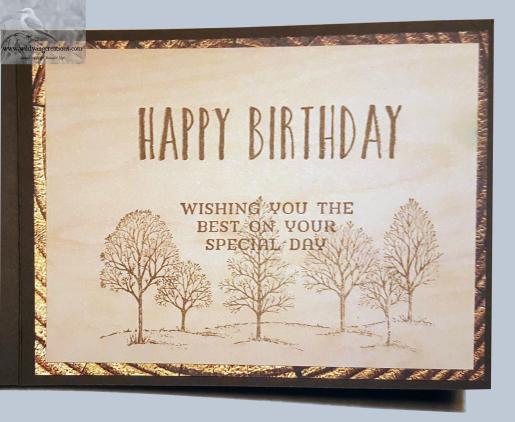
For the inside, I used the tree rings paper for a mat, then stamped my sentiment and the Lovely as a Tree image on a plainer  wood grain panel. The sentiment is from Perennial Birthday and stamped in full strength Soft Suede. The trees were stamped off once before stamping on the liner panel. I used my Stamp-A-Ma-Jig to line up the sentiments. All were adhered with Liquid Glue.

On the envelope, never to be naked, I again stamped the Lovely as a Tree image on the front in Soft Sued, and used more of the tree rings DSP on the flap.

This card is quick and simple, yet, I think it is lovely. Try one for yourself.

The current HOST CODE, good through March 15 is UJWYGVQJ

Use this code when placing your order through my website for a free gift. Details can be found on the customer rewards page.

If you don’t have a demonstrator, and need supplies, just click on the Shop Online button at right. Be sure to check out the rewards page to receive free goodies.

Cuts: Early Espresso: 4-1/4″ x 11″ scored at 5-1/2″; Wood Textures Designer Series Paper Stack: tree rings die cut 4-1/4″ x 5-1/2″, tree rings mat 4″ x 5-1/4″, plain (front) 4″ x 5-1/4″, plain (inside) 3-3/4″ x 5″

Product List

Uncategorized

Thankful

Good Thursday morning to you all. And a very Blessed and Happy Thanksgiving as well. The turkey is done, the ham balls also. The pies are ready to go in the oven. I still have a little picking up and the vacuuming to do, but otherwise I think I will be ready for my company when they arrive.

Today’s card is a thank you to all of you who follow me. I appreciate every one of you so very much.

front

I am thankful, and grateful for all I have been given by the Good Lord. Blessings abound, even in the time of uncertainty or trouble.

I began my card with an Early Espresso card base. Then I chose one of the Wood Textures DSP for the art piece. Into this I die cut three leaves using the Thinlit from the Colorful Seasons Bundle I love this little leaf and use it often.

Using the same die, I cut three leaves from Copper Foil Sheets. Setting this aside for the moment, I sponged a piece of Very Vanilla card stock with Crushed Curry, Cajun Craze, Old Olive, Pumpkin Pie and Elegant Eggplant. This was adhered with liquid glue to the back of the Wood Textures DSP. The Precision Base Plate is a great advantage when cutting this detailed die, or for any intricately detailed die.

Also using Liquid Glue, I adhered the copper leaves into the negative space of the Wood Textures panel. This panel is Liquid Glued to a Pumpkin Pie mat.

Using Linen Thread, I wrapped it three times around the left side of the card front, taping it on the back. I did a ‘three times around three fingers’ bow and tied it to the wrapped strands. A glue dot for extra holding power keeps it in place.

front angled

The sentiment is from the Paisleys and Posies stamp set, stamped in Versamark on a light colored Wood Textures DSP and heat embossed in Copper Stampin’ Emboss Powder. Before adding Versamark and embossing powder, rub your piece with the Emboss Buddy. This prevents embossing powder from straying off the Versamark and all over your paper. The ends were cut with the Triple Banner Punch and the banner attached with Stampin’ Dimensionals.

The completed front is adhered to the card base with Stampin’ Dimensionals.

The inside is a panel of Very Vanilla stamped all over with the leaf stamp from Colorful Seasons. I used Cajun Craze,  and Crushed Curry with some stamped full strength and some by continuing to stamp without re-inking. inside

The sentiment is also from Paisleys and Posies and is stamped in Early Espresso. My world is truly brighter because of each of you!  Thank you. This was adhered to a Pumpkin Pie mat and into the card base.

I did not have time to do the envelope which will probably have leaves stamped on the front and some Wood Texures DSP on the flap, unless I decide to stamp more of the lovely leaves!

Card Cuts: Early Espresso: 4-1/4″ x 11″ scored at 5-1/2″; Pumpkin Pie: front mat 4-1/8″ x 5-3/8″, inside mat 4-1/8″ x 5-3/8″; Very Vanilla: sponged piece3-7/8″ x 5-1/8″ inside liner 3-7/8″ x 5-3/8″; Wood Textures DSP: dark for front 3-7/8″ x 5-1/8″ light for sentiment 2″ x 4″
Product List

Uncategorized

Stampin’ Up! Masculine Card

Alas, there aren’t very many choices for cards for the masculine gender. For this card I used the retired Build It framelits and Nailed It stamp set. The card is for a guy who likes to do woodworking, so it is appropriate for him.

My card base is Tranquil Tide with a panel of woodgrain paper from the Wood Textures DSP. It is not embossed this time, though I really like the look that embossing gives.

front

I used the largest square in the Stitched Shapes framelits to cut the mat from Tranquil Tide. The next size square die cut the logs paper, also from Wood Textures DSP. Both pieces are adhered with liquid glue.

The hammer handle is stamped with the Build It stamp in Early Espresso and cut with the Build It framelits. Do they even make hammer handles in wood anymore? I guess I am dating myself. The hammer head is stamped in Basic Black and dried with my heat tool. The paper for it was a scrap of some sort of metallic looking paper I found in my stash. The ruler along the left edge is cut from the same scrap. I like this because it has a dull finish, not shiny like foil. Basic Gray would probably work just as well.

The nails are stamped in Basic Black on the wood grain panel. I wrapped some thin jute twine around three times and taped it on the back. I think Linen Thread would work as well, but I couldn’t find it today. I made a loopy bow by wrapping around three fingers four times. Then I cut a short piece of twine and wrapped it around the middle three time and tied it in the back. This was adhered using a glue dot.

The Happy Birthday thinlit cut the greeting 3 times; once in brown fun foam, once in Crumb Cake and once in Tranquil Tide. I offset the Tranquil Tide a bit to allow the ‘shadow’ of the Crumb Cake to show. I used an adhesive sheet on the foam to adhere it to the cardstock greeting. I didn’t want to mess with cutting little pieces of Stampin’ Dimensionals to lift the greeting off the panel. I think the foam works really well. The biggest issue is getting everything lined up correctly before it sticks for good! The greeting is then adhered to the panel with liquid glue.

The hammer is adhered to the squares with Stampin’ Dimensionals.

detail6.jpg

On the inside another piece of Wood Textures DSP is the mat for the sentiment. I randomly stamped some nails in Early Espresso here. The Sentiment is from Beautiful You and is stamped in Early Espresso on Very Vanilla. This is liquid glued to a scrap of previously dry embossed darker wood grain from Wood Textures. I find myself using this paper stack a lot. I just wish there were more pieces of the shabby chic worn white. I think I have used all of it. But I digress.

I stamped the nails next to the sentiment and punched holes with a hand held 1/8″ punch to hold the metal brads. This sentiment piece is adhered with Stampin’ Dimensionals.

inside

The envelope has an Early Espresso hammer and a few nails on the front. The flap is covererd in a piece of the Wood Textures DSP and stamped with a few nails in Early Espresso.

This was a fun card. If you like it, or, if you don’t, please leave a comment.

Thank you for stopping by!

If you like to make cards, or want to learn, and don’t have a demonstrator, I would be happy for you to order using the Shop Online button at right. There are many great products and oh, so many ways to use them. They are not just for cards, though that is usually my focus.

I’ve added a Hostess Code to the bottom of my daily posts. If you apply that Hostess Code to your online orders under $150, you’ll get a free gift from me. If your order is over $150, please don’t apply the hostess code (you’ll miss out on your own Stampin’ Rewards/Hostess $$ if you use it), but you’ll still get the free gift, too!o many ways to use them. For details, go here.

Wild Wing Creations Bird Egg Rewards:

Bird Egg Rewards

Qualify to earn FREE Stampin’ Up! product from ANY current Stampin’ Up! catalog or promotion!  The Wild Wing Creations Bird Eggs Rewards Program is my way of personally saying “thank you” to my returning customers.

Card Cuts: Tranquil Tide: card base 5-1/2″ x 8-1/2″ scored at 4-1/4″, Greeting 3-1/2/” x 4″, large square 2-3/4″ x 2-3//4″, Wood Textures DSP: front mat and inside mat 4′ x 5-1/4″, hammer handle, scrap 3/4″ x 2″, small square 2-3/8″ x 2-3/8″, inside sentiment mat 1-1/4″ x 3-3/4″; Very Vanilla: inside sentiment 1″ x 3-1/2″; Metallic paper: ruler1/2″ x 5-1/2″, hammer head 1-1/2″ x 2-1/2″; Crumb Cake: Greeting 3-1/2″ x 4″

Non Stampin’ Up! products used: metallic paper, brads, fine jute twine, fun foam

Product List