

Good Tuesday Everyone! What a weekend we had, rain, rain and more rain. My farm has had more rain in the past 3 weeks than in all of June, July, August and the first 2 weeks of September. I wanted to mow one last time, but that may not happen. Oh, well!
Today several of the talented members on Amy’s Inkin’ Krew are hopping, so let’s get on with it. Our theme is “Give Thanks”, and here is what I created. I just love the Tin Tile Dynamic Textured Embossing Folder (DTIEF), and chose to do it in Copper Foil Sheets.
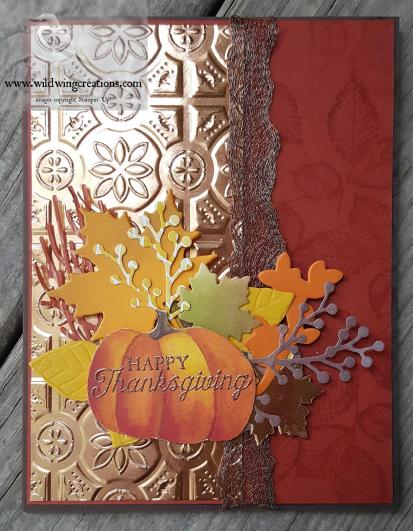
Making the embossed copper was the first step. Next I used Versalmark ink to stamp the three leaf image from the Rooted in Nature bundle all over a panel of Cajun Craze.The Copper panel was adhered to this mat with Liquid Glue.
I pulled out some of the 1/4″ Copper Trim and stretched it wider, then covered the seam with it. I used a strip of Tear and Tape to make sure it stayed put, then wrapped it over the back and secured it with tape. This was adhered onto the Early Espresso card base with Liquid glue.
Now for the fun. I first cut all the pieces I needed for the collage as follows using dies from: Winter Woods Bundle-the bare tree cut from a piece of Nature’s Roots DSP; First Frost Bundle- berry branch (2) one from Wood Textures and one from Country Lane DSP; Rooted in Nature Bundle – triple leaf (embossed and die cut) (2) from Crushed Curry, and a Pumpkin Pie leafy branch; Seasonal Layers – large leaf from a previous endeavor of Grapefruit Grove sponged with Old Olive, and 2 small leaves, one from a previously sponged panel from another project and one from Copper Foil Sheets.

All of this was dry arranged on an oval using the #3 die from layering ovals (numbered from smallest to largest) cut from a scrap of Wood Textures DSP. When I was satisfied with the look, everything was adhered using Liquid Glue. Stampin’ Dimensionals on the back lift it off the front a bit.
To finish this art collage, I fussy cut one of the pumpkins from Toil and Trouble DSP, used Liquid Glue to adhere it to a scrap of Pumpkin Pie and fussy cut again. I didn’t want to use more Stampin’ Dimensionals, but didn’t want it flat either.
The sentiment is from the Pleasant Pheasant stamp set. After rubbing my Embossing Buddy over the pumpkin, it was stamped in Versamark, then heat embossed with Copper Stampin’ Emboss Powder. To add more dimension though, I used my stylus from the Simply Scored Scoring Tool to enhance the grooves in the pumpkin. Liquid Glue used again here to attach it over the leaves. That finished the front.
On the inside, I stamped the berry branch from Frosted Floral in Crumb Cake, twice, on a panel of Crushed Curry. Over this I rubbed my Embossing Buddy, then stamped the other sentiment from Pleasant Pheasant in Versamark. This was then heat embossed in Copper Embossing Powder. Liquid Glue adhered this panel to a mat of Cajun Craze and into the card base.

Card done!
The envelope front has a pair of the Rooted in Nature triple leaves stamped in Versamark and heat embossed with Copper Embossing Powder.
For the flap, I used the watermark treatment on a panel of Cajun Craze using Versamark ink and the triple leaf stamp from Rooted in Nature. Liquid Glue was used to adhere this to the flap.  I hope you enjoy this card. I seldom repeat a card, but this one might be the exception.
Only one question: Do you prefer a down and dirty quick blog post, or one that gives instruction, as this post does? Please, leave comments below.
To proceed with the hop, just click on either button to go forward to the very creative Karen, or in reverse to see what our talented leader Amy has done. Should you get lost, just click on any name to go to her blog.


- Julie Johnston – you are here
- Karen Finkle – https://karenscardkorner.blogspot.com/2018/10/stampin-up-painted-harvest-for-inkin.html
- Karen Ksenzakovic – https://wp.me/paaNf4-5i
- Jaimie Babarczy – https://wp.me/p79UhD-2a2
- Linda Richenberg – https://wp.me/p8GiKS-ub
- Connie Troyer – https://wp.me/p8xvI6-cG
- Shirley Gentry – https://stampinwithshirleyg.com/?p=2205
- Mary Deatherage – https://wp.me/p5snyt-6gA
- Sue Prather –https://wp.me/p5yitZ-JZ
- Aurora Lopez – https://craftystamperdesigns.com/?p=781
- Amy Koenders – https://wp.me/p2SFwf-c49
The host code for October is EV7ETS99
CARD CUTS: Early Espresso: card base 5-1/2″ x 8-1/2″ scored at 4-1/4″; Cajun Craze: front mat and inside mat (cut 2) 4-1/8″ x 5-3/8″; Crushed Curry: inside liner 4″ x 5-1/4″; Copper Foil Sheets: front embossed panel 2-1/2″ x 5-1/4″; Toil and Trouble Designer Series Paper: 3″ x 3″ or big enough to cut out a pumpkin. Other papers used are listed above
Product List


 Designer Series Paper")
 Designer Series Paper")


What a beautiful card Julie! Love the fall colors and images, perfect for Thanksgiving! Beautiful embossed copper panel too! 🙂
LikeLiked by 1 person
Thank you VERY much, Amy!
LikeLike
Beautiful card Julie, very creative! 🙂
LikeLike
Thank you, Aurora.
LikeLike
What a gorgeous card! I love all the details on it–using the stylus to give depth to the pumpkin is genius. I especially love reading all the details on how you did each leaf, twig and tree so a big thank you for not only the time invested in making the card, but for the strong instructions as well. It is a work of art!
LikeLike
Oh, my! Thank you so much Susan, for taking the time to give me the kind of feedback I need to continue doing what I do. I have wondered if the time spent giving instruction is wasted because folks would prefer just the basics. I so appreciate your comments!
LikeLike
Stunning card, Julie! I just got the DTIEF and will have to try this. Thanks for your gorgeous example!
LikeLike
Thank you so much, Connie! I have several ‘favorites’, but this tin tile DTIEF is pretty near the top of the list. I wanted to put a ‘tin’ ceiling in my kitchen, but haven’t done it…..yet. Just haven’t found the style I want. I think this embossing folder lends itself well to many styles of cards.
LikeLike
I love the tin ceilings too! And the folder is good for so many kinds of cards. I’m looking forward to playing with it.
LikeLike
You will find that you love using it.
LikeLiked by 1 person
Gorgeous card Julie. Absolutely love all your fall colors and the design.
LikeLike
Thank you Karen!
LikeLike
Wow – this is gorgeous! Love the tone-on-tone background and, of COURSE, the Tin Tile embossed copper. Wish it was on MY ceiling! 🙂
LikeLike
Thanks, Mary! Wonder how long it would take to do a ceiling with copper foil sheets and this DTIEF? 🙂
Appreciate your comments.
LikeLike
What a beautiful card! And I did like reading the details of how you made it. Thanks!
LikeLike
Why, thank you, Maryanne! I appreciate you taking the time to leave your comments. I guess I will continue to give instructions, as most who have commented say they like that.
LikeLike
A gorgeous card and wonderful instructions–keep them coming!
LikeLike
Thanks for stopping by Sharon, and thank you also for taking the time to give some feedback. Good to know you like the instruction.
LikeLike
You are definitely good at creating a collage. That is far from my strong suit. I totally agree with Susan K.’s comment AND your response. Very nicely done.
LikeLike
Thanks so much, Karen. appreciate the feedback.
LikeLike
I LOVE having instructions on how to make the cards!! A lot of times my poor little brain can’t figure out what all was done! I love this card!
LikeLike
Thank you so VERY much Lisa on answering my question. I like to tell how it is done, because when I see a card I like, I want to know how they made it. Appreciate your stopping by and your feedback.
LikeLike
WOW! Julie your card is so beautiful. I love that embossing folder and you have made it so gorgeous.
LikeLike
I appreciate your comments, Shirley. Thanks Much!
LikeLike
Julie, guess I missed your feedback question until I got on my laptop. I always enjoy reading your instructions, seems as if you are in the room. I know detailed instructions are good and sometimes I just do the short version, so thank you very much for taking the time to share.
LikeLike
That’s ok, Shirley. I did get several responses, so some people do read it I guess. Thanks for your input.
LikeLike
Beautifully done, Julie! And I agree that giving detailed instructions is so very helpful!
LikeLike
Thank you very much Linda. Most of the comments seem to like the details, so I guess I will continue with that. Thank you for taking the time to respond to my question.
LikeLike
Such great texture to your card and love the embossed sentiment!
LikeLike
Thanks much Jaimie!
LikeLike
I was thrilled to read all your instructions thereby ensuring sucess when I set out to create my version of your outstanding card. It’s very impressive.
LikeLike
Thank you very much Melody, for your kind comments. You will enjoy making it. If you have any questions, please let me know.
LikeLike