
 I hope you are all having a tremendous Thursday as you join us for the Thursday Blog Hop. Our challenge for today was color, and I think these are GREAT colors, especially when used together. Here are the colors for today’s challenge.

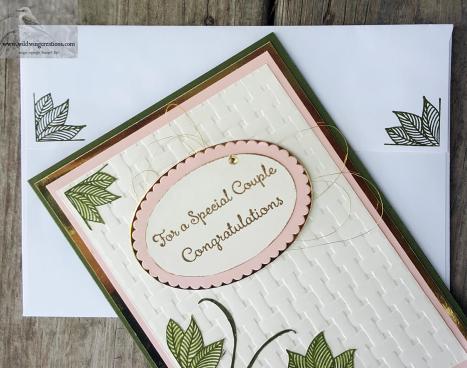
Here is the card I created for it. It is a 5″ x 7″ card, so if you want a smaller one, adjust the card cuts accordingly.

I began with a Mossy Meadow card base. Next up was to emboss the Very Vanilla with the Basketweave 3D Dynamic Textured Embossing Folder. I love this folder! It is so versatile and can be used with so many stamp sets.
I stamped the large design in the Serene Garden stamp set in Mossy Meadow on Very Vanilla, colored the flowers with my Petal Pink Stampin’ Write Marker, and used my Blender Pen to add a bit of color to the leaves. I thought the flowers looked ‘flat’ so I went over the outer petals again with the Petal Pink marker. Then I fussy cut this image. Yes, you heard me, I fussy cut it, because I have not yet purchased the coordinating dies. Even if I had the dies, I would have still done some fussy cutting so more of my basketweave would show. YOU can save 10% by ordering both the stamps and the dies in a bundle.
I stamped the smaller corner leaves in Mossy Meadow (my new favorite green) and again used the blender pen to distribute some color. I also fussy cut these.

The sentiment is from Special Celebrations and stamped in Versamark on Very Vanilla and heat embossed in Gold. Before stamping, I used my Embossing Buddy to go over the Very Vanilla so I wouldn’t get little bits of gold where I didn’t want them. I cut this with the third largest Layering Ovals die and adhered it to a Petal Pink Layering Ovals die. Before adhering I edged the VV oval with Versamark and dipped it in the Gold Emboss Powder, then heat set it. This layered oval was then Tear and Taped to a Gold Foil Sheets oval, just slightly larger than the scalloped pink one.
I did a dry fit and decided to do the inside before making the final adhesion. Good thing I did, too, as I dry fit the front to be a horizontal card, then made the inside vertical! I am sure none of you have ever done that! Since I hadn’t glued anything to the front, it was all ok, though I think I would have liked the horizontal layout better.
The inside sentiment is from the retired Number of Years and stamped in Mossy Meadow on Very Vanilla. I also edged this panel with my Mossy Meadow Stampin’ Write Marker. I used the retired stamp set because this is an anniversary card, and I have no other anniversary sentiment, at least that I could find.
The lovely dove in Serene Garden graces the inside in Petal Pink. The single stemmed flower is stamped in Mossy Meadow and the flower colored in Petal Pink. This panel was adhered to a Petal Pink mat and into the card base with Liquid Glue.
Back to the front and I was ready to put everything together when I noticed the horizonal/vertical mis-match. No problem, just make the whole thing vertical!
I Liquid Glued the fussy cut pieces to the basketweave. This panel was Tear and Taped to the Petal Pink mat. The Petal pink was also adhered to the Gold Foil Sheets (out of which I cut the center leaving a 3/4″ border) with Tear and Tape and the whole was glued to the card base with Liquid Glue.

To finish the front I stuck MANY Stampin’ Dimensionals to the back of the layered ovals and wound some Gold Metallic Thread around then adhered it to the card front. The final touch was a single gold dot, but the label is missing, so I don’t know which embellishment it is. I think any bit of gold, or Petal Pink or Mossy Meadow would do.
The envelope was stamped on the front and flap with the same stamps as for the card, also in Mossy Meadow. The flowers on the front were colored with my Petal Pink Stampin’ Write Marker. I only used the corner stamp for the flap after waffling about whether to add flowers.

I really like this Serene Garden stamp set and will no doubt use it frequently.
Now, ON with the HOP! Click the image to go to the next blog, or click on any name to go there. There are some talented ladies on this hop so don’t miss any of them!

Julie Johnston: YOU ARE HERE
Don’t forget, if you don’t have a demonstrator, there are free goodies to be had if you place an order with me. Click here for details on freebies.
Hostess code: 3YHGPBAT
Card Cuts: Mossy Meadow: card base 7″ x 10″ scored at 5″: Very Vanilla: basketweave 4-1/4″ x 6-1/4″, for leaves, floral piece and sentiment oval 4″ x 6″, inside panel 4-1/4″ x 6-1/4″; Petal Pink: front mat and inside mat (cut 2) 4-1/2″ x 6-1/2″; Gold Foil Sheets: Front mat 4-3/4″ x 6-3/4″, cutting the oval from the center
Product List


Recipients will love it. Beautifully created.
LikeLike
Thank you Karen. You are kind.
LikeLike
Very pretty Julie! That’s some serious fussy cutting to get all of those little stems done! My hands are not nearly so steady!! 🙂
LikeLike
Thank you for the kind words, Amy. And, after I messed up, not once, but twice this week! It won’t happen again.
LikeLike
Lovely, elegant card, Julie – whoever receives it will love it very much! And – no. I have never EVER done what you did! 😉
LikeLike
Well, I know you read the text! Sometimes I don’t know what I am thinking, or if I AM thinking!
Thanks for the nice comments.
LikeLike
Pretty card, Julie. They will love it!
LikeLike
Thank you, Sue!
LikeLike
Beautiful card–horizontal or vertical. I love that stamp set but I won’t be fussy cutting it! You did great though! Such patience and skill you have! I especially like how you layered the scalloped oval on gold. It really makes it pop. I’ll have to try that! TFS.
LikeLike
Thank you so much Susan. I like fussy cutting, but this one was a bit of a challenge. The gold was not in my original plan, but it looked plain so I added it before doing the final adhesion. It really does make things pop, as you said.
LikeLike