
 Hello, Everyone! It is good to be back on the blog scene. Wow! First it was winter, and BOOM! it was summer. I wanted spring in there, but it didn’t happen, and life suddenly got busier than I could have imagined. Things are settling down, I think, so here goes (if I didn’t forget everything). The goal now is to blog daily, but with gardening and all the additional outdoor work, it may not happen. I will do my best.
We have a team hop for you today with lovely creations to CASE, or just to enjoy. Our theme is ‘Masculine’, so anything for a man, or boy, is acceptable. A young man I know is graduating from high school, so my card today is for him.
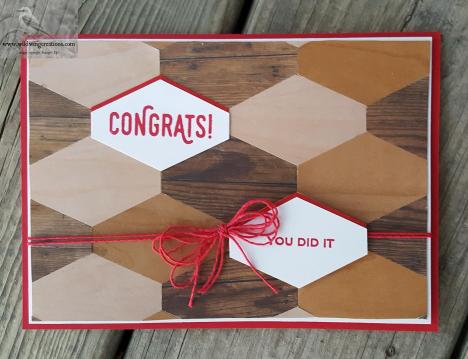
This card was inspired by Stampin’ Up demonstrator Jan Brown from the UK. You can see her tutorial here. I will give instructions, but for details, please watch her tutorial. I see no point in re-inventing the wheel.
I began with a Real Red card base, a Whisper White mat for the art piece, and Crumb Cake is the base of the Tailored Tag punched Wood Textures pieces.
The next step was choosing three tones, or three designs of your choice. I preferred the look of the wood tones, so chose a dark, a medium and a light and punched about 6 or 7 of each color, not knowing how many I would need. I made my card a 5″ x 7″ so really didn’t know.
I marked the center of the Crumb Cake panel on each side, then drew a faint line connecting them, both horizontally and vertically, so I would know where to center my first Tailored Tag punched piece. I then proceeded to Liquid Glue them all in place, starting in the center and making sure to not put two of the same color value together.
Liquid Glue adhered this design panel to the Whisper White mat. Real Red Bakers Twine (from the Candy Cane Lane pack) was wrapped twice around and taped to the back. I used Stampin’ Dimensionals to adhered this to the card base.

I stamped the sentiments for the front from Perfect Pairings, in the Sale-A-Bration catalog, in Real Red on Whisper White and again used the Tailored Tag Punch to cut them. I also punched two in Real Red. The Whisper White sentiment pieces are offset and Liquid Glued so the red shows at the top. The ‘Congrats’ one is Liquid Glued to the matching tag, and the ‘You did it’ is adhered with Stampin’ Dimensionals, also matching it to the tag underneath.
I made a bow by wrapping the Real Red Baker’s Twine around 3 fingers three times and tying another short piece of twine around it. This was adhered with a couple of wadded up Glue Dots. That finished the front.
On the inside I again found the center and placed one of the Tailored Tags in each color across the Crumb Cake panel. These were adhered with Liquid Glue and the panel then adhered to a Whisper White mat. I thought it looked too plain, so added some ‘stitching’ with my Soft Suede Stampin’ Write marker. There is still room for a personal message.

Using my Stamp-A-Ma-Jig, which unfortunately is retiring, I stamped the sentiment from the Truly Tailored stamp set, also retiring, in Real Red on the center tag. I know, it is risky to add the sentiment after the tag was already glued in place, but, frankly, I just forgot to do it first!
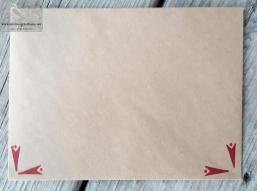
The envelope flap got another piece of the dark Wood Textures DSP, and the little arrow from Truly Tailored stamped in Real Red completes the front.

I think this is a masculine card, even if it does have a bow.
If any of these products that are retiring have been on your wish list, when they are gone, they are gone, so act quickly.
Now, on with the Hop! You can go to the next or previous participants by clicking the image, or pick and choose where to go from the list.


Julie Johnston-YOU ARE HERE
CARD CUTS: Real Red: card base 7″ x 10″ scored at 5″, two tags 2″ x 6″; Whisper White: 2 mats 4-3/4″ x 6-3/4″, two tags 2″ x 6″; Crumb Cake: 4-5/8″ x 6-5/8″; Wood Textures DSP: Tailored Tags- minimum of one sheet each of three color values, 1 sheet for the flap
Product List


What a neat card and design. I love the paper and colors you chose. I agree, I’ll watch Jan’s video…why reinvent the wheel!
LikeLike
Thanks, Karen. I liked her design too, and used the young man’s school colors to accent the wood. Love that wood!
LikeLike
Perfect card for a graduation! Love the wood textured panel and the touch of red really shows off the sentiment! 🙂
LikeLike
THanks much Amy! I like red with the wood, but Red and white happen to be his school colors too.
LikeLike
Love your card Julie, I must learn to do great cards like everyone that doesn’t take forever. Thank you for this idea for a card. I just may CAS(E)
LikeLike
Thank you Shirley. It was pretty easy, with the most time consuming part being butting up all the pieces. I can’t take any credit for it though. Jan B was the brains behind it. Thanks all the same and CAS(E) away!
LikeLike
Great card – and thank you for the tip on the horizontal and vertical lines! That’s a good technique for tiling – but for some reason it never occurred to me for a card! Love the Wood textures on this perfect masculine card! 🙂
LikeLike
Thank you very much, Mary! I have done it in the past, but Jan B really underscored that for me. Makes everything so easy. Yes, hard to beat wood for a guy.
LikeLike
Love the tiling. Good idea to use his school colors as base and bow–he’ll love it too.
LikeLike
Thanks Susan. Glad you like it.
LikeLike