
 Good Thursday mornin’ Everyone! Another week has FLOWN by. Where does the time go anyway? Today is Maundy Thursday. It is Holy Week for Christians, and Easter will be upon us in a couple of days. Tomorrow is end-of-the-work-week Friday for most people, Good Friday for Christians, and the day to plant potatoes for gardeners! On top of that, it is probably National Something-or-Other Day as well. But, that is off the subject, so let’s move on to today’s Hop.
Our challenge for today is this sketch.
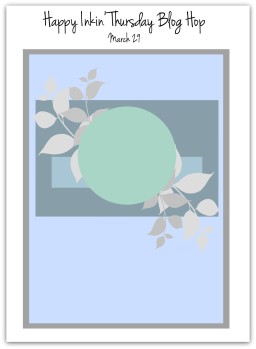
I really like this sketch and will use it again soon. For today however, I chose to make my card base from Always Artichoke. The rectangle is a light piece of Wood from the Wood Textures DSP Stack. I didn’t want the sentiment to take center stage, so I used the Thank You from Teeny Tiny Wishes and stamped it in Early Espresso. To give the panel more texture, I ran it through the Big Shot in the Pinewood Planks Dynamic Textured Embossing folder. This was Liquid Glued to a mat of Crumb Cake. I wrapped a strand of Linen Thread around this piece about 5 times, taping it on the back. I then adhered this to the card base with Stampin’ Dimensionals.

From a dark piece of Wood Textures DSP I die cut a circle using one of the Layering Circles, I think the second or third largest, to provide a background for the ‘bird’s nest’. For the nest, I cut one each of the swirly things from Swirly Scribbles from the same dark Wood Textures DSP. To add more dimension to the nest, I cut 2 more of each from Crumb cake and Liquid Glued them together. I then glued the one with the ‘leaves’ to the one without leaves, then to the circle.
At this point I needed to dry fit everything. Using the branch from Seasonal Layers I cut 2 of these from Early Espresso. From a scrap piece of striped green from Delightful Daisy DSP, I cut several leaves with the leaf from Flourish Framelits, and cut a couple from Vellum as well. I never know for sure how many I will need, and any extras can be kept for another project. (In the end I used one branch, 2 Daisy DSP leaves, 1 vellum leaf, 1 Pear Pzazz leafy branch, 1 vellum leafy branch, and saved the rest)

Then from Vellum and Pear Pzazz I cut some of the leafy branch from the Petals and More die set. (Purchased as a bundle with the Petal Palette stamp set you save 10%.) Then I stamped the bird in Early Espresso from the same set on Sahara Sand, die cut it and painted it with my Basic Black and Melon Mambo markers. I tucked the bird in the nest and adhered it with Stampin’ Dimensionals.
I dry fit everything, then used Liquid Glue to tack down all the elements, leaving some of the leaves floating free. The card front is now finished.
On the inside, I stamped an Old Olive leafy branch and the sentiment in Early Espresso, both from the Petal Palette stamp set, onto a light colored panel of Wood Textures DSP. This was Liquid Glued to a Dark Panel of Wood Textures and onto a Crumb Cake mat. The whole was Liquid Glued into the card base.

For the envelope I stamped the bird on the front in Early Espresso and left it plain, then used more of the Wood Textures DSP on the flap.


I like this card, but wondered how it would look if I changed out the card base and gave it some texture. This is the result.

I added a couple of flowers stamped from Petal Palette and colored with Melon Mambo and Pear Pzazz Stampin’ Write Markers. Card base is Old Olive. Which do you like better?
Host Code: UJWYGVQJ good through March 31. Don’t forget…..Sale-A-Bration ends Saturday. You don’t want to miss out on the free goodies you can get when you order from me.
Please, now click on the “Next Blog” image and see what Amy has created. Each participating team member is listed below so you can link directly to each one if you prefer.

Julie Johnston-you are here
Card Cuts: Always Artichoke: card base 7″ x 10″ scored at 5″; Crumb Cake: front rectangle mat 3-1/4″ x 4-1/4″, inside mat 4-1/4″ x 6-1/4″, backing for swirly pieces 6″ x 6″, bird 1-1/2″ x 2″; Wood Textures Designer Series Paper Stack: Light: front rectangle 3″ x 4″, inside panel 3-3/4″ x 5-3/4″; Dark: circle 2-1/2″ x 2-1/2″, swirly pieces 3″ x 6″, inside mat 4″ x 6″; Delightful Daisy Designer Series Paper (green): leaves 1-3/4″ x 5″; Pear Pzazz: leafy branch 3′ X 3″; Vellum: leaves 3″ x 6″; Early Espresso: branch 1-1/2″ x 4″
(The above pieces listed for the leaves are for what I actually used on the card. I cut more than I used, so saved them for later.)
Product List


Hey, Julie! Great use of the sketch for both cards. I especially like the second one with the textured card base and the pop of color on the flowers. I also love the way you started out your post!
LikeLike
Thank you so much Karen! Sometimes people need to be reminded of reality, Do people really know what Maundy Thursday is?
LikeLike
They’re both beautiful Julie! Love your sweet little birds with their nests behind them. Fantastic layering, great take on the sketch! 🙂
LikeLike
Thanks Amy! I love that little bird, and they are all thinking about nesting now.
LikeLike
Lovely! I love how you used the Wood Textures and Swirly Scribbles to make a nest for your adorable little bird! Perfectly designed!! 🙂
LikeLike
Thank you very much, Mary! It’s spring and all the birdies are thinking about nesting. I just like the organic feel of it.
LikeLike
Gorgeous card! I like the artichoke one better; it seems more serene. I love your step by step explanation. I feel like I am right there talking to you about your card.
LikeLike
Why, thank you, Gale! You are very kind. My goal is for folks to be able to make the same card if they wish, so I always hope the instructions are clear. Personally, I like the artichoke one too. Thanks again.
LikeLike
So sweet, both of them. That bird sitting in its nest is the cutest!!!
LikeLike
Thank you, Jaimie!
LikeLike
Somehow it seems appropriate that you used a bird on your cards! Good thinking to use the swirly nest….so cute. I love them both but my favorite is the second with that added texture and pop of color. Great job.
LikeLike
Thank you Susan. I appreciate you taking the time to comment.
LikeLike