
Marvelous Monday to you all! We are on the downhill side of summer, at least I always think summer is half over when we hit July 4. In honor of all the lovely growing things of summer, I have made this shutter card today.
It looks more complicated than it is, but you do have to be precise in your measurements or it won’t work. All card cuts are at the end of this post.
I began with Whisper White cardstock for my card base, Cut at 5-1/2″ x 8-1/2″. I know, I said cuts are at the end. In order for you to know where to score, you need to know the card base size. I scored with my Simply Scored tool at 2-1/8″ and again at 6-3/8″. These 2 lines make your gatefold card.
The front pieces are cut from Pool Party cardstock and Delightful Daisy DSP with the Pool Party as the mat. These are adhered to each other and to the card base with liquid glue.
Ok, are you ready? Now for the fun part, and the part where you need to really pay attention. I learned this technique from a You Tube video by Jan Brown from the UK. See it here. There are other tutorials out there, but hers is easy to do.
Since I am new at blogging, I forget sometimes that I need photos of various steps. Guess what? I don’t have any photos of the inside process. I hope I can explain.
The gatefold opens up to reveal a surprise. When fully opened, it looks like this.
Isn’t that cool? When I started on today’s project I had it in my head to do a Z-fold card, and went online to find some measurements for that. You know, if you can CAS, why re-invent the wheel, or in this case, the measurements? Then I found Jan B’s video and decided to try it. I think this is one I will do several times, changing up the colors and sentiments.
Ready? You need 2 pieces of Pool Party cut 3-1/2″ x 4″. The first item of business is to find the exact center of these and mark it with a light pencil dot.With the 4″ side against the top of the Simply Scored, score at 1/2″ on both pieces. On the opposite side of your score line, using a straight edge, mark from the corners up to the center mark, creating a large V shape. Cut this piece out. Tip: You can save one of these pieces as a template for the next time you make one of these cards.
Lining them up perfectly, use the one you just cut as a template to mark the other identical piece. If your marks show, flip the pieces over so the marks are underneath. Now, fold on the score marks to the underneath side.
Use Fast Fuse (Liquid glue would work, but don’t use SNAIL, it isn’t strong enough for the use this will get) on the little flap you just created. Before going further with these two pieces, let’s make the center piece, the one with the hole in the middle.
You will need to liquid glue your DSP to the mat and lay it in the card, centering it side to side from your score lines, and lining up the top and bottom with the edges of the card base. If you need to make light marks to get this placement correct, it is better than guessing. Find the exact center of this piece as well and using a 2-1/2″ circle die or circle punch, cut a hole in the middle.
Put 3 Stampin’ Dimensionals on both ends, leaving the middle free of adhesive, but don’t put it in the card just yet.
Centering from top to bottom of your card base, lay your V cut piece, Fast Fuse side up, with the flap edge next to your score line in the center of your card base, not on the side piece. Don’t get it ON the line, stay, maybe 1/16″ away from the score line so everything will fold nicely. Remove the adhesive backing and fold the side piece over the center and press to adhere. Repeat for the other V shaped piece on the opposite side, being sure to line them up perfectly with one another. Be certain both ends of one piece lie atop the other.
With the card open, and the V shaped pieces folded toward the center, you are now going to stamp a sentiment in the diamond created by those 2 pieces. For my sentiment I chose Happy Birthday from the Beautiful Bouquet stamp set and stamped in Pool Party. The little flower is from Best Birds. I inked the flower with my Peekaboo Peach and Pool Party Stampin’ Write markers and stamped it under the sentiment.
Next comes your center piece, the one with the hole. Center it over the diamond and your sentiment and adhere. Close the card, open it and see the magic! Surprise!
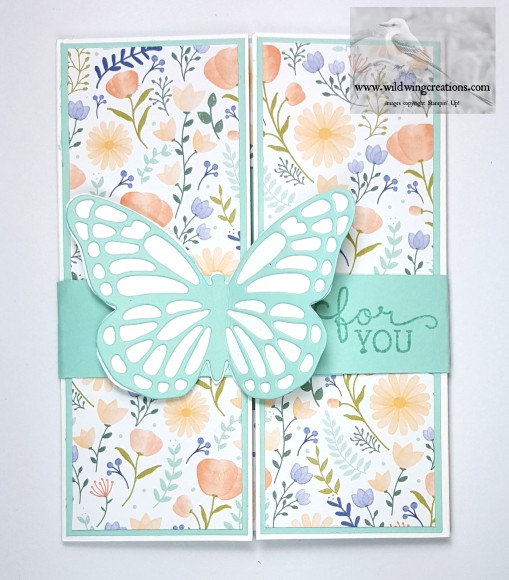
The belly band is not necessary, but I like the way it holds the card closed and gives a place to embellish. In hindsight, I think I should have put pearls down the body of the butterfly, which is cut from Pool Party with the smaller die in the Butterflies Thinlits. I used the die, upside down, to trace another butterfly on Whisper White and fussy cut it, trimming to fit (almost) the fancy one. Using liquid glue I adhered the pool party butterfly over the white one., folding the wings up where they join the body.

The band itself is 1-1/8″ by 11″, wrapped around the closed card and trimmed. Probably you could just cut it at 10-1/4″ and it would be fine. Instead of measuring where to score, I just wrapped the band around the card, trimmed the excess, and, using liquid glue, stuck the ends together.
Liquid glue on just the body attaches the butterfly to the band, a little off center to allow room for another sentiment if you wish. The Sentiment is from Birthday Blooms and is stamped in Pool Party. I had to lift the wing out of the way to do the stamping.
WHEW! This card is finished! I think it is pretty special for a special someone. Please let me know what you think.
If you don’t have a demonstrator and need supplies, please use the button at right to shop my online store.
BONUS DAYS are going on NOW. Might be a good time to get those supplies you want.

Also, if you join my team as a Stampin’ Up demonstrator, during Christmas in July, you get lots of extras. Contact me for more information.
Card Cuts:
Whisper White 5-1/2″ x 8-1/2″ for card base, scrap for butterfly; Pool Party (2)3″ x 4″ (shutter), (2)2″ x 5-3/8″ (front mat), (2) 1-3/8″ x 5-3/8″ (inside side mat), 3″ x 5-1/2″ (Center mat), 1-1/8″ x 11″ (belly band), scrap for butterfly; Delightful Daisy DSP (2)1-7/8″ x 5-1/4″ (Outside), (2)1-1/4″ x 5-1/4″ (inside), 2-7/8″ x 5-3/8″ (inside center).
Product List


Beautiful!! Love the colors and the paper and the butterfly and the whole shootin’ match!! Wonderful shutter card, Julie! 🙂
LikeLike
Hey Mary, thank you bunches!
LikeLike
That turned out just perfectly Julie! I agree, perfect colors and design! 🙂
LikeLike
Beautiful card, Julie. Great step-by-step instructions, too.
LikeLike
Thank you very much too. Are you going to try one now?
LikeLike
Absolutely gorgeous card, Julie! Love the shutter surprise – haven’t tried that one yet but after your instructions I think I just may be able to make it. TFS!
LikeLike
Thank you so much Linda. Let me know if you do one! It was fun seeing it come together.
LikeLike