
Sunday. The first day of a new week. I hope your day was good and that your week will be good as well.
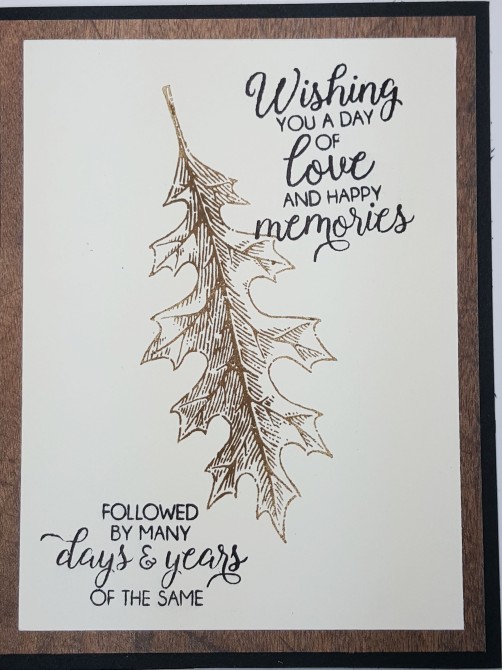
Today I made a card for a gentleman friend for his birthday. I really do like making masculine cards, though sometimes it is a challenge if you don’t know them well enough to know if they hunt, fish or do woodworking. Perhaps they all like the look of wood, leaves and texture. I’m hoping my friend does, as I used the Vintage Leaves stamp set and Leaflets Oak leaf die for my card.

I began with a Basic Black cardstock base. Card cuts at the end of this post.
Next, I dry embossed a piece of Very Vanilla with the Woodland textured embossing folder. This is one that I really, really like and use it often. Next up are the leaves. I wanted texture, so opted to use 3 different papers instead of stamping.
The first set of leaves left me thinking something wasn’t quite the way I had envisioned, which necessitated going through my collection of papers. Ultimately, I settled on the Copper foil, corrugated paper and a piece of what I call ‘Walnut’ from the Wood DSP stack. I die cut the three oak leaves, one from each paper, and using a glue dot to hold the stems together, spread them a little apart and tied a bow with a strand of burlap and double strand of copper thread.

I put several Stampin’ Dimensionals on the back of the copper leaf, and a couple on the outer edges of the topmost walnut leaf and adhered them to the embossed mat.
At this point I decided the front needed something else, and settled on an acorn using the acorn builder punch, which is now retired. For the acorn, I turned the Wood DSP from which I had cut the leaf, over (it is double sided), using the lighter side for the acorn. The acorn cap is cut from a piece of gauzey (is that a word?) brown paper for yet another bit of texture. I wanted a little definition between the acorn and the cap, but didn’t want anything as thick as dimensionals, so I used a few glue dots to lift the cap a bit.
The stem is placed under the bow and the acorn is adhered with Stampin’ Dimensionals.
The last bit for the card front is the sentiment label. Using the Happy Birthday stamp and from Teeny Tiny Wishes and Versamark ink, I stamped and heat embossed the copper sentiment on a scrap of Basic Black cardstock. This was cut with the smallest die from the Banners framelits set, then adhered to the card front with Stampin’ Dimensionals. A copper brad to added a finishing touch.

This completes the card front.
For the inside panel of the card, I cut a mat of the ‘Walnut’ Wood DSP and added a piece of Very Vanilla for the sentiment. I first stamped the oak leaf from Vintage Leaves in Soft Suede, stamping off once. Using a couple of sentiments from the Beautiful Bouquet stamp set, I stamped the message in Basic Black. This was liquid glued to the Walnut mat, then the whole thing glued into the card base.
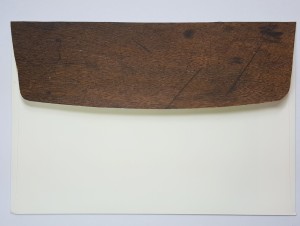
That is all for the card. On to the envelope, as you know, we can’t have naked envelopes!
Using a Very Vanilla medium envelope, I stamped a Vintage Leaves oak leaf to the front, stamping off once in Soft Suede. 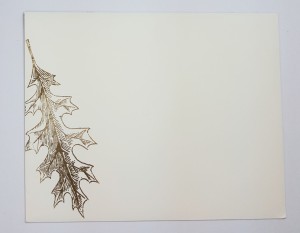
The flap got a piece of the Walnut Wood DSP and the envelope is now finished too.
I hope you like this card. You can find the supplies I used listed below as well as the card cuts. If you don’t have a demonstrator, please use the button at right to shop my online store.
Card cuts: Basic Black 5-1/2″x 8-1/2″ and scored at 4-1/4″; Very Vanilla 4″ x 5-1/4″ embossed, 3-3/4″ x 5″; Wood DSP 4″ x 5-1/4″. Copper foil, Corrugated Paper and Wood DSP for the leaves. Wood DSP for the envelope flap and acorn, scrap of textured paper for the acorn cap.
Product List


Just beautiful Julie! I love your layering and the colors are perfect! 🙂
LikeLike
Thanks, Amy!
LikeLike
Oh my goodness, Julie!! I love love love this card. Just may have to CASE it!! Perfectly and beautifully done!! 🙂
LikeLike
Thank you so much!!
LikeLike
I have looked at all your cards and what a wonderful gift you have! Love this one especially! TFS
Hugs
Kay
LikeLike
Thank you so much Kay. What a nice thing for you to say.
LikeLike